Building the Employee Store Using ASP, ColdFusion, or PHP


If you read the title of this section, chances are you're wondering why we're covering ASP, ColdFusion, and PHP in a single section. The answer to this question is simple; Dreamweaver's core functionality is so similar across the three server models that individual sections for each server-side technology aren't warranted. Instead, we'll build our dynamic web pages using the ASP server model, pointing out the small differences/additions for the other two server models along the way.

In the coming sections, you'll learn to build the dynamic employee store web page using ASP, ColdFusion, or PHP. As the chapter unfolds you'll learn about the various Dreamweaver features that make working with database data a snap. Specifically, you'll learn about the following concepts:

  • Recordsets

  • Paging

  • Dynamic text

  • Region repeaters

  • Showing specific regions (conditionals)

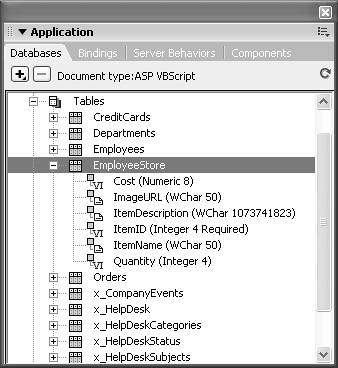
By the end of this chapter, you'll have a fully functional employee store web page that pulls product information directly from a database and displays it for users to purchase. Let's get started.

Creating the EmployeeStore Page

The EmployeeStore page of the Dorknozzle intranet site is the heart of the Dorknozzle web application. After all, this is where Dorknozzle employees come to buy flare and chochkes (marketing lingo for lame and unusable stuff) to show off their Dorknozzle pride to co-workers, friends, and family. The idea is that employees will visit the page, the page will pull information from the EmployeeStore table contained in the Dorknozzle database, and present items to the user for purchase. The user can then click an item, add it to their cart, and complete their purchase using a convenient checkout button. All of this functionality will be exposed in time. For now, let's review the basic structure of our Dorknozzle database, specifically, the EmployeeStore table. As Figure 25.18 indicates, we can expand the EmployeeStore table directly from the Databases panel (by clicking the small (+) icon) to reveal the field names and the data types associated with each field.

Figure 25.18. The EmployeeStore table is the central source of data for the EmployeeStore web page.


Table 25.1 outlines the fields in the database table, including the data types used by Dreamweaver.

Table 25.1. Fields in the EmployeeStore Database Table

Field Name

Data Type

Description

ItemID

Integer

The unique identifier for each item in the EmployeeStore table. Whenever we make updates, modifications, or remove items from the EmployeeStore table, this value serves as a base point.

ItemName

WChar

A generic name for each item in the table.

ItemDescription

WChar

A long-winded Marketing description about the item for sale.

ImageURL

WChar

A path to the image in the Images directory of our defined site. Rather than physically storing the image in the database, we store the image on the file system and reference that image by storing the path in the database. This effectively reduces database file size.

Cost

Numeric

A currency value that represents the cost of the item for sale.

Quantity

Integer

A numeric value indicating how many of a specific item are left in stock.


Now that you've seen the database structure, you are ready to begin extracting data from it. The next few sections cover the following concepts as they relate to ASP, ColdFusion, and PHP:
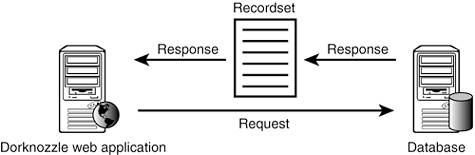
  • Recordsets

  • Dynamic text

  • Paging

  • Showing specific regions (conditionals)

  • Repeating regions

  • Commands

Creating a Recordset

By now you may be curious about how data in your database can be extracted into your application. Sure, you've learned a lot about SQL and are familiar with the commands to retrieve the information, but now what? SQL alone does not provide enough flexibility to read from the database and write that data to the application; there's still a piece of the puzzle missing. That piece is the recordset. Recordsets act as an intermediary virtual table between the database and the application. You can write SQL commands to ask questions of the database (also known as a query), but the information retrieved is stored in a recordset. The programming logic iterates through the recordset and ultimately presents the data to the browser in a structured way. Figure 25.19 illustrates this point.

Figure 25.19. The application makes a call to the database, which then returns data in the form of a recordset.


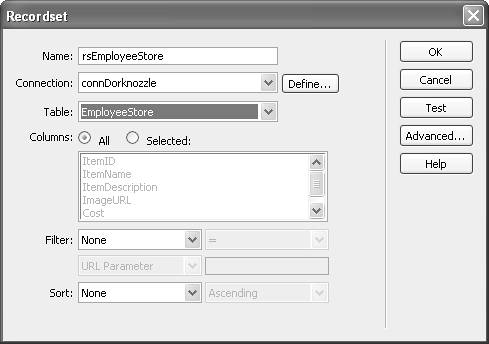
Remember that the questions asked of the database are made in the form of queries, and queries are a process that usually involve SQL to structure how the question will be asked. After the question (query) has been asked, the data is returned into a virtual table or recordset. The recordset is then browsed through by the application logic and presented to the user in a structured HTML document.

To demonstrate this point, you can use Dreamweaver to create a simple recordset that will query the EmployeeStore table. To create a recordset, follow these steps:

1.

With the Application panel group open, switch to the Bindings tab and click the Add (+) button. Select Recordset (Query) from the list that appears when you click the Add (+) button. The Recordset dialog appears.

2.

In the Name text box, type the name rsEmployeeStore.

3.

Select the connDorknozzle option from the Connection drop-down menu. If the name of your connection does not appear in the drop-down menu, it means that you haven't yet defined the connection. Review the first part this chapter for information on creating a connection. Selecting the connection option from the list exposes a set of tables in the Table drop-down list. These are the database tables that exist in the Dorknozzle database to which you've just connected.

NOTE

If you're using ColdFusion, make note of the User Name and Password text boxes. If your DSN requires authentication before connecting to the data source, enter those credentials here.

4.

Pick the table in the Table menu for which you want to create a recordset. In our case, choose the EmployeeStore option.

5.

You'll have the opportunity to choose all or selected fields from the database table. For the sake of demonstration, keep the All radio button selected.

6.

Optionally, you can filter and sort the data based on specific values. More on this later. For now, the configured Recordset dialog should resemble Figure 25.20.

Figure 25.20. Fill out all the information in the Recordset dialog.


7.

Click the Test button to see a sample of the results that will be returned. Figure 25.21 shows the returned recordset with all the data from the EmployeeStore table. Now that you know that the recordset works, click OK.

Figure 25.21. The test results show the recordset with populated data.


NOTE

The ColdFusion model optionally supports connections using ColdFusion Components (CFCs). Although we will discuss CFCs in Chapter 30, for now, be aware that the option for connecting to a DSN using a CFC is made available by clicking the CFC Query button.

8.

Click OK to close the Recordset dialog. As you'll see, the new Recordset is listed in the Bindings panel.

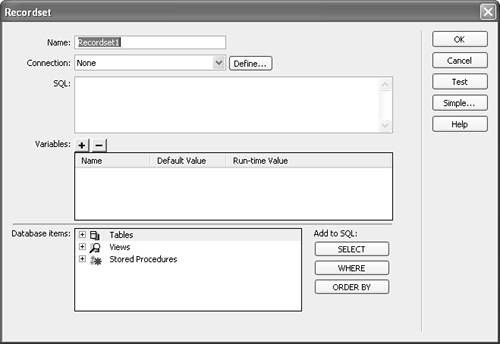
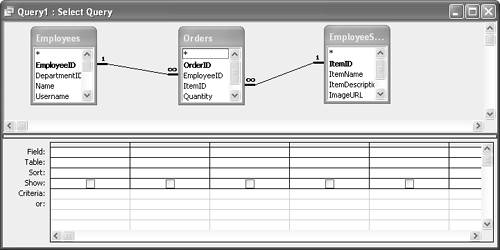
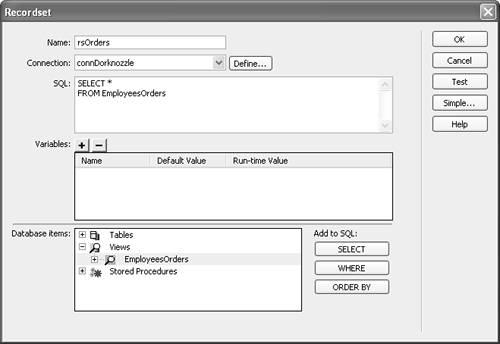
Note that by selecting the Bindings tab and then expanding the recordset, you can view the field names contained within the recordset (more on this later).

Creating an Advanced Recordset

Simple recordsets can serve your needs if you are performing simple queries of all or certain fields in a single database table. But what if you wanted to perform joins and merge two tables into one recordset? Unfortunately, the simple method wouldn't do. Although creating advanced recordsets can become very complex, the trade-off is flexibility, scalability, and power.

Rather than creating multiple recordsets in which you store each and every table, you can join two or more tables into one recordset based on a common value. Take the EmployeeStore and Orders tables as examples. Suppose that you were working in the Shipping and Receiving department and your job was to print out a list of all orders for a specific day. If that were the case, you would need to create a recordset that merged the EmployeeStore and Orders tables together into one virtual table. Furthermore, you'd also need to include the Employees table because all orders are related not only by products in the EmployeeStore table, but also by the employee from the Employees table. This complex recordset can't be constructed using the Simple recordset view (the basic Recordset dialog). Instead, you'd have to use the Advanced view.

To create a recordset using the Advanced view, follow these steps:

1.

In the Bindings panel, choose the Recordset (Query) option from the Add (+) menu. The Recordset dialog opens.

2.

Click the Advanced button. Figure 25.22 shows that the dialog is relatively similar in design to the Simple view, except that you can enter an SQL query manually rather than allowing Dreamweaver to create it for you.

Figure 25.22. The Advanced Recordset dialog enables you to manually type the SQL code, allowing for greater flexibility.


TIP

The Advanced Recordset dialog also provides limited visual control over the fields you want to include in your query. The Database Items list contains the same tree node that the Database panel exposes. From this list, you can choose specific tables and then click the SELECT, WHERE, or ORDER BY buttons to include the specific fields in the SQL statement in the SQL multi-line text box.

3.

If you remember the lengthy code structure for creating SQL joins, begin typing. If you are like most people and like to rely on programs to do the work for you, open the Dorknozzle.mdb file in Access and begin a new query in Design view.

4.

Add the Employees, Orders, and EmployeeStore tables to your query as shown in Figure 25.23.

Figure 25.23. Add the Employees, Orders, and EmployeeStore tables to the Design view in Access.


5.

Select the Employees.Name, Employees.BillingShippingAddress, Employees.BillingShippingCity, Employees.BillingShippingState, Employees.BillingShippingZip, Orders.Quantity, Orders.DatePurchased, EmployeeStore.ItemName, and EmployeeStore.Cost fields. Remember, we don't need to extract everything from the database tables. Instead, we want to pull only the data from the three tables that is relavant to the Shipping and Receiving department. Figure 25.24 shows the complete design.

Figure 25.24. Select the fields from the tables that you want to include in your query.


6.

To use the SQL code that was generated, select SQL View from the View menu. Figure 25.25 shows the SQL code that is generated.

Figure 25.25. View the SQL code that Access generated by selecting View, SQL View.


7.

Copy the SQL code, save the query as EmployeesOrders, and close Access. Don't forget to save the query. This step is crucial for the next section.

8.

You are now free to paste the code into the SQL box in the Advanced Recordset dialog in Dreamweaver. Figure 25.26 shows the result.

Figure 25.26. Paste the SQL code you created in Access into the SQL text box of the Advanced Recordset dialog.


9.

Type the name rsOrders in the Name text box.

10.

Select the connDorknozzle option from the Connection drop-down menu.

12.

Click the Test button to test the results. As Figure 25.27 demonstrates, a Test grid is presented with no data (at this point, we don't have any orders to view). At the very least however, you can see all the fields pulled from the three tables combined in one virtual table result.

Figure 25.27. Combine the contents of three tables into one recordset by using joins.


13.

Click OK to close Text SQL Statement window.

14.

Click OK to close the Recordset dialog.

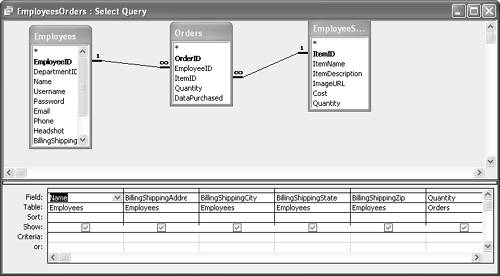
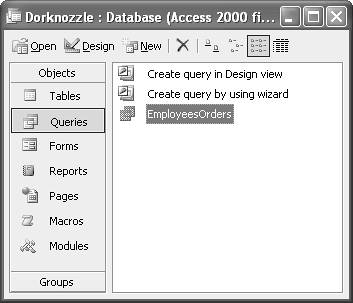
After you close the Recordset dialog, notice that the new recordset is listed in the Bindings panel.

Creating a Recordset from a View

In the preceding sections, you saw how to create both simple and advanced recordsets. The Simple Recordset dialog allowed you to select a single table and work with the fields in that table in your recordset. The Advanced Recordset dialog allowed you to paste in SQL statements created in Access's Query Designer to join two or more tables and work with the data from multiple tables in your recordset. Recall that you saved the query you created in Access as EmployeesOrders. Look at the saved query in Access; it might resemble Figure 25.28.

Figure 25.28. The query is saved as EmployeesOrders in Access.


Rather than opening Access every time we need to use that query and then copying the SQL statement and pasting it in the Advanced Recordset dialog, we can use that query in Dreamweaver as-is. To use the saved query in Dreamweaver, follow these steps:

1.

Open the Advanced Recordset dialog by double-clicking the rsOrders recordset in the Bindings panel. This action launches the Recordset dialog in the Advanced view.

2.

Select the entire SQL query and delete it from the SQL multiline text box.

3.

From the Database Items list box, expand the Views selection tree. Notice that the EmployeesOrders view (the query you saved in Access) is exposed.

4.

Choose the EmployeesOrders view and click Select. The SQL statement should resemble the one in Figure 25.29.

Figure 25.29. Choose the query from the Views selection tree.


NOTE

The terms view and query are essentially the same thing. Although Access calls them queries, the standard and universal term is view. MSDE, MySQL, and Dreamweaver refer to them as views.

5.

Click the Test button.

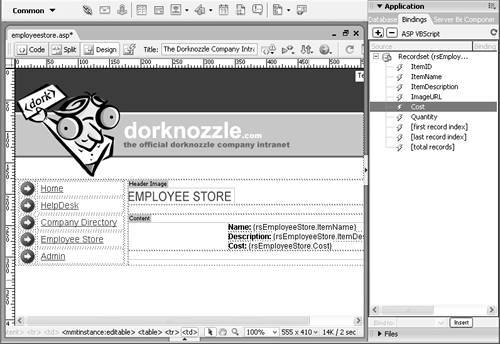
NOTE

We explored the process of creating saved queries within Access, but you should know that SQL Server/MSDE and the newest build of MySQL 5 also support views. Nothing should stop you from using Web Data Administrator to create views in MSDE. Unfortunately, however, as of the time of this writing, there is no visual tool that supports building views for MySQL 5.


Whether you are creating simple or advanced recordsets in Dreamweaver or using a saved query to create your recordsets, be assured that the process remains relatively simple. As you have seen, even complex joins can be achieved with ease. The next sections introduce you to methods of extracting the data from the recordset into your application.

Working with Dynamic Elements

Now that you've been able to extract data from your data source, your next step is to structure it within your application somehow. Dreamweaver's Server Behaviors and Bindings panels provide the capabilities you need to get started producing dynamic elements centralized within the database but exposed by the application.

Dynamic Text

The first step to creating dynamic applications is to try and make all your text as dynamic as possible. That is, allow all your company's valuable information to reside in the database and then pull it out, displaying it in dynamic pages as needed. To start creating dynamic text, begin by creating a table that will serve as the means of organizing the data output. You can accomplish this by following these steps:

1.

Replace the text INSERT TEXT HERE on the EmployeeStore page with a new table by choosing Insert, Table. This table should have one row, two columns, a width of 460, and 0 for border thickness, cell padding, and cell spacing. Click OK after you enter the values.

2.

Insert a nested table in the cell on the right. Give this table 3 rows, 1 column, a width of 300, and 0 for border thickness, cell padding, and cell spacing.

3.

Add the text Name, Description, and Cost in the three rows for the table you just created. You might decide to make the text bold so that it stands out to the user. The table resembles the one in Figure 25.30.

Figure 25.30. Insert the table we'll use to structure our dynamic elements.


4.

Expand the rsEmployeeStore recordset in the Bindings panel to reveal all the fields.

5.

Manually click, hold, and drag the ItemName field from the rsEmployeeStore Recordset in the Bindings panel into the cell for the table you just created, making sure that you drop the field just next to the Name caption.

6.

Repeat step 5 for the ItemDescription and Cost, dragging those fields into their proper cells next to their respective captions. The result will resemble Figure 25.31.

Figure 25.31. Drag the remaining fields into their respective locations in the table.


7.

Save the page and display it in the browser by pressing F12. As you can see from Figure 25.32, the first item in our EmployeeStore database is shown on the page.

Figure 25.32. The first item "Dorknozzle Shirt" is dynamically shown on the page.


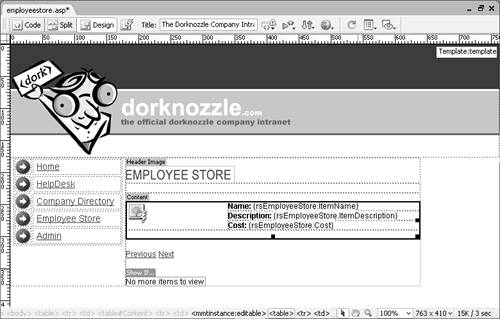
Congratulations! You've just taken your first step to working with dynamic web pages! As the chapter unfolds, you'll learn to add dynamic images, repeating regions, pagination functionality, and more. This is just the tip of the iceberg.

Dynamic Images

Now that you've created dynamic text within your application, you're ready to begin adding dynamic images. The images we'll add here are not the typical static images you have used throughout the book; instead, they will be dynamic. Remember, we added the path to the image of each item in the EmployeeStore table. What we want to now do is dynamically show the image, based on the path provided within the ImageURL field, on our dynamic EmployeeStore web page. To do this, follow these steps:

1.

Place your cursor in the leftmost cell (we'll use this cell to place the product's image dynamically) and vertically align the cursor to the top of the cell by choosing the Top option from the Vert menu in the Properties Inspector.

2.

Select Insert, Image. The Select Image Source dialog appears.

3.

Near the top of the Select Image Source dialog are options for selecting the image from the File System (static) or from Data Sources (dynamic). Select the Data Sources option. The Select Image Source dialog's interface changes to allow you to select an image path from the recordset. Select the ImageURL field.

4.

Click OK. The dynamic image placeholder appears within the cell.

Save your work and test the results in the browser by pressing the F12 key. The image for the Dorknozzle T-Shirt should now appear as shown in Figure 25.33.

Figure 25.33. The image is dynamically placed based on the path within the database.
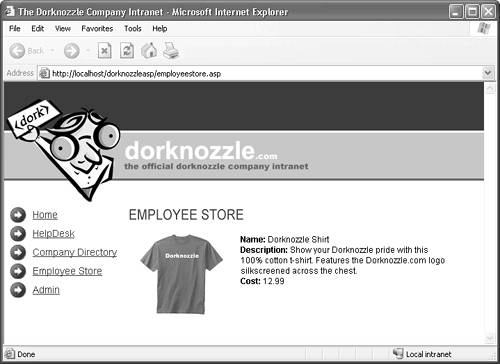

Recordset Paging

Now that you've seen how easy it is to place dynamic content on a page, you'll probably want to begin adding features that allow your users to interact with the content on your pages. Paging, for example, enables your users to page through items in the recordset until they find the item they are looking for. For every press of a button, your users can advance to the next record or, conversely, return to a previous record. Developers gain certain benefits from pagination, including:

  • Load time: Rather than the page having to process multiple records at once, it processes only a predefined set of records at a time. Records are loaded only as users advance forward to another record.

  • Size constraints: By paging through a recordset, screen real estate is gained. The records are loaded in a certain area of the page rather than all records showing continuously down the page.

Dreamweaver's pagination behaviors are located in the Add (+) menu in the Server Behaviors panel and include the following behaviors:

  • Move to First Record: Returns the user to the first set of records in the recordset.

  • Move to Previous Record: Returns the user back one set of records.

  • Move to Next Record: Advances the user one set of records forward.

  • Move to Last Record: Advances the user to the last set of records in the Recordset.

  • Move to Specific Record (ASP only): Advances or returns the user to a set of records specified by the developer or by a parameter passed by the user.

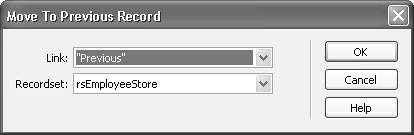
NOTE

In ColdFusion, the pagination behaviors are named a bit differently. For example, ColdFusion uses Move to First Page, Move to Previous Page, Move to Next Page, and Move to Last Page.


To begin adding pagination features to your site, follow these steps:

1.

Place your cursor just below the table that includes the dynamic data.

2.

From the Recordset Paging submenu, available by clicking the Add (+) button in the Server Behaviors panel, select Move to Previous Record.

3.

The Move To Previous Record dialog appears similar to Figure 25.34. Select the Create New Link: Previous option from the Link menu and make sure that the rsEmployeeStore recordset is selected from the Recordset menu. Click OK. A new dynamic Previous hyperlink is created.

Figure 25.34. Confirm the settings in the Move To Previous Record dialog.


NOTE

In the ColdFusion model, a Pass Existing URL Parameters check box appears in this dialog. Enabling this check box ensures that existing URL parameters are preserved when the user clicks the Next and Previous hyperlinks. Furthermore, ColdFusion doesn't support direct paging of records without the use of the Repeating Region Server behaviors first. More on this later in the chapter.

4.

Add a space after the Previous hyperlink and repeat steps 2 and 3, this time selecting the Move to Next Record option from the Recordset Paging submenu. When you've finished adding both paging widgets, two hyperlinks (one identified as Previous and one as Next) appear under the table, similar to Figure 25.35.

Figure 25.35. Dynamic Previous and Next hyperlinks appear under the table that contains the dynamic image and text.


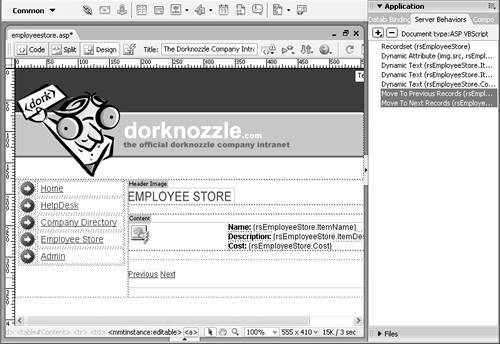
Save your work and test the result in the browser by pressing the F12 key. You should be able to navigate from the first record in the EmployeeStore database to the next record and back. Figure 25.36 shows the record Dorknozzle Hooded Sweat Shirt that appears after Dorknozzle Shirt as a result of clicking Next.

Figure 25.36. Clicking the Next hyperlink enables you to cycle through records.


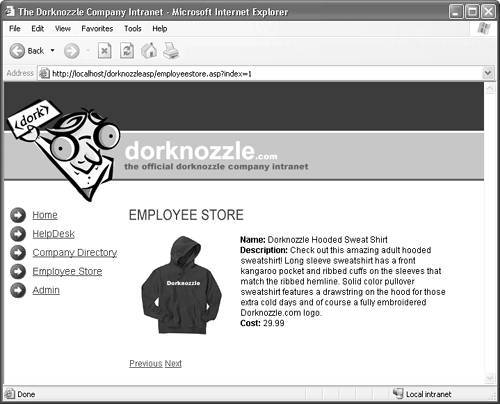
Of course, you should feel free to experiment with the other paging server behaviors. Dreamweaver provides behaviors for moving to the last record and to the first record. If you're using the ASP model, you can also include a text box that allows a user to enter the specific record to jump to.

Showing Specific Regions

Now that you have added the capability to cycle through the recordset, consider the following problem: Users click Next until they get to the last record and then they are abruptly stopped. They keep clicking Next but nothing happens. The problem is that the users have reached the end of the recordset and they cannot go any further. Of course, the user has no way of knowing that. To fix this, Dreamweaver provides functionality in the form of a group of Show Region behaviors. For example, we can create a region that contains text alerting the users that they have reached the end of the recordset. When the user reaches the recordset's end, the region is displayed. The complete list of Show Region behaviors is given here:

NOTE

Although the functionality is the same across server models, the names of these server behaviors vary slightly under the ColdFusion and PHP server models.


  • Show Region if Recordset Is Empty: This behavior can be useful to alert a user that an empty result was returned from the database.

  • Show Region if Recordset Is Not Empty: Use this behavior when you want to populate a table of data from results returned from a recordset if it isn't empty.

  • Show Region if First Record: If users are on the first set of records, you can alert them to this fact.

  • Show Region if Not First Record: If users are on anything except the first set of records, you can alert them to this fact.

  • Show Region if Last Record: If users are on the last set of records, you can alert them to this fact.

  • Show Region if Not Last Record: As the user cycles through the records, you can provide a message. When they are on the last set of records, a message can be displayed.

NOTE

In ColdFusion, the conditional behaviors are named a bit differently. For example, ColdFusion uses Show Region if First Page, Show Region if Not First Page, Show Region if Last Page, and Show Region if Not Last Page.


To add a Show Region behavior to your page, follow these steps:

1.

Type the text No more items to view just below the Previous and Next paging widgets. This is the "region" that shows when the condition (the current record is the last record in the recordset) is true.

2.

With the text highlighted, select the server behavior Show Region If Last Record from the Show Region submenu. The Show Region If Last Record dialog appears.

3.

Make sure that the rsEmployeeStore recordset is selected and click OK.

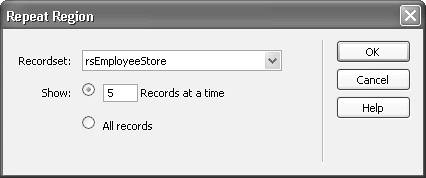
Notice that a gray visual aid surrounds the text. This guarantees that the text contained within this region appears only when the user reaches the last record in the recordset.

Save your work and run it in the browser by pressing the F12 key. Click the Next hyperlink until you reach the last record. A message will appear when you reach the end of the recordset.

Again, this is only one example of the server behaviors exposed in the Show Region set of server behaviors. Now that you have a general idea about what the Show Region server behaviors do, feel free to experiment with the others.

Using Repeat Region

Although recordset paging is the ideal model to strive for, at times you might want to display all the records (or a certain number of records) in the database at once. The Repeat Region behavior enables you to create a pattern that repeats within the web page. For instance, in the EmployeeStore page, a table was created to display the content for the image, name, description, and cost. Using the Repeat Region server behavior, you can maintain that structure and repeat the contents for every record (or a certain number of records) in the database. To create a repeatable region on our page, follow these steps:

1.

Select the table for which you want the content to repeat. Your selection should resemble Figure 25.37.

Figure 25.37. Select the table for which you want to create the repeatable region.


2.

Select the Repeat Region option by clicking the Add (+) button in the Server Behaviors panel. The Repeat Region dialog appears, similar to Figure 25.38.

Figure 25.38. Configure the Repeat Region dialog to show 5 records at a time from the rsEmployeeStore recordset.


3.

The Repeat Region dialog enables you to enter choices regarding which recordset to create the repeat region for as well as how you want to display the results. Make sure that the rsEmployeeStore option is selected from within the Recordset menu. Additionally, make sure that the 5 Records at a Time option is selected. Click OK to apply the server behavior to the selected table.

Save your work and test the results in the browser by pressing the F12 key. Figure 25.39 shows records grouped in sets of 5.

Figure 25.39. All the records are shown when you use the Repeat Region server behavior.


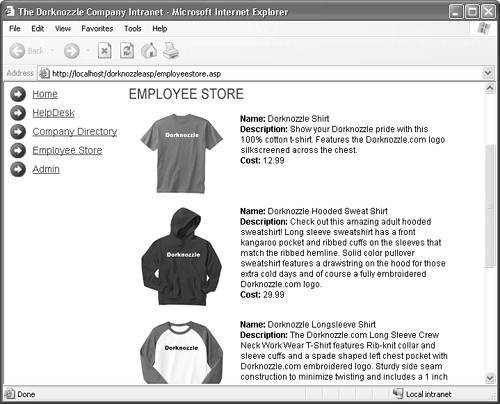
As you can see, you can scroll down the page to view five Dorknozzle items at a time. When you want to view the next five items in the recordset, click the Next hyperlink that we added in the previous section.

NOTE

If you're working with the ColdFusion model, you probably noticed that the paging server behaviors didn't work. Try them now. You'll notice that by adding the Repeat Region server behavior, the paging server behaviors now work. Again, ColdFusion relies on the Repeat Region server behavior for the paging server behaviors to work properly.


Macromedia Dreamweaver 8 Unleashed
ISBN: 0672327600
EAN: 2147483647
Year: 2005
Pages: 237
Authors: Zak Ruvalcaba

flylib.com © 2008-2017.
If you may any questions please contact us: flylib@qtcs.net