| Step one to working with dynamic data in Dreamweaver is to properly define a website. Of course, this important step establishes a connection between Dreamweaver and the files on your computer. Aside from that however, it also allows you to tell Dreamweaver what server-side technology you plan to use for the defined site. This process is important because Dreamweaver must configure its interface according to the server-side technology you pick. The second step to working with dynamic data is to establish a connection between Dreamweaver and your data source. Numerous methods for connecting your web applications to your data sources (in Dreamweaver) exist, including the following: DSN Connection (supports Access, MSDE, and MySQL via ASP) DSN Connection via RDS (specifically for ColdFusion) Custom Connection String/DSN-less Connection OLE DB Connection (specifically for ASP.NET but can be used by other server models such as ASP) MySQL Connection (specifically for PHP)
As you can see, numerous methods exist for connecting your web applications to your data sources. The server-side technology you plan on implementing in conjunction with the data source you plan to employ will guide the method you'll use to connect with. In general, there's no preferred method. The method that works best for you is the route you should ultimately take. To help you make the decision, I've outlined each connection method in the next few sections. Connecting to a Data Source Using a DSN As mentioned in Chapter 21, "Introduction to Web Applications," to communicate with database data, a bridge of communication must be established between the web application in Dreamweaver and the actual data source itself. This bridge of communication is handled through a Data Source Name (DSN). To understand the concept of DSN is to understand how applications connect to database data using the web server's operating system. As you learned in Chapter 21, at this foundation level is Open DataBase Connectivity (ODBC), a standard database access method developed by the SQL Access group in 1992. The goal of ODBC is to make it possible to access any data from any application, regardless of which database management system is handling the data. ODBC manages this by inserting a middle layer, called a database driver, between an application and the database. This layer translates the application's data queries into commands that the database understands. For this to work, both the application and the database must be ODBC-compliant, that is, the application must be capable of issuing ODBC commands and the database must be capable of responding to them. DSNs provide connectivity to a database through the ODBC driver. The DSN contains a database name, directory, database driver, UserID, password, and other information. After you create a DSN for a particular database, you can use the DSN in an application to call information from the database. NOTE For the most part, ODBC drivers that connect web applications to Access and MSDE/SQL Server come pre-installed with the operating system, so there's nothing to download. However, if you plan on using MySQL, you'll need to download the latest ODBC 3.51 driver. The driver, titled Connector/ODBC 3.51, can be found along with the other MySQL downloads at http://dev.mysql.com/downloads/index.html.
A negative to using DSNs is that they're generally less efficient than other standards when connecting to data sources. However, they are probably more than adequate for low-to-moderate production servers. If you're developing a more robust application, you may want to consider some of the other methods discussed later in this chapter. If you plan to develop a web application with ASP.NET or PHP for instance, note that these technologies do not support DSNs; you must use an alternative connection standard, also discussed later in this chapter. DSNs, however, are great to use, especially in the development phase of the application. On a Windows machine, DSNs are managed though the ODBC Data Source Administrator and support the creation of DSNs for Access and MSDE databases as well as MySQL databases (after the driver has been installed). In the next three sections, you'll learn how to create a DSN for the three supported databases in this book. Let's begin. NOTE On a Mac, DSNs are managed through the ODBC Administrator, available by choosing Go, Utilities, ODBC Administrator. Although we won't be walking through the process of defining a DSN on a Mac in this chapter, the functionality exposed by the Windows-based ODBC Data Source Administrator and the Mac-based ODBC Administrator is relatively similar. Concepts discussed on one apply to the other.
Defining a DSN to an Access Database To create a DSN that connects to an Access database, follow these steps: 1. | From the Start menu, choose the Control Panel option from the Settings menu to open the Control Panel folder.
| 2. | Inside the Control Panel folder, double-click the Administrative Tools folder to open it.
| 3. | Inside the Administrative Tools folder, double-click the Data Sources (ODBC) icon to launch the ODBC Data Source Administrator dialog.
| 4. | In the ODBC Data Source Administrator dialog, click the System DSN tab. The System DSN tab lists all DSNs previously configured on your system.
| 5. | Click the Add button on the System DSN tab to open the Create New Data Source dialog, as shown in Figure 25.1.
Figure 25.1. The Create New Data Source dialog provides the options for choosing the appropriate driver for the database to which the data source will point. 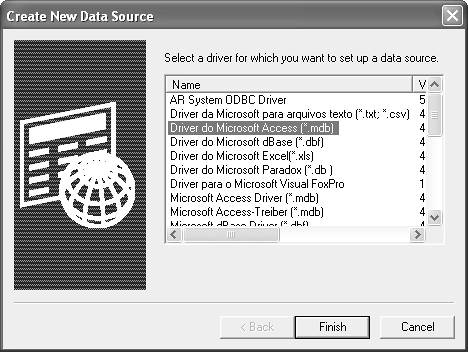
NOTE File, System, and User DSNs all contain the same information about the connection. The major difference between the three is that File DSNs store the information in a file on disk. While System and User DSNs store the info in the Registry, System DSNs are available to all users on that system and User DSNs are available only to the user who created them. | 6. | In the Create New Data Source dialog, choose from the list of drivers that match the database with which you are working with. Because we're working with Access in this section, choose the Driver do Microsoft Access [*.mdb] driver. Then click the Finish button to exit the Create New Data Source dialog and launch the ODBC Microsoft Access Setup dialog, as shown in Figure 25.2.
Figure 25.2. In the ODBC setup dialog, you have the option to provide a name and description for the data source. 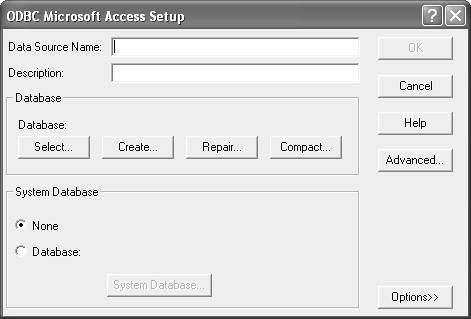
| 7. | Specify the name DorknozzleAccessDSN as the name for the data source in the Data Source Name text box. Enter a description for the data source if you want in the Description text box.
| 8. | You'll have to point the DSN to the path of your database. Assuming that you're working with ASP, click the Select button on the Database pane. The Select Database dialog appears. Browse to the drive and folder that contains the Access database (for our project, it's in C:\Inetpub\wwwroot\DorknozzleASP\Database), select the Dorknozzle.mdb file, and click OK.
| 9. | Now that the database has been selected, you can optionally provide a username and password to access the database by clicking the Advanced button. Doing so launches the Set Advanced Options dialog. In an effort to keep our example simple, I won't set a username and password at this time. However, when your application goes live, usernames and passwords are parameters you'll no doubt want to configure.
| 10. | When you finish the ODBC Microsoft Access setup, click OK to exit and return to the ODBC Data Source Administrator dialog. The new DSN, DorknozzleAccessDSN, appears in the list.
|
Congratulations! You now have a connection to an Access database established! Of course, the next step is to connect to the newly created DSN through Dreamweaver. Before we get ahead of ourselves however, let's review some of the other methods of establishing connections to databases. Defining a DSN to a MSDE Database To create a DSN that connects to an MSDE database, follow these steps: 1. | From the Start menu, choose the Control Panel option from the Settings menu to open the Control Panel folder.
| 2. | Inside the Control Panel folder, double-click the Administrative Tools folder to open it.
| 3. | Inside the Administrative Tools folder, double-click the Data Sources (ODBC) icon to launch the ODBC Data Source Administrator dialog.
| 4. | In the ODBC Data Source Administrator dialog, click the System DSN tab.
| 5. | Click the Add button on the System DSN tab to open the Create New Data Source dialog.
| 6. | In the Create New Data Source dialog, choose from the list of drivers that match the database with which you are working. Because we're working with an MSDE database in this section, choose the SQL Server driver located at the bottom of the list. Then click the Finish button to exit the Create New Data Source dialog and launch the Create a New Data Source to SQL Server dialog, as shown in Figure 25.3.
Figure 25.3. The Create a New Data Source to SQL Server dialog allows you to define properties that establish a DSN connection to a SQL server. 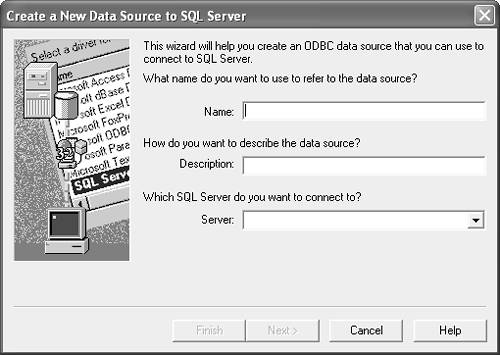
| 7. | Specify the name DorknozzleMSDEDSN as the name for the data source in the Name text box. Enter a description for the data source if you want in the Description text box.
| 8. | Point the DSN to the path of the MSDE instance. If the instance doesn't appear in the list, enter the path to the server (the same you used to connect using Web Data Administrator) and click Next (mine was ZAK\NETSDK, but yours will differ).
| 9. | Now that the MSDE server has been defined, you'll need to specify the credentials you use to connect to the database. To do this, select the With SQL Server Authentication using a LoginID and Password radio button and enter the login ID (sa) and password you use to connect to MSDE in the Login ID and Password text boxes, respectively.
| 10. | The next screen allows you to define which database this DSN should default to. Because we're working with the Dorknozzle database, enable the Change the Default Database to check box and select the Dorknozzle option from the drop-down menu. Click Next.
| 11. | Click Finish to exit the Create a New Data Source to SQL Server dialog. Before you exit, the ODBC Microsoft SQL Server Setup dialog appears with a break down of selected options. Click the Test Data Source button to test the connection to the database. When you've finished, click OK to close the dialog and return to the System DSN tab of the ODBC Data Source Administrator dialog. The new DSN, DorknozzleMSDEDSN, appears in the list.
|
Congratulations! You have successfully established a connection to an MSDE database! Of course, the next step is to connect to the newly created DSN through Dreamweaver. Before we get ahead of ourselves however, let's review the final method for connecting to a data source using a DSN. Defining a DSN to a MySQL Database To create a DSN that connects to a MySQL database, you will need to first install the appropriate ODBC driver available from the MySQL website. After the ODBC driver has been installed, you can follow these steps to establish a DSN that connects to a MySQL database: 1. | From the Start menu, choose the Control Panel option from the Settings menu to open the Control Panel folder.
| 2. | Inside the Control Panel folder, double-click the Administrative Tools folder to open it.
| 3. | Inside the Administrative Tools folder, double-click the Data Sources (ODBC) icon to launch the ODBC Data Source Administrator dialog.
| 4. | In the ODBC Data Source Administrator dialog, click the System DSN tab.
| 5. | Click the Add button on the System DSN tab to open the Create New Data Source dialog.
| 6. | In the Create New Data Source dialog, choose from the list of drivers that match the database with which you are working. Because we're working with a MySQL database in this section, choose the MySQL ODBC 3.51 driver located near the bottom of the list. Then click the Finish button to exit the Create New Data Source dialog and launch the Connector/ODBC dialog, shown in Figure 25.4.
Figure 25.4. The Connector/ODBC dialog box allows you to create a DSN for a MySQL database. 
| 7. | Specify the name DorknozzleMySQLDSN as the name for the data source in the Data Source Name text box. Enter a description for the data source if you want in the Description text box.
| 8. | Point the DSN to the path of the MySQL instance. You can do this by entering localhost in the Server text box.
| 9. | Now that the MySQL server has been defined, you'll need to specify the credentials you use to connect to the database. By default, MySQL doesn't assign a username and password to log onto the MySQL instance. In most cases, typing root in the User text box is enough.
| 10. | Select the dorknozzle option from the Database drop-down menu.
| 11. | If you'd like, click the Test button to test the connection between the DSN and the database. If everything is successful, click the Ok button to exit the Connector/ODBC dialog and return to the ODBC Data Source Administrator dialog.
|
Congratulations! You have successfully established a connection to a MySQL database! Of course, the next step is to connect to the newly created DSN through Dreamweaver. Before you make the switch to Dreamweaver, however, close the ODBC Data Source Administrator dialog by clicking OK. Connecting an ASP Web Application to a DSN One of the most feature-rich and flexible server-side technologies that Dreamweaver supports is ASP. Although the technology is in its waning days in terms of industry use and support, the integration between the technology and Dreamweaver has never been stronger. This section guides you through connecting a site defined using the ASP server model to either an Access, MSDE, or MySQL database using a DSN. With that said, you can establish a connection with the DSN by following these steps: 1. | If you haven't done so already, open Dreamweaver and choose the DorknozzleASP defined site from the Site list in the Site Files panel.
| 2. | Open the employeestore.asp page by double-clicking it in the Files list.
| 3. | With Dreamweaver open, open the Application panel by choosing Window, Databases (see Figure 25.5).
Figure 25.5. The Database panel enables you to configure the connection between Dreamweaver and the DSN. 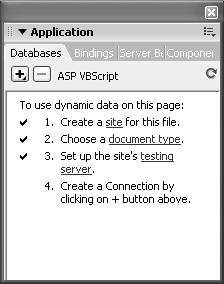
| 4. | In the Database panel, click the Add (+) button to access the drop-down menu and choose Data Source Name (DSN) to launch the Data Source Name dialog as shown in Figure 25.6.
Figure 25.6. The Data Source Name dialog offers the option to configure the connection to the DSN. 
| 5. | The first thing to do is to determine whether you're using the DSN on the testing server or on your local machine (as specified by the radio buttons at the bottom of the dialog). If you're using the DSN on the testing server, choose the Dreamweaver Should Connect Using DSN On Testing Server option. Because we know that our local machine is acting as the testing server, choose the Using Local DSN option.
| 6. | Enter a name for the connection. We'll name ours connDorknozzle, prefixing the Dorknozzle name with conn. This prefix provides a decent identification for the Dorknozzle connection; we always know that this name represents the connection string and not the database name or site definition.
| 7. | From the Data Source Name (DSN) drop-down menu, choose the DSN DorknozzleAccessDSN.
TIP Notice the Define button that appears next to the Data Source Name (DSN) menu. Click this button to launch the ODBC Data Source Administrator directly from Dreamweaver. This allows you to quickly create and manage DSNs without having to manually browse to the Administrator through the operating system. TIP Of course, if you were using MSDE or MySQL in conjunction with ASP, you'd select the appropriate DSN from the list. For simplicity's sake, we'll limit our selection to the DorknozzleAccessDSN. | 8. | If the database you choose (such as MSDE or MySQL) requires User name or Password authentication, enter those values in their respective text boxes.
NOTE As you saw within the DSN Administrator, MSDE and MySQL allow you to define the default schema/catalog that the web application will use. In our case, we defined the Dorknozzle database as the default schema/catalog to use with the DSN. If you prefer to define that in the connection string, click the Advanced button and enter the necessary schema/catalog in the respective text boxes. | 9. | To make sure that your connection is established properly, click the Test button. This action launches an alert message specifying that the connection was made successfully. If the connection was not made successfully, double-check the naming convention of the DSN and be sure that the database file wasn't moved to a different directory (if using Access) or that the database server is running (if using MSDE or MySQL). You might also receive an error if your login credentials are invalid.
| 10. | After you've made a successful connection, click the OK button to close the Data Source Name (DSN) dialog. The new connection will be available in the Databases panel.
|
As you can see, establishing communication between the DSN and Dreamweaver is pretty straightforward. In the Databases panel, you can expand the Tables node in the connDorknozzle tree to see a visual representation of the database tables in Dreamweaver. As we progress through the chapter, I'll show you how you can use information made available in this panel group to create dynamic sites. NOTE After you've established a successful connection to your DSN, Dreamweaver creates a file within a Connections folder in your defined site. The file, named after the connection name, contains valid ASP code for connecting to your DSN. Do not remove this file as it will be included in every dynamic page in your defined site.
Custom Connection Strings with ASP When developing web applications with DSNs, one of the biggest hassles can be getting the system administrator of the web server to configure the DSN if you don't have access to that area of the server. If you can't get your DSN configured, your application is crippled and useless. Often, developers like to bypass such ordeals by creating a DSN-less connection. With a DSN-less connection, not only are you freed from the hassles of relying on a system administrator but you're also free to customize the connection string further than what you can do with the basics exposed by DSNs. A DSN-less connection uses the same drivers as its DSN counterpart; however, the DSN-less connection does not rely on a defined Data Source Name. Instead, you physically write the connection string that your dynamic web pages will use to connect to the database directly. Essentially, you're dropping the DSN "middle man" from the loop. The syntax for configuring a DSN-less connection varies a bit from database to database, but all have the same five essential parts: Driver: The proper name for the driver can be found at the manufacturer's website or locally in your machine's ODBC Administrator dialog. Path to Data Source: Depending on the database you are using, you usually will specify the entire path to the database. However, some databases provide an exception, such as SQL Server and Oracle. The parameter for these databases appears in two parts: an area for both the server address and the database or catalog name. Username: If a username is required by the data source, you must provide it in the string. Password: If a password is required by the data source, you must provide it in the string. Provider: This is an optional entry, but it refers to the mechanics of the ODBC/OLE DB driver (The provider for ODBC is always MSDASQL). Because these two elements go hand in hand, if you omit the provider, the connection string will still work.
Because we are working with an Access database called Dorknozzle.mdb, you can easily make a DSN-less connection using a custom string that resembles the following: "Driver={Microsoft Access Driver (*.mdb)}; Dbq=C:\Inetpub\wwwroot\DorknozzleASP\Database\Dorknozzle.mdb;"
As you can see from the connection string, the Provider sets the driver to use the Dbq parameter and specifies the path to the database file. If we were making use of a username and password, we would simply add and set those parameters as well. The benefit to writing the connection string becomes obvious. Not only is it simple and direct, but if we ever needed to modify the connection string (to use MSDE, for example), we simply change a few parameters rather than opening the ODBC Administrator dialog and making the change through a long and drawn out wizard. To create a DSN-less connection in Dreamweaver, follow these steps: 1. | Be sure that the Database panel is open by choosing Window, Databases.
| 2. | In the Databases panel, click the Remove () button to remove the existing connDorknozzle DSN reference.
| 3. | Click the Add (+) button and choose the Custom Connection String option from the menu. This action launches the Custom Connection String dialog, shown in Figure 25.7.
Figure 25.7. The Custom Connection String dialog offers options for defining a custom connection string. 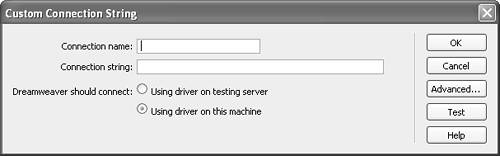
| 4. | Enter the name connDorknozzle in the Connection name text box.
| 5. | Type the previously outlined connection (Driver={Microsoft Access Driver (*.mdb)}; Dbq=C:\Inetpub\wwwroot\DorknozzleASP\Database\Dorknozzle.mdb;) into the Connection String text box.
| 6. | Select the Using Driver on This Machine radio button.
| 7. | To make sure your connection was set up properly, click the Test button. This action should return an alert message saying that the connection was made successfully.
| 8. | Click OK to exit the Custom Connection String dialog.
|
Notice that the connection is now available in the Database panel. If you expand the connDorknozzle reference, the Tables are outlined as they were when a DSN was used. Again, the method you decide to use is up to you. Many advanced users prefer the custom connection string approach because it provides much more flexibility in the parameters outlined in the connection string. For more information on connection stringsincluding syntax for Access, SQL Server 2000, MySQL, and morevisit http://www.connectionstrings.com. Connecting a ColdFusion Web Application to a DSN Heavily integrated into the Dreamweaver framework is functionality that allows you to connect to a DSN with ColdFusion. Rather than exposing a simple Data Source Name (DSN) dialog as the ASP model does, Dreamweaver, under the ColdFusion model, allows direct integration with the ColdFusion Administrator. With that said, you can establish a connection with the DSN by following these steps: 1. | If you haven't done so already, open Dreamweaver and choose the DorknozzleCFM defined site from the Site list in the Files panel.
| 2. | Open the employeestore.cfm page by double-clicking it in the Files list.
| 3. | With Dreamweaver open, open the Application panel by choosing Window, Databases.
| 4. | Notice that the Add (+) button doesn't appear in the Databases panel. Instead, Dreamweaver relies on the RDS login to directly log in and retrieve available Data Source Names from the ColdFusion Administrator. Because we haven't defined any Data Source Names in the ColdFusion Administrator yet, you'll see a five-step list allowing you to modify parameters required for setting up the testing server, establishing an RDS password, and modifying Data Source Names similar to Figure 25.8.
Figure 25.8. Because we haven't defined any data sources yet, Dreamweaver exposes a five-step list allowing us to modify parameters required for connecting to Data Source Names in the ColdFusion Administrator. 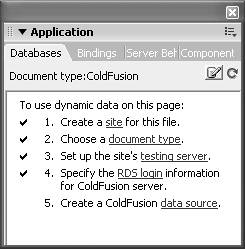
| 5. | In Chapter 22, we established the RDS password to use for connecting Dreamweaver to the ColdFusion Administrator. The only step we did not check in that chapter was the last step requiring you to set up a data source. Click the link for step 5. The login screen for the ColdFusion Administrator appears. Enter your password and click Login. You'll immediately be redirected to the Data Sources page.
| 6. | To set up a new data source, begin by entering the name connDorknozzle in the Data Source Name text box.
| 7. | Select the database driver to which you plan on connecting the DSN to by selecting the appropriate option from the Driver drop-down menu. For simplicity's sake, choose the Microsoft Access option. (Of course, you should choose the Microsoft SQL Server option if you're working with MSDE or the MySQL option if you're working with it.) Click the Add button. You'll immediately be redirected to the Data Source configuration page.
| 8. | Enter the path C:\Inetpub\wwwroot\DorknozzleCFM\Database\Dorknozzle.mdb in the Database File text box. Click Submit to create the new DSN. Notice that the new connDorknozzle DSN appears in the Connected Data Sources list similar to Figure 25.9.
Figure 25.9. The new connDorknozzle DSN appears in the Connected Data Sources list. 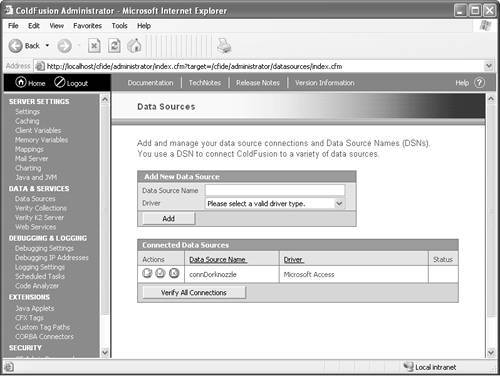
| 9. | To verify the connection between the DSN and the database, click the Verify All Connections button. If the connection is successful, the word OK appears in the Status column.
| 10. | After you've made a successful connection, close the ColdFusion Administrator browser instance.
| 11. | In Dreamweaver, click the Refresh button. Immediately, Dreamweaver recognizes the new DSN and lists it in the Databases panel similar to Figure 25.10.
Figure 25.10. The connDorknozzle DSN appears in the Databases list. Expand the tree to see the list of tables within the database. 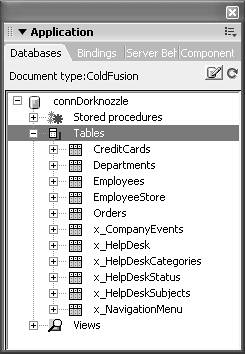
|
As you can see, establishing communication between the DSN and Dreamweaver is pretty straightforward. You can expand the Tables node in the connDorknozzle tree to see a visual representation of the database tables in Dreamweaver. As we progress through the chapter, I'll show you how you can use information made available in this panel group to create dynamic sites. Connecting an ASP.NET Web Application Using OLE DB As you discovered in an earlier section, a DSN-less connection does not require an actual Data Source Name. As a matter of fact, ODBC itself is a mere translator that relies on OLE DB to make the connection. A more efficient way to communicate with the database is directly through OLE DB. An OLE DB connection looks similar to a custom connection string. The exception is that only the Provider parameter, not the Driver parameter, is included. Here's what an OLE DB connection string would look like, based on a Microsoft Access database called Dorknozzle.mdb: Provider=Microsoft.Jet.OLEDB.4.0; Data Source=C:\Inetpub\wwwroot\DorknozzleASPX\Database\Dorknozzle.mdb;
When working with the ASP.NET server model, you are essentially required to use an OLE DB (DSN-less) connection if you plan on connecting to an Access database. Of course, leave it up to Dreamweaver to make the process simple. To create an OLE DB connection for ASP.NET in Dreamweaver, follow these steps: 1. | If you haven't done so already, open the employeestore.aspx file by double-clicking it in the Site Files list.
| 2. | Make sure that the Database panel is open by choosing Window, Database.
| 3. | Click the Add (+) button and choose the OLE DB Connection option from the menu. The OLE DB Connection dialog appears, as shown in Figure 25.11.
Figure 25.11. The OLE DB Connection dialog offers a large area for you to type in a custom connection string. 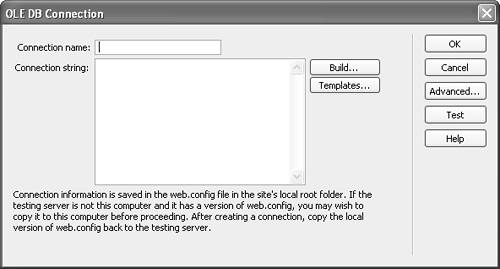
| 4. | Type the name connDorknozzle in the Connection Name text box.
| 5. | Type the connection string outlined in the introduction of this section within the Connection String multi-line text box. If you want to avoid typing the connection string, you can manually build it by clicking the Build button (Windows only). This action launches the Data Link Properties dialog shown in Figure 25.12 and allows you to walk through a wizard that fills in the required connection string information.
Figure 25.12. The Data Link Properties dialog offers an easier way to create complicated connection strings. 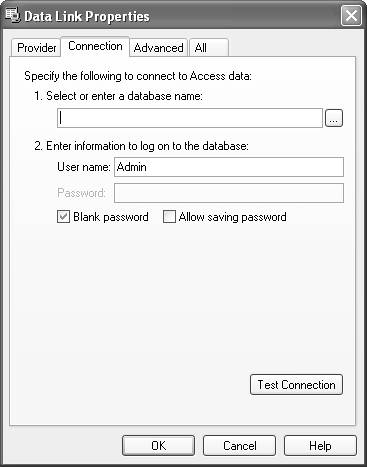
| 6. | Alternatively, you can click the Template button to launch the Connection String Template dialog similar to Figure 25.13. From this dialog, you can select a connection string template such as the Microsoft Access 2000 template. Click OK to see the connection string template complete with options for you to enter necessary values.
Figure 25.13. The Connection String Template dialog allows you to select from a connection string template. 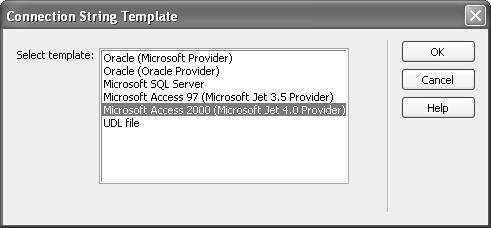
| 7. | Either method you choose produces the same results. When you've populated the connection string, click the Test button to make sure that the connection was established properly. Dreamweaver displays a message informing you of the status of the connection.
| 8. | When you're done, click OK to exit the OLE DB Connection dialog. When you return to the Database panel, notice that the new connection is available similar to Figure 25.14.
Figure 25.14. The Dorknozzle database becomes available in the Databases panel. 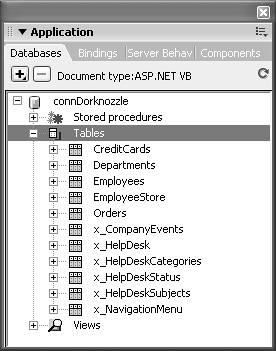
|
Note that you can expand the Tables node in the connDorknozzle tree to see a visual representation of the database tables in Dreamweaver. As we progress through the chapter, I'll show you how you can use information made available in this panel group to create dynamic sites. Connecting an ASP.NET Web Application Using a SQL Server Connection Connecting an ASP.NET web application to an MSDE database is just as easy, if not easier, than connecting to an Access database. The only downside is that you don't get the Build option with a MSDE connection like you would when using the OLE DB connection. When building a connection to a SQL Server/MSDE database, Dreamweaver simply gives you a connection string template and asks you to fill in the blanks. For the most part, the template resembles the following string: Persist Security Info=False; Data Source=[serverName]; Initial Catalog=[databaseName]; User ID=[username]; Password=[password];
Based on what you know of your MSDE installation thus far, you can summarize that the complete connection string will resemble the following: Persist Security Info=False; Data Source=ZAK\NETSDK; Initial Catalog=Dorknozzle; User ID=sa; Password=yourpassword;
As you can see, the data source is the path to the MSDE instance on the server. The initial catalog is the default database to use, and the user ID and password represent your credentials for logging into the database from the web application. With that said, you can create a SQL Server (in our case, MSDE) connection for an ASP.NET web application by following these steps: 1. | With the employeestore.aspx file open, remove the existing database connection from the Database panel by selecting connDorknozzle and clicking the Remove () button.
| 2. | Click the Add (+) button and choose the SQL Server Connection option from the menu. The SQL Server Connection dialog appears, as shown in Figure 25.15.
Figure 25.15. The SQL Server Connection dialog offers an intuitive interface for establishing a connection to a SQL Server or MSDE database. 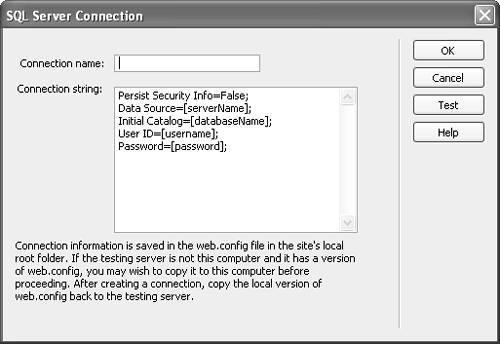
| 3. | Type the name connDorknozzle in the Connection Name text box.
| 4. | Replace the values in the Connection String multi-line text box with those given in the introduction to this section. Don't forget to tweak the values slightly to accommodate your specific server.
| 5. | When you've populated the connection string, click the Test button to make sure that the connection was established properly. Dreamweaver displays a message informing you of the status of the connection.
| 6. | When you're done, click OK to exit the SQL Server Connection dialog. When you return to the Database panel, notice that the new connection is available in the list in the Databases panel.
|
Note that you can expand the Tables node in the connDorknozzle tree to see a visual representation of the database tables in Dreamweaver. As we progress through the chapter, I'll show you how you can use information made available in this panel group to create dynamic sites. Connecting a PHP Web Application to a MySQL Database Although the ASP, ASP.NET, and ColdFusion server models support multiple methods for connecting to data sources, the PHP server model supports only one: a MySQL connection. To create a connection with a MySQL database in Dreamweaver, follow these steps: 1. | If you haven't done so already, open the employeestore.php file.
| 2. | Make sure that the Database panel is open by choosing Window, Databases.
| 3. | Click the Add (+) button in the Database panel and choose the MySQL Connection option. The MySQL Connection dialog appears, similar to Figure 25.16.
Figure 25.16. Complete the requested information in the MySQL Connection dialog to establish a connection with a MySQL database. 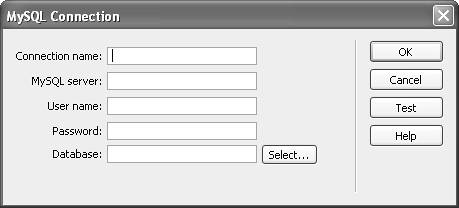
| 4. | Enter the name connDorknozzle in the Connection Name text box.
| 5. | Enter the IP address or host name of your MySQL server in the MySQL server text box. In most cases, this value is simply localhost.
| 6. | Specify the database username in the Username text field. If you went with the default installation, the value will be root.
| 7. | Specify the database password in the Password text field, if one was configured during installation.
| 8. | Click the Select button located to the right of the Database text box. This action launches the Select Database dialog similar to Figure 25.17; the dialog is pre-populated with a list of databases housed within your MySQL database instance.
Figure 25.17. Select the Dorknozzle database from the Select Database dialog. 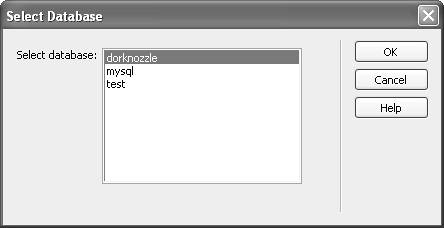
| 9. | Select the Dorknozzle database and click OK.
| 10. | To make sure that the connection was properly configured, click the Test button. Dreamweaver opens an alert dialog indicating whether the connection was made successfully.
| 11. | Click OK to exit the MySQL Connection dialog. When you return to the Database panel, notice that the new connection is available in the list in the Databases panel.
|
Note that you can expand the Tables node in the connDorknozzle tree to see a visual representation of the database tables in Dreamweaver. As we progress through the chapter, I'll show you how you can use information made available in this panel group to create dynamic sites. NOTE After you've established a successful connection to your MySQL database, Dreamweaver creates a file in a Connections folder in your defined site. The file, named after the connection name and with the PHP extension, contains valid PHP code for connecting to your MySQL database. Do not remove this file because it will be included in every dynamic page in your defined site.
|