Templates and the Assets Panel
| As your site grows, so too will the number of templates it employs. In general, overall management of site templates is handled by the Templates category in the Assets panel, shown in Figure 15.21. Figure 15.21. Use the Templates category in the Assets panel to manage site templates.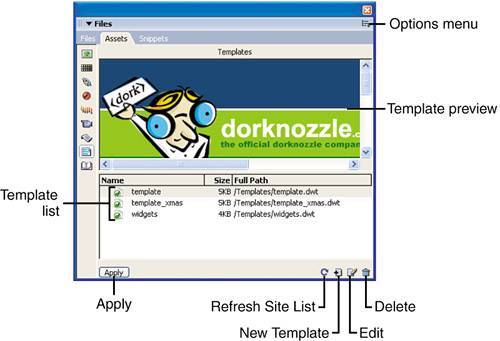 The Assets panel is separated into the following areas:
For the most part, general management of site templates can be handled through the small button bar that appears at the bottom of the Template category in the Assets panel. For more advanced options, however, access options located in the panel's Options menu:
Managing Templates Using the Assets PanelAs described in the previous section, numerous options exist for managing templates in the Assets panel. We've covered topics such as refreshing the site list, re-creating the site cache, updating the current page, updating the site, copying to the site, and locating in the site as they relate to other aspects of development. In this section, I'll introduce you to alternatives for creating new templates, editing templates, opening a new page based on a template, and deleting templates straight from the Assets panel. You can create a new blank template by choosing the New Template option from the Assets panel's Options menu. Doing this allows you to establish a new empty template and then edit it when you're ready. To do this, follow these steps:
Of course, you can delete a template by selecting it from the list and either pressing the Delete key on your keyboard or clicking the trash icon (located first from the right in the button bar). Note that Dreamweaver won't alert you of files that are tied to that template. After you delete a template, ties to that template are broken. CAUTION When you delete a template, not only are the ties to that template broken, but the DWT files is permanently deleted from the site. Finally, you can create a template-derived page straight from the Assets panel, effectively saving you from the more tedious approach of choosing the New option from the File menu, locating the template, and clicking Create. To do this, right-click the template in the template list and choose the New from Template option from the context menu. Selecting this option opens an instance of the template in the Document window. Applying Templates to Existing PagesDreamweaver makes it easy for you to apply various template designs to an existing document while at the same time maintaining your current content. When would this come in handy? Assume you were building various designs for a client in the hopes that they would choose the one they liked and then build their website based on the design they picked. Rather than designing numerous templates and then numerous template-derived pages for each of the templates, you could easily create one template with a set of editable regions and then a template-derived page that would represent the client-supplied content to add. If the client didn't like the original template, no problem, you can keep the content you already added to the template-derived page. You'd simply create other templates (with the same editable regions as the original) and apply the template to the existing template-derived page. Numerous possibilities for this feature exist. A second example is an existing page updated seasonally. You could create four different templates that represent the four different seasons of the year. When you're ready to apply the appropriate seasonal template, open the template-derived page and choose the Apply Template feature. Let's describe this process with more detail:
As you can see from Figure 15.23, the Dorknozzle Christmas template is applied to the engineering page. Figure 15.23. The Dorknozzle Christmas template is applied to the engineering page.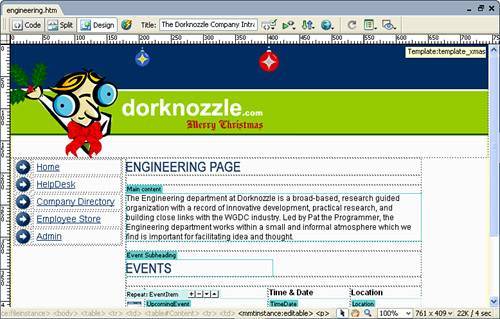 Because the editable regions in both the template and template_xmas pages coincide with those in the engineering.htm page, the transition is seamless. Of course, we can easily switch back to the regular template when we're ready. To demonstrate the switch back, let's use the Apply Template to Page method from the Modify menu:
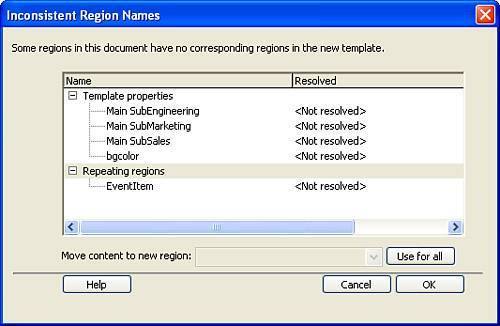
The original template is now applied. Mapping Template RegionsWhen Dreamweaver applies a template to a page, it attempts to match the regions on the two pages with one another. If there is a one-to-one correspondence with the regions on the template page and the ones on the normal page, the transition happens smoothly. If the regions do not match, however (maybe you called an editable region in a new template NewHeading but that same region is called MyHeading in the page), Dreamweaver gives you the opportunity to line up the inconsistent region names using the Inconsistent Region Names dialog, shown in Figure 15.24. Figure 15.24. The Inconsistent Region Names dialog allows you to remap inconsistent region names between two pages.
The Inconsistent Region Names dialog appears automatically when Dreamweaver finds regions that don't match between a template and a page for which the template is being applied. Dreamweaver will not let you proceed until all inconsistent regions have been addressed. NOTE The Inconsistent Region Names dialog is a way for Dreamweaver to map editable regions in a template to specific areas in a page. However, more often than not, Dreamweaver cannot map a specific area to a region, especially when that region doesn't exist. Because this is the case, you have the option of Ignoring a region: By choosing the Nowhere option from the Move Content to New Region menu, you can instruct Dreamweaver to disregard the mapping of a particular region. To remap regions using the Inconsistent Region Names dialog, follow these steps:
If there are regions you want to map from one page to the other, those regions appear in the drop-down menu. Rather than choosing the Nowhere option, you could instead select the region name to which you want to remap the inconsistent region. |

EAN: 2147483647
Pages: 237