Using Active Directory Users and Computers
The Active Directory Users and Computers snap-in is the primary tool for Active Directory administrators, and it's the tool that you will use most often for day-to-day directory maintenance. Active Directory Users and Computers displays all the objects in a domain by using a Windows Explorer-style expandable tree display. Dialog boxes for each object provide access to the object's properties, which you can modify to update user information and account restrictions.
You also use Active Directory Users and Computers to create new objects and model the tree hierarchy by creating and populating container objects like organizational units (OUs). The following sections examine the most common tasks that administrators perform using Active Directory Users and Computers.
Launching Active Directory Users and Computers
Active Directory Users and Computers, like most of the Active Directory administration tools, is a snap-in for the MMC. The snap-in file is called Dsa.msc, and you can launch the manager in any one of three ways.
- Select Active Directory Users And Computers from the Administrative Tools group in the Start menu's Programs group.
- Highlight a domain in the console tree of the Active Directory Domains and Trusts snap-in, and choose Manage from the Action menu. This opens a new MMC dialog box called Active Directory Users And Computers, leaving the existing Domains And Trusts window intact.
- Open the Run dialog box from the Start menu and execute the Dsa.msc snap-in file.
To perform many of the functions provided by the Active Directory Users and Computers snap-in, you must be logged on to the domain using an account that has administrative privileges. You can use the Delegation of Control Wizard to delegate administration tasks for specific objects to other users without giving them full administrative access to the domain, as discussed in "Delegating Object Control" later in this chapter.
Viewing Active Directory Objects
The main Active Directory Users and Computers dialog box (shown in Figure 11-20) contains many of the standard MMC display elements. The console tree (on the left) lists an Active Directory domain and the container objects within it in an expandable display. The result pane (on the right) displays the objects within the highlighted container. The manager includes a specialized toolbar providing quick access to commonly used functions and a description bar that provides information about the manager's status or the currently highlighted object. The program displays the actions that you can perform on each object in the Action menu once you have clicked the objects.
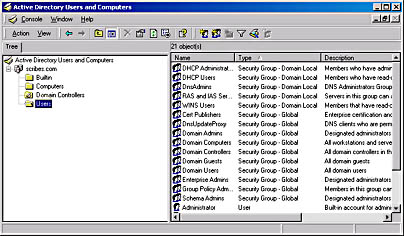
Figure 11-20. The main Active Directory Users and Computers screen.
Active Directory Object Types
The objects in the Active Directory Users and Computers screen represent both physical entities, such as computers and users, and logical ones, such as groups and organizational units. The default object types in a newly created Active Directory domain are listed in Table 11-1.
Table 11-1. Object types created in a new Active Directory domain
| Object Type | Icon | Function |
|---|---|---|
| Domain | Root object of Active Directory Users and Computers display; identifies the domain currently being administered by the manager. | |
| Organizational Unit | Container object used to create logical groupings of computer, user, and group objects. | |
| User | Represents a network user and functions as a repository for identification and authentication data. | |
| Computer | Represents a computer on the network and provides the machine account needed for the system to log on to the domain. | |
| Contact | Represents a user external to the domain for specific purposes such as e-mail delivery; doesn't provide the credentials needed to log on to the domain. | |
| Group | Container object representing a logical grouping of users, computers, or other groups (or all three) that is independent of the Active Directory tree structure. Groups can contain objects from different organizational units and domains. | |
| Shared Folder | Provides Active Directory-based network access to a shared folder on a Windows 2000 system. | |
| Shared Printer | Provides Active Directory-based network access to a shared printer on a Windows 2000 system. |
By modifying the schema that control the directory service structure, you can create new object types in Active Directory and modify the attributes of existing types. For more information, see "Using Active Directory Schema Manager" in Chapter 12.
Normal Mode vs. Advanced Mode
By default, the Active Directory Users and Computers display operates in normal mode. Normal mode displays only the objects that administrators are most likely to access during a typical Active Directory maintenance session. This includes the organizational units containing the built-in users and groups created during Active Directory installation and all the objects created by administrators after the installation. Normal mode also hides certain tabs in an object's Properties window from view, including the Object tab and the Security tab that you use to set permissions for the object.
When you choose Advanced Features from the manager's View menu, however, the display changes to include all the system objects in Active Directory, which represent policies, DNS records, and other directory service elements, as well as the LostAndFound container, as shown in Figure 11-21.

Figure 11-21. The Active Directory Users and Computers Advanced Features mode displaying all of the system objects in the selected domain.
From this interface, you can view information about the system objects and control access to them by modifying the associated permissions. Because access to these objects isn't required as frequently, you can suppress their appearance by leaving the manager in normal mode. However, when you want to modify the permissions for standard objects like organizational units, users, and groups, you must enable Advanced Features to see the Security tab in an object's Properties window.
Changing the Domain
You can use the Active Directory Users and Computers snap-in to administer any domain on the network. To change the currently displayed domain in the manager, highlight the root or domain object in the console tree and choose Connect To Domain from the Action menu. This displays the Connect To Domain dialog box, where you can enter the name of the domain or browse to another domain.
From the Action menu, you can also choose Connect To Domain Controller to access the selected domain by using a specific domain controller on the network. Unless your domain controllers are out of sync, the information should be the same on all of the replicas, but sometimes you might want to select a domain controller at a different location to avoid a slow or expensive WAN connection.
Using Filters to Simplify the Display
When you begin to populate Active Directory with new objects, it can rapidly grow to an unwieldy size. The sheer number of objects in the display can make locating the specific object you need difficult. To temporarily suppress the display of objects you don't need to see, you can apply a filter to the Active Directory Users and Computers snap-in based on object types or based on the contents of specific object attributes.
When you choose Filter Options from the View menu, the Filtering Options dialog box appears, as shown in Figure 11-22. Here you can opt to display all object types, select specific object types to display, or build a custom filter based on object attributes.
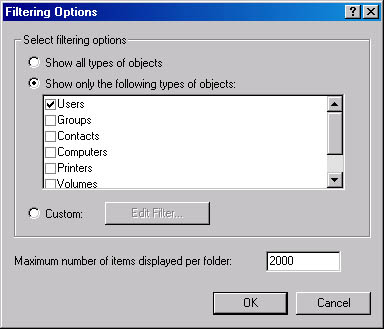
Figure 11-22. The Filtering Options dialog box of Active Directory Users and Computers.
When you select the Custom option and click the Edit Filter button, you see a Find Custom Search dialog box like that shown in Figure 11-23. In this dialog box, you can select an object type, choose an attribute of that object, and specify a full or partial value for that attribute.
For example, you can display only the user objects that have the value Sales in the Department attribute (as shown in the figure), or you can choose to display only the users that have a particular area code in the Telephone Number attribute. This enables you to quickly zero in on the objects you need to use without scrolling through an unnecessarily cluttered display.
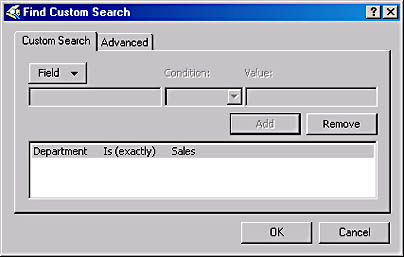
Figure 11-23. The Find Custom Search dialog box of Active Directory Users and Computers.
Finding Objects
You can also search for specific objects in the entire Active Directory without modifying the manager's display. By selecting the domain object and choosing Find from the Action menu, you display the Find Users, Contacts, And Groups dialog box (Figure 11-24), in which you can specify the type of object you want to locate, a specific domain, or the entire directory, and the name and description of the object.

Figure 11-24. The Find Users, Contacts, And Groups dialog box of Active Directory Users and Computers.
The program then searches the Global Catalog that is automatically created on the first controller in a domain to locate the desired object. The GC is a subset of the entire Active Directory, containing only the most commonly used attributes, which makes it easier to search for a specific object. Without the GC, the task of searching an Active Directory installation that includes domain controllers in remote locations could require extensive WAN traffic that is both slow and expensive.
![]()
NOTE
Although Active Directory always creates the GC on the first domain controller for a domain, you can change its default location by modifying the NTDS settings in the Active Directory Sites And Services snap-in. You can also specify additional attributes that are to be stored in the GC by using the Active Directory Schema snap-in.
The Advanced tab in the Find Users, Contacts, and Groups dialog box uses the same interface as the Custom Filter feature discussed in the previous section. In the same way, you can search for objects based on any of their attributes. If an attribute you select isn't part of the GC, the search will proceed by looking through the actual contents of the domain controllers on your network. In some cases, this can slow down the search process considerably.

TIP
Much of the same Active Directory object searching functionality found in the Active Directory Users and Computers snap-in is also available from the Start menu's Search feature.
Default Active Directory Objects
A newly created Active Directory domain contains organizational unit, computer, user, and group objects that the Active Directory Installation Wizard creates by default. These objects provide access to the system at several levels and include groups that enable administrators to delegate specific network maintenance tasks to others. Even if you don't expect to use these objects in the future, you must use them to create other objects with the appropriate permissions for your network.
If, for example, you don't want to have any single user with the full control granted to the administrator account, you must still log on as administrator in order to create new user objects with the rights and permissions you want. With Active Directory, you can "orphan" parts of the directory structure if you modify, delete, or disable the administrator account without first creating other user objects and granting them equivalent permissions to the various parts of the directory.
The default objects created in an Active Directory domain, along with their functions and their locations in the domain hierarchy, are listed in Table 11-2.
Table 11-2. Objects created by default in an Active Directory domain
| Object Name | Object Type | Location | Function |
|---|---|---|---|
| Builtin | Builtin Domain | Domain root | Default container for groups providing access to server administration functions. |
| Computers | Container | Domain root | Default container for upgraded computer accounts. |
| Users | Container | Domain root | Default container for upgraded user accounts. |
| Domain Controllers | Organizational Unit | Domain root | Default container for new Windows 2000 domain controllers. |
| Account Operators | Security Group—Builtin Local | Builtin | Members can administer domain user and group accounts. |
| Administrators | Security Group—Builtin Local | Builtin | Members can fully administer the computer/domain. |
| Backup Operators | Security Group—Builtin Local | Builtin | Members can bypass file security to back up files. |
| Guests | Security Group—Builtin Local | Builtin | Users are granted guest access to the computer/domain. |
| Print Operators | Security Group—Builtin Local | Builtin | Members can administer domain printers. |
| Replicator | Security Group—Builtin Local | Builtin | Supports file replication in a domain. |
| Server Operators | Security Group—Builtin Local | Builtin | Members can administer domain servers. |
| Users | Security Group—Builtin Local | Builtin | Ordinary users. |
| DHCP Users | Security Group—Domain Local | Users container | Members who have read-only access to DHCP Server. |
| DnsAdmins | Security Group—Domain Local | Users container | DNS administrators. |
| RAS and IAS Servers | Security Group—Domain Local | Users container | RAS and IAS Servers. |
| WINS Users | Security Group—Domain Local | Users container | Members that have read-only access to WINS. |
| Cert Publishers | Security Group—Global | Users container | Enterprise certification and renewal agents. |
| DnsUpdateProxy | Security Group—Global | Users container | DNS clients that are permitted to perform dynamic updates on behalf of some other clients (such as DHCP servers). |
| Domain Admins | Security Group—Global | Users container | Designated administrators of the domain. |
| Domain Computers | Security Group—Global | Users container | All workstations and servers joined to the domain. |
| Domain Controllers | Security Group—Global | Users container | All domain controllers in the domain. |
| Domain Guests | Security Group—Global | Users container | All domain guests. |
| Domain Users | Security Group—Global | Users container | All domain users. |
| Enterprise Admins | Security Group—Global | Users container | Designated administrators of the enterprise. |
| Schema Admins | Security Group—Global | Users container | Designated administrators of the schema. |
| Administrator | User | Users container | Built-in account for administering the computer/domain. |
| Guest | User | Users container | Built-in account for guest access to the computer/domain. |
| IUSR_xxx | User | Users container | Built-in account for anonymous access Internet Information Services (IIS). |
| IWAM_xxx | User | Users container | Built-in account for anonymous access to IIS out-of-process applications. |
| Krbtgt | User | Users container | Key Distribution Center Service Account. |
The next sections examine the procedures for creating new objects in a domain and modifying their attributes.
Creating an Organizational Unit
The directory service schema dictate which objects you can create in an Active Directory domain, where they can be located, and which attributes they are permitted to have. Active Directory Users and Computers lets you create objects only in locations appropriate to the object type. For example, you can't create an organizational unit (OU) object that is subordinate to a user object, but a user object can be subordinate to an OU object.
OUs can be subordinate to each other, however, and the number of OU layers you can create in your Active Directory domain is unlimited. To create an OU, you click the domain object or another OU in the Active Directory Users and Computers scope or result pane, and choose New from the Action menu and select Organizational Unit. You can also click the Create New Organizational Unit button on the Active Directory Users and Computers toolbar to achieve the same effect. After you specify a name for the new object in the Create New Object dialog box, the manager creates an icon with the appropriate name and inserts it into the Active Directory Users and Computers display.
Once you've created an OU, you can populate it with other objects, such as users, computers, groups, and other OUs, or you can modify its attributes by opening the Properties window from the Action menu.
Configuring OU Objects
The Properties window for an OU consists of three tabs. The General tab and the Managed By tab enable you to specify information about the OU such as a descriptive phrase and an address for the location of the object, as well as the identity of the person responsible for managing the OU. The information that you include on these tabs (if any) depends on the criteria you use to design your Active Directory. An OU can be associated with a particular department within an organization, a physical location such as a room, a floor, or a building, or even a branch office in a particular city or country.
The Group Policy tab is where you create and manage the links to group policy objects in Active Directory. Group policy objects are collections of system settings that control the appearance and functionality of network clients. When you apply group policies to OUs, domains, and sites, the system settings are inherited by all the objects contained in those entities. You can link OUs to multiple group policy objects on this tab, and you can control the priorities with which the policies are applied. When you use the Edit button on the Group Policy tab to modify a group policy object, Active Directory Users and Computers launches the Group Policy snap-in for the MMC. (For more on setting group policy and using the Group Policy snap-in, see Chapter 9.)
When you enable Advanced Features in the Active Directory Users and Computers View menu, the OU's Properties window also displays the Object tab (Figure 11-25) and the Security tab (Figure 11-26). The Object tab displays the full path to the object in the domain hierarchy, the dates and times of its creation and last modification, and the update sequence numbers from when it was created and last modified.
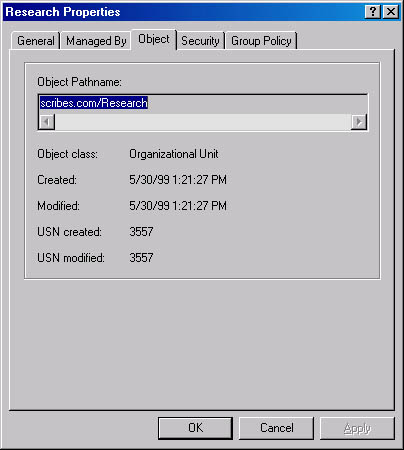
Figure 11-25. The Object tab of the Research Properties window.
The Security tab enables you to control access to the object by assigning permissions to users and groups. With the Allow Inheritable Permissions check box, you can also control whether the object inherits permissions that have been assigned to its parent object.
The Advanced button on the Security tab provides access to the Access Control Settings dialog box, shown in Figure 11-27, from which you can control access to the object in much greater detail. In the Security dialog box, you can specify whether specific users and groups are permitted to create and delete child objects in the OU, but this screen enables you to specify which object types they can create and delete.
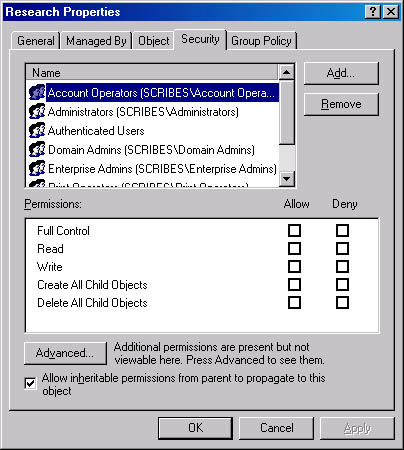
Figure 11-26. The Security tab of the Research Properties window.
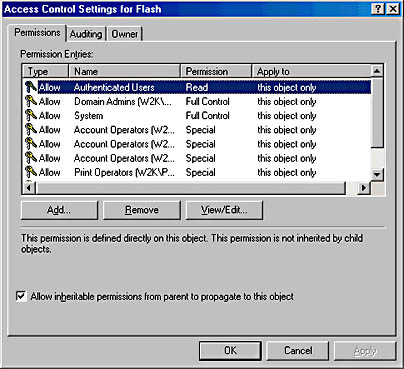
Figure 11-27. The Access Control Settings dialog box.
Delegating Object Control
Active Directory is designed to support much larger enterprise networks than Windows NT domains, and larger networks naturally require more attention and maintenance from administrators. Active Directory makes it possible for administrators to delegate control over specific container objects to other users without giving them full access to the domain. To do this, launch the Delegation of Control Wizard by choosing Delegate Control from the Action menu for a domain or organizational unit.
The wizard first prompts you to specify the container object over which you want to delegate control and the users, groups (or both) to whom you want to delegate control. Once you've done this, the wizard displays the Active Directory Object Type screen (shown in Figure 11-28) that you use to specify which types of objects in the container the selected users/groups should be able to control. You can, for example, grant a specific user or group control over the user objects in only the container, enabling them to update user information but preventing them from modifying other types of objects.
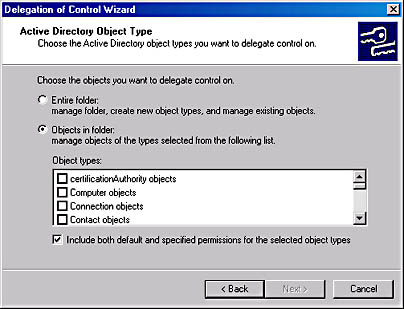
Figure 11-28. The Active Directory Object Type screen of the Delegation of Control Wizard.
In the Permissions dialog box, you specify the degree of control you want the selected users/groups to have over the objects you selected. The Filter Options box enables you to select whether you want to work with general permissions that concern the entire object, or property permissions that control access to the object's individual attributes. With this type of permission, you can grant users the ability to modify some of an object's properties while protecting others. This way, you can conceivably allow department managers to perform simple modifications on user objects, such as changing addresses and phone numbers, without endangering any other properties of the object.
Once you've supplied the wizard with the appropriate information, it configures the selected object with the appropriate permissions. If you check out the Security tab in the object's Properties window (which is visible only when Advanced Features is enabled in the Active Directory Users and Computers View menu), you can see the permissions that the wizard has assigned to the users or groups you selected.
Creating a User Object
A typical Active Directory installation usually consists of more user objects than any other type, and the creation and management of user objects accounts for much of the Active Directory administration burden. The task of manually creating a user object is just like that of creating an organizational unit or any other object. After selecting the container in which the user object will reside (usually an OU), you select the container and choose New from the Action menu and select User or click the Create New User button on the Active Directory Users and Computers toolbar, producing the dialog box shown in Figure 11-29.
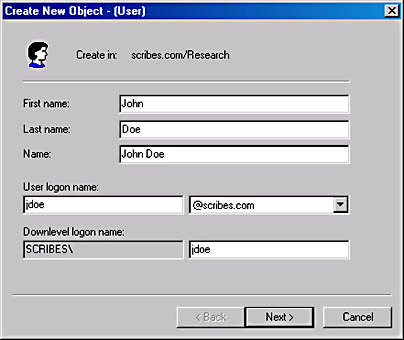
Figure 11-29. The Create New Object dialog box.
In the Create New Object dialog box, you specify the first and last name of the user and the logon name that the user will supply when connecting to the network. The downlevel logon name for the user (that is, the name with which the user will log on at Windows NT or Windows 9.x workstations) then appears automatically. The next dialog box provides a field for the user object's password and enables you to set basic password and account options for the user, as follows:
- User must change password at next logon
- User cannot change password
- Password never expires
- Account disabled
After a summary screen confirming your input, Active Directory Users and Computers creates the user object in the container you selected.
Configuring User Objects
Once you've created a user object, you can proceed to the configuration process, in which you add information about the user to the Active Directory database and define the user's access to the network. The Action menu that Active Directory Users and Computers generates when you click a user object contains several of the commands most commonly used by administrators, as well as access to the Properties window for the user. These commands are as follows:
- Add Members To A Group Generates a dialog box from which you can select the groups to which the user will belong
- Name Mappings (visible only when Advanced Features is enabled) Enables administrators to map X.509 certificates and Kerberos names to the user object
- Disable Account Prevents the user from logging on to the network using the account until it is manually enabled by an administrator
- Reset Password Generates a dialog box with which you can modify the user account's logon password
- Move Enables administrators to move the user object to another container object (that is, domain or organizational unit) in Active Directory
- Open Home Page Opens the default browser on the system and displays the URL listed in the Home Page field on the General tab of the user object's Properties window
- Send Mail Opens the default e-mail client on the system and addresses a message using the e-mail address listed in the E-Mail field on the General tab of the user object's Properties window.
While Active Directory Users and Computers provides these functions on the Action menu for the sake of convenience, you can also access most of them through the user object's Properties window, which provides a complete interface to the object's attributes. The following sections examine the 11 tabs in this window and the functions located on each one.
![]()
NOTE
The attributes appearing on the tabs of the Properties window are those included in the default schema used by Active Directory. You can modify the schema to create additional attributes or change existing ones by using the MMC Active Directory Schema Manager snap-in. See Chapter 12 for more information on using this tool.
The General Tab
The General tab contains basic information about the user, including the first and last names you specified when creating the object. This tab also has fields for a descriptive phrase about the user, office location, and the user's telephone number, e-mail address, and home page URL. Apart from the name fields, the information on this tab is optional and is used solely for reference purposes. Users can search Active Directory using the values of the attributes on this (and other) tabs and automatically insert the user's e-mail address and home page URL into the appropriate client applications, but these fields don't affect the user's access to the network in any palpable way.
The Address Tab
On the Address tab, you find fields where you can insert mailing address information for the user. As on the General tab, these are reference fields that don't play a major role in the object's configuration.
The Account Tab
The Account tab (shown in Figure 11-30) contains the user logon name you specified during the creation of the object as well as its downlevel user name.
The Logon Hours button and the Logon To button provide access to dialog boxes that enable you to restrict the hours and days of the week that the user is permitted to log on to the network (Figure 11-31) and the workstations from which the user can log on to the network.
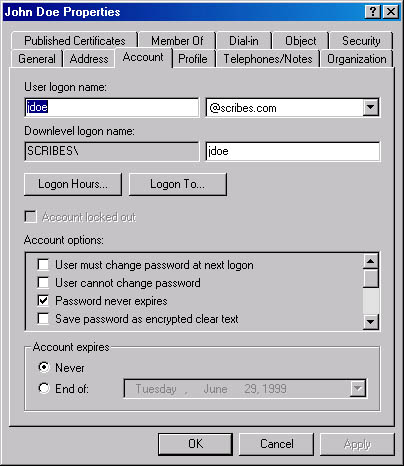
Figure 11-30. The Account tab of the Properties window.
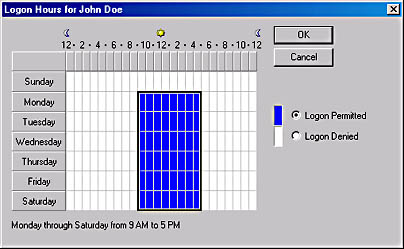
Figure 11-31. The Logon Hours dialog box.
The Account Locked Out check box is selected whenever the user account has been disabled, either deliberately by an administrator, or because of repeated logon failures. Clearing this check box releases the account and permits the user to log on again. The Account Options area contains numerous password and account options (some of which are duplicated in the Create New Object dialog box). When creating new user accounts, the following must be selected or cleared:
- User Must Change Password At Next Logon Presents the user with a dialog box during the next logon requiring a new password
- User Cannot Change Password Prevents the user from changing his or her own password
- Password Never Expires Prevents the user account from being subject to expiration policies defined in the Account Expires box
- Account Disabled Prevents the user from logging on using this account until it is cleared by an administrator
The Profile Tab
On the Profile tab, you can specify the location of the user profile associated with the object. By default, every user who logs on to a Windows 2000 system has a profile directory created in the Documents And Settings folder on the system drive. When you specify a profile path on this tab, the system stores a copy of the profile in the specified directory. If this directory is located on a shared network drive, the user can access the profile from any system on the network. The Logon Script field specifies the name of the script that the workstation should execute when the user logs on to the network.
From the Home Directory box, you can create a personal directory on a network drive over which the user has full control. Storing data files on a network drive makes it easier to protect them from tampering and accidental erasure. You can configure the workstation to map a drive to the shared drive automatically during the logon process by specifying a drive letter and the UNC name of a network share in the Connect fields. In the Shared Documents Folder field, you can specify a location where users who require access to the same documents can store files.
The Telephones/Notes Tab
The Telephones/Notes tab contains fields for all the various phone numbers associated with a user, including pager, mobile, fax, and IP phone numbers. A multiline Comments field provides a general-purpose area for notes.
The Organization Tab
The Organization tab provides fields in which you can specify the user's title, department, and company. In the Manager box, you can identify the user's superior by selecting another user object from Active Directory. A multiline Direct Report field can store a supervisor's notes on the user.
The Member Of Tab
The Member Of tab is where you specify the groups of which the user should be a member. Clicking the Add button displays an object listing from which you can select the appropriate groups. The Set Primary Group button is enabled only for Macintosh users. The Windows Services for Macintosh recognizes a single group affiliation—usually the group with which the Macintosh user shares documents on a server.
![]()
NOTE
You can also add a user to a group from the Members tab of the group object's Properties window.
The Dial-In Tab
On the Dial-In tab, you control whether the user should be permitted access to the network through a dial-in Remote Access Service (RAS) connection. With the Allow Access option, you can select whether the user object should require callback or caller ID for security verification, and you can specify a static IP address and static routes for the connection.
The Published Certificates Tab
The Published Certificates tab, which is visible only when you enable the Active Directory Users and Computers Advanced Features display option, lets you manage the X.509 certificates linked to the user object. From this page, you can view the certificates published for the user account, add new certificates, remove certificates, and export certificates to files.
The Object Tab
The Object tab (visible only when Advanced Features is enabled) displays the full pathname of the user object, the dates it was created and last modified, and the update sequence numbers (USNs) from when it was created and last modified.
The Security Tab
The Security tab (also visible only when Advanced Features is enabled) lets you assign permissions that control access to the user object. The tab is virtually identical to the same tab in the Properties windows for other object types. Chapter 9 has more information on the creation and configuration of user accounts.
Creating a Group
Group objects make it possible to assign permissions and other object attributes to multiple users in a single operation, as well as to distribute e-mail to large number of addresses (when Microsoft Exchange Server is installed). When you assign permissions to an Active Directory object (or to an NTFS file or directory), you can add groups to the object's access control list (ACL), which causes the permissions to be propagated to all of the group's members. You create group objects in Active Directory Users and Computers just as you would any other object type, and then you select the objects that you want to be members of the group.
Group objects can exist in organizational units, in other groups (when the domain is operating in native mode), or directly beneath the domain root. When you select one of these container objects in Active Directory Users and Computers and choose New from the Action menu and select Group, you see the Create New Object dialog box shown in Figure 11-32.
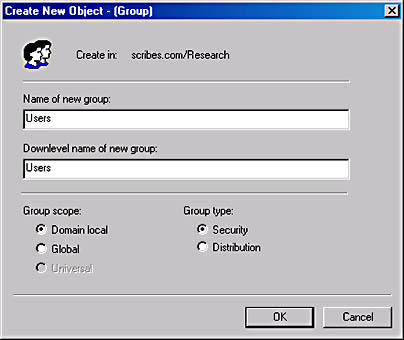
Figure 11-32. The Create New Object dialog box.
As with other objects, you must first specify a name (up to 64 characters long) for the new group and a downlevel NetBIOS name equivalent (up to 15 characters long). Then with the Group Scope options, you select one of the following options:
- Domain Local A Domain Local group can contain user objects, other Domain Local groups in the same domain, Global groups from any domain in the forest, and Universal groups. You can insert Domain Local groups into the ACL for any object in that domain but not objects in other domains. Domain Local groups don't appear in the GC.
- Global A Global group can contain user objects and other Global groups from the same domain. Unlike Domain Local groups, you can insert Global groups into the ACL for any object in the forest. Global groups are included in the GC, but their members are not; Global group memberships are replicated only within their domain.
- Universal The most comprehensive group scope, a Universal group can contain other Universal groups, Global groups, and users from any domain in the forest. Like Global groups, you can insert Universal groups into the ACL for any object in the forest. Universal groups appear in the Global Catalog with their members; using Global groups as members of the Universal group lessens the update traffic to the GC because changes to the Global group memberships (which aren't included in the catalog) are far more frequent than changes to the Universal group memberships.
![]()
NOTE
Group nesting (that is, the storage of groups within other groups) is an Active Directory feature that is available only when the domain is running in native mode. To operate in native mode, all of the domain's controllers must be running Windows 2000 Server. For more information on switching from mixed mode to native mode, see "Changing the Domain Mode" in this chapter.
After selecting the group scope, you select one of the following group types.
- Security Security groups are intended for inclusion in the ACLs of network resources such as files and printers. They can also serve as distribution lists for e-mail.
- Distribution Distribution groups are intended solely for use as e-mail distribution lists.
When you click OK, the manager creates the group object in the container you selected.
Configuring Group Objects
The Properties window for a group object contains up to six tabs (depending on whether Advanced Features is enabled).
The General Tab
The General tab provides fields where you can insert a description of the group object, specifies the group's type and scope, and includes a multiline field for comments.
The Members Tab
The Members tab is where you specify the objects that are to be the members of the group. Clicking the Add button produces a dialog box in which you can browse Active Directory and select the desired objects.
The Member Of Tab
When operating in native mode, Active Directory group objects can be members of other objects. On the Member Of tab, you can select the groups of which the new group is to be a member.
The Managed By Tab
The Managed By tab enables you to specify information about the person responsible for administering the group object.
The Object Tab
The Object tab (which appears only when Advanced Features is enabled in Active Directory Users and Computers) displays the full pathname of the group object, the dates of its creation and last modification, and its USNs at its creation and last modification.
The Security Tab
The Security tab (which appears only when Advanced Features is enabled in Active Directory Users and Computers) enables you to set the permissions that specify which objects will have access to the group object and how much access they will have.
Creating a Computer Object
In addition to container objects, group objects, and user objects, Active Directory also has objects representing computers. To log on to a domain, a Windows 2000 computer must have an object representing it in the Active Directory hierarchy. When you promote a system to a domain controller or log on to a domain for the first time, Windows 2000 automatically creates a computer object. (In the case of a first-time logon, the system prompts for the user name and password of an account with sufficient privileges to create new objects. However, you can also create computer objects manually, just as you would create any other object.)
Selecting a container, choosing New from the Action menu and selecting Computer produces a Create New Object dialog box in which you supply the name for the new computer object (which can be the computer's NetBIOS or DNS name). You can also specify the particular user or group that is authorized to join the computer to the domain.
TIP
The Active Directory Users and Computers snap-in creates objects one at a time, but sometimes administrators have to create a great many objects, and this tool becomes impractical. For more information on creating objects en masse, see "Batch Importing and Exporting" in Chapter 12.
Configuring Computer Objects
Once Active Directory Users and Computers creates the computer object, you can configure its attributes using the following seven properties: General, Operating System, Member Of, Location, Managed By, Object, and Security. Almost all of the tabs have the same purpose as those in other objects. The two that are unique to the Computer object are Operating System and Location.
The Operating System tab identifies the operating system running on the computer, the version, and the currently installed service pack. These fields are not editable; they are blank when you manually create a computer object and are filled in when the computer joins a domain. The Location tab enables you to specify which locations are served by the site in the directory setup.
Using Remote Computer Management
Active Directory Users and Computers provides administrative access to remote computers represented by objects in Active Directory. When you click a computer object and choose Manage from the Action menu, the manager opens the MMC Computer Management snap-in with that computer as its focus. With this capability, you can read the remote system's event logs, manipulate its services, and perform many of the other tasks provided by the Computer Management snap-in.
Publishing a Shared Folder
Shared folder objects enable you to publish shared network directories in Active Directory, enabling users to access them directly by browsing in the Network Neighborhood for the object. This eliminates the need for users to know the exact location of the shared folder. Creating a shared folder object doesn't actually create the share; you must do this manually on the Sharing tab of the drive or folder's Properties window in the Windows Explorer window or the My Computer window. You can also create shared folder objects from Distributed file system (Dfs) folders.
To create a shared folder object, click a container object in Active Directory Users and Computers and choose New from the Action menu and select Shared Folder. In the Create New Object dialog box, specify a name for the new object and enter the UNC pathname to the share. After the manager creates the object, you can configure it using the tabs in the object's Properties window.
![]()
NOTE
The permissions that you set on the Security tab of the shared folder's Properties window don't control access to the shared folder itself, only to the shared folder object. To access the folder by using Active Directory, a user must have permission to access both the share and the object. The same is true for a printer object.
Publishing a Printer
Creating a printer object enables users to access the printer through Active Directory in much the same way that they can access shared folders. You create a printer object just as you do a shared folder object, by selecting a container and choosing New\Printer from the Action menu and specifying the UNC path to the shared printer. The manager then creates the object, combining the name of the host system and the share to form the object name.
Moving, Renaming, and Deleting Objects
Once you've created objects in Active Directory, you can use Active Directory Users and Computers to remodel your tree at any time by moving objects to different containers, renaming them, and deleting them. The Action menu for nearly every Active Directory object contains a Move command that opens a dialog box in which you can browse for a container where you want to place the object. You can also select several objects by holding down the Ctrl key while clicking them and move them all to the same container.
Moving a container object to a new location automatically moves all of the objects within the container at the same time and also modifies the references to that object in all other Active Directory objects. If, for example, User X is a member of Group Y and you move the organizational unit containing X's user object to a new location, X remains a member of Y, and Group Y's member list is automatically updated to show X in its new location. In the same way, when you rename an object using the Rename command on the Action menu or by clicking the object once, all the references to that object throughout Active Directory change to reflect the new name. When you delete a container object, all of the objects in the container are deleted as well.
EAN: 2147483647
Pages: 366
- Chapter IV How Consumers Think About Interactive Aspects of Web Advertising
- Chapter VIII Personalization Systems and Their Deployment as Web Site Interface Design Decisions
- Chapter X Converting Browsers to Buyers: Key Considerations in Designing Business-to-Consumer Web Sites
- Chapter XII Web Design and E-Commerce
- Chapter XVII Internet Markets and E-Loyalty
- Key #2: Improve Your Processes
- Beyond the Basics: The Five Laws of Lean Six Sigma
- Making Improvements That Last: An Illustrated Guide to DMAIC and the Lean Six Sigma Toolkit
- The Experience of Making Improvements: What Its Like to Work on Lean Six Sigma Projects
- Six Things Managers Must Do: How to Support Lean Six Sigma