Check the Integrity of Your Drive
Within a hard drive is a dense magnetic cylinder where the data is stored. When data is requested from the hard drive, the cylinder spins around as an arm with a device for reading the data extends to the specific place where the data is stored. This all happens very fast and results in the whirring sound when you access the hard drive.
Hard drive errors
There are several different ways that errors can appear on your hard drive. Hard drive errors manifest as warning dialog boxes that say "An error occurred trying to read a file," or as a dialog box claiming that a file is missing. Hard drive errors could be caused by physical damage to the hard drive surface or when the computer tries to write one file over the top of another, a situation that results in cross-linked files. Cross-linked files occurs when two files are written to the same space on the hard drive. Another potential problem occurs when the index to the file gets mixed up.
Physical damage
Current hard drives are built in a way to protect the read/write arm from impacting with the magnetic cylinder, but if the computer gets bumped or dropped during the read/write process, the hard drive could be damaged, making it impossible to save or retrieve data from the damaged area. Power surges are another potential cause of hard drive damage.
| Tip | You can help avoid damage to your hard drive by placing the computer in a safe place where it won't be bumped or dropped. |
If a hard drive gets damaged, the damaged area produces read errors when the data at the area tries to get read, but the remainder of the hard drive continues to work fine. Using a disk check utility, you can check your entire hard drive for damaged areas. If any damaged areas are found, the utility marks these areas as bad sectors on the hard drive so the computer doesn't try to write data to these areas anymore.
Cross-linked files
When the computer tries to save data to the hard drive in a place where a file already exists, the two files become cross-linked. When this occurs, data from both files share the same sector on the hard drive causing both to become corrupt. In some cases, one of the cross-linked files can be saved, but often both must be deleted.
Misaligned indexes
When file indexes get mixed up, they can usually be fixed without having to delete any data. A file index tells Windows where on the hard drive the data is located. It also tells what type of data to expect. Windows sometimes writes the wrong address for the file, but the Error checking tool can fix these problems.
Using the Error-checking tool
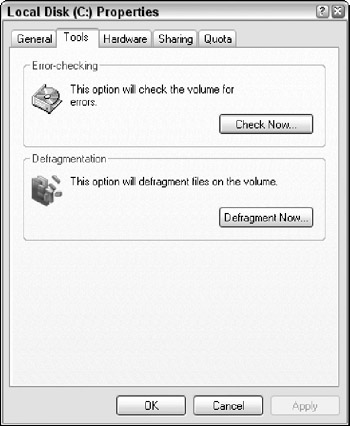
To locate and mark damaged areas and fix other problems on your local hard drive, you can use the Error-checking tool. This tool is found in the Tools tab of the Local Disk Properties dialog box, shown in Figure 49.8. The Local Disk Properties dialog box can be opened by selecting the C: drive in Windows Explorer and choosing the File ![]() Properties menu command, or you could right-click on the C: drive and choose Properties from the pop-up menu.
Properties menu command, or you could right-click on the C: drive and choose Properties from the pop-up menu.

Figure 49.8: The Tools tab of the Local Disk Properties dialog box includes the Error-checking tool.
| Tip | You can schedule the Error-checking tool, like the other disk maintenance utilities, to run regularly using the Scheduled Tasks utility. |
The Error-checking tool cannot fix any errors if any files are currently open. You should close down all applications before running the Error-checking tool. It is also helpful to disconnect your computer from the Internet and/or network before checking the local hard drive so that any automatic process such as checking email aren't running.
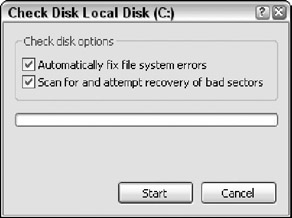
To begin the Error-checking tool, simply click the Check Now button. This opens the Check Disk Local Disk dialog box, shown in Figure 49.9, where you can choose the Check Disk options and start the tool. This tool can detect any errors on the hard drive even if neither of the options are selected, and you can choose whether the tool automatically tries to fix the errors or to recover any of the data located in the damaged sectors.

Figure 49.9: The Check Disk Local Disk dialog box includes options for how the hard drive is checked.
| Tip | You can use the Error-checking tool to check any hard drive attached to your system including floppy drives, external hard drives, and network drives. However, it cannot check CD-ROM drives. |
The Error-checking tool runs in several phases. During the first phase, it verifies the integrity of all files; the second phase verifies all file indexes (which can take a lot longer); the third phase verifies the security descriptors; and the last phase does a hardware scan if the Scan for and attempt recovery of bad sectors option is enabled.
When the Error-checking tool is run, a warning dialog box opens every time an error is found; but if you enable the Automatically fix file system errors option, these dialog boxes are skipped and the tool automatically attempts to fix any errors it finds.
| Note | If you're worried about letting the Error checking tool fix the errors automatically, you can disable this option and all errors are displayed before any action is taken. |
The search for cross-linked files and misaligned indexes happens relatively quickly, but checking the entire physical hard drive sector by sector can take a lot of time-up to an hour depending on the hard drive size and speed. If you select the Scan for and attempt recovery of bad sectors option, the Error-checking tool scans the entire physical hard drive sector by sector.
The Error-checking tool can run in read-only mode if none of the options are enabled. But if the tool finds any opened files or any attempts to read or write data to the hard drive when either of the options are enabled, the dialog box shown in Figure 49.10 appears, asking if you want to reschedule the tool to run next time Windows is restarted. If you select Yes, the disk is checked as part of the boot-up process, which may take some time, the next time Windows is restarted.

Figure 49.10: If you're having trouble running the Error-checking tool, you can schedule it to run the next time Windows is restarted.
Running the Error-checking tool from the Command Prompt window
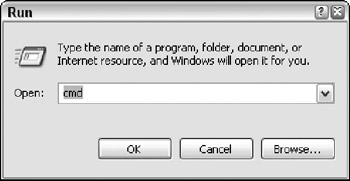
The Error-checking tool, called Chkdsk, can also be run from the Command Prompt. To open the Command Prompt, just type cmd in the Run dialog box, shown in Figure 49.11.

Figure 49.11: The Command Prompt lets you execute commands such as chkdsk.
From the Command Prompt console, you can navigate to the hard drive that you want to check by typing its drive letter followed by a colon and pressing enter. Then type the following command:
chkdsk /F /R
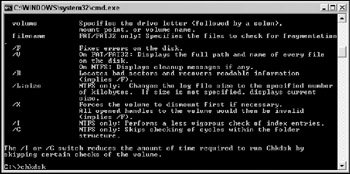
where the /F and /R are the options for automatically fixing errors and scanning for bad sectors. By typing chkdsk /?, you can see the available options for this utility, as shown in Figure 49.12.

Figure 49.12: At the Command Prompt are several additional options for setting checking the hard disk.
| Note | Running chkdsk on large hard drives may take a long amount of time to complete. |
EAN: 2147483647
Pages: 372