The Effect Controls Panel
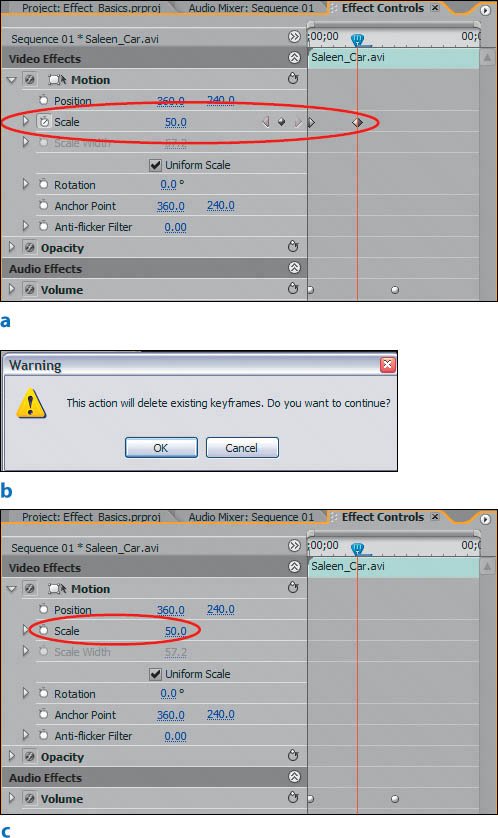
| In the last chapter, you learned the power of the Effect Controls panel for adjusting transitions. That panel takes on a different look and feel, however, when you adjust and manipulate clip effects. To start customizing your effect parameters, choose Window > Effect Controls. When you select a clip in the timeline, the left side of the Effect Controls panel lists the clip's Fixed and Standard effects and their parameters. The effects' associated keyframes appear on the right of the panel in a timeline view. Only when a clip is selected can you make adjustments to the effect parameters in the Effect Controls panel. Tip Depending on your preference, you can dock the Effect Controls panel in the Project panel frame, the Source Monitor frame, or you can leave it to float free as its own panel. To move from one frame to the other, click and drag the Effect Controls panel by its tab. Effect ListingsEach effect listing has a twirl down triangle that enables you to expand the listing to reveal the effect's parameters or collapse it to view only the effect's name, on/off toggle, Reset button, and Direct Manipulation icon (Figures 8.11a and b). Figures 8.11a and b. Twirling down the name of the effect reveals its effect parameters (Scale in the top image). Twirling down a parameter reveals, in most cases, an adjustment slider. To turn on keyframing for an individual parameter, click on the keyframe stopwatch for the parameter you want to adjust. Once you turn on keyframing, the effect listing expands further to show two keyframe graphs (Scale in the bottom image): The Value graph shows the effect value, and the Velocity graph shows the keyframe velocity between value keyframes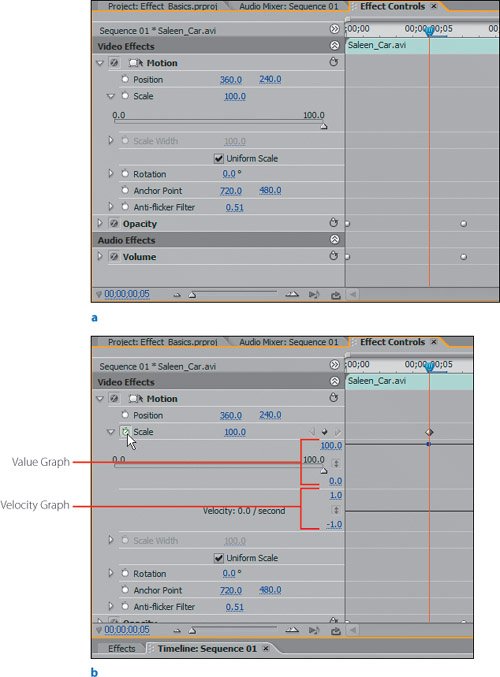 The effect on/off toggle is at the far left of each listing. When the F is visible, the settings assigned within the effect will be applied to the selected clip. Click the F to turn off the effect for the selected clip. Turning an effect off deactivates it, but does not delete its parameters. This is useful when you're trying out multiple effects on the same clip. Disabling an effect also can improve real-time playback. On the opposite edge of the effect listing you'll find the Reset button. Click it to return the effect's parameters to their original state. Unfortunately, you cannot reset individual parameters, only the entire listing. Use Reset with caution on effects with multiple parameters: You can lose a lot of work very quickly. The Undo command may be a better choice. Some effects, such as Motion, have the Direct Manipulation icon (a square with a mouse pointer next to it) before their names (Figure 8.12). Click on the effect name and the Program Monitor will display visible handles for you to grab and adjust. These handles directly manipulate a few specific parameters of the selected effect. Figure 8.12. With direct manipulation turned on, you can click and drag from one of the corner handles to scale the selected clip. All your adjustments are dynamically updated into the settings area of the Effect Controls panel. In this figure I am adjusting the scale of the clip by dragging one of its corners inward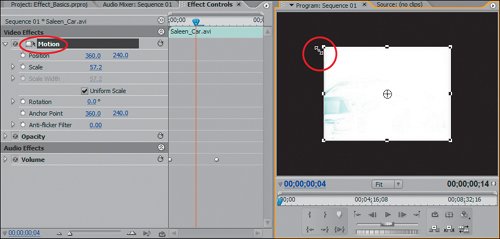 Effect ParametersTo access an effect's parameters from the Effect Controls panel, twirl down the effect's listing. To the left of each parameter name is the Toggle Animation icon (a little stopwatch). Click it to enable or disable keyframe adjustments (see Figures 8.13a, b, and c). When the stopwatch is empty, keyframe adjustment is disabled. When the stopwatch has a box around it, you can adjust keyframes. Once you set keyframes, clicking the stopwatch off deletes all assigned keyframes for the parameter. In some cases, such as the Color Corrector, this deletes the effect. Premiere Pro displays a warning dialog asking you to confirm your action before deleting the keyframes. Figures 8.13a, b, and c. If you have keyframes assigned (a) and you toggle the keyframing off, Premiere displays a warning (b), then deletes all keyframes (c). Notice that because the Edit Line was on top of the 10% scale keyframe when the keyframes were deleted, that became the static scale value You adjust the parameter using the hot text field to the right of its name. Scrub the field left or right to change its value. Holding down Ctrl while scrubbing adjusts the value at lower increments. Holding the Shift key and scrubbing adjusts the value at higher increments. Click in the hot text to manually enter the value you desire. If you prefer a more visual adjustment, click the twirl down triangle next to the parameter's name to access the slider control to change the parameter. Tip Docking the Effect Controls panel in the Project panel gives you a much wider panel, meaning you have more screen real estate devoted to viewing and adjusting keyframes. If you're less concerned with keyframes and need to view all the effect listings and their parameters in one glance, resize the Effect Controls panel to be very tall instead. Timeline Viewing AreaThe Effect Controls panel timeline viewing area displays the effect keyframes associated with the selected clip. To check the accuracy of the effect and keyframe placements, you can zoom and navigate through the clip using the panel's time ruler and viewing area bar. Scrubbing in the Effect Controls panel reveals the frames in the Program Monitor. By default, the boundaries of the Effect Controls panel timeline viewing area are defined by the boundaries of the clip. Although this is the best view for most cases, you can extend the boundaries by toggling off Pin to Clip in the Effect Controls panel wing menu. If you turn off Pin to Clip, you can adjust the viewing area bar so that you can see beyond the edges of the clip in the Effect Controls panel timeline (Figures 8.14a and b). This view is not recommended unless subtle or advanced keyframing is required that starts beyond the boundary of the clip. Figures 8.14a and b. With Pin to Clip turned on (a) the boundaries of the Effect Controls panel Keyframe Navigation area are pinned to the edge of the clip's timeline instance. If you turn Pin to Clip off, you can see beyond the edge of the clip instance (dark blue area) to assign additional keyframes in this area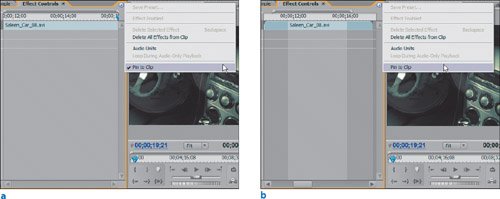 Turn Pin to Clip off to place an effect keyframe outside the boundary of your clip. With this "extra" keyframe in place, you later can adjust the duration or extend the edge of your clip toward that keyframe without reapplying the effect. |
EAN: 2147483647
Pages: 200