Working with Keyframes
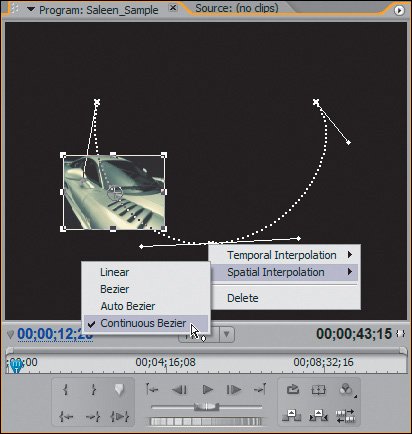
| Working with keyframes is an important part of applying effects in Premiere Pro, so learning how to manipulate them is vital. When you are assigning keyframes for an effect, first make sure that the clip associated with that effect is selected in the timeline and that the CTI is positioned between that clip's boundaries. Next, click the Toggle Animation button (the stopwatch) for the effect parameter that you wish to adjust or add keyframes. Now, any adjustment to the parameter adds a keyframe at the CTI's position with the setting in the parameter's hot text (Figure 8.15). If the CTI is over an existing keyframe, changing a parameter's setting changes the value for that keyframe. Clicking the Previous or Next Keyframe buttons snaps the CTI backward or forward one keyframe for the current parameter. This works exactly the same as it did when you went through the same steps in the timeline tracks. Figure 8.15. With the CTI positioned between the clip's boundary, turning on Toggle Animation assigns a start keyframe at the current Edit Line/CTI position. If the CTI is moved and the Scale is adjusted, a new keyframe is added at the new position to reflect the update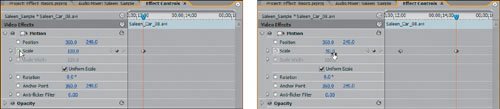 If you wish to add a keyframe and adjust it later, move your CTI to the desired spot and click the Add Keyframe button at the right of the parameter name. If the CTI is positioned on top of a keyframe, the Add Keyframe button turns a dark gray and clicking it removes the current keyframe for that parameter. To move a keyframe to a new location, select it and drag it in the Effect Controls panel timeline. Clicking and dragging a keyframe does not change its literal value, only its position. Using the Shift and Ctrl keys, you can select continuous or discontinuous keyframes to move them as a group. Clicking and dragging with the selection tool, you can marquee select a range of keyframes (Figure 8.16). Figure 8.16. With the Selection tool, you can click and drag to marquee select multiple keyframes in the Effect Controls panel. Once those keyframes are selected, not only can you copy and paste them to other clips, but you can also drag them as an entire group Be sure to stay aware of the CTI's position in the Effect Controls panel as you work. As you scrub through a clip with multiple keyframes, the parameter values between keyframes update as you scrub. If you happen to park the CTI in a location without a keyframe and adjust a parameter that has Toggle Animation turned on, you will add a keyframe at that position (Figures 8.17a and b ). Figures 8.17a and b. 8.17a shows a 100% Scale keyframe (left) and a 50% Scale keyframe (right). The current Scale value for the middle frame that the CTI is parked on is 70%. If you update that value to 85% (b), you decrease the amount of scaling for the same number of frames between the first and second keyframes and increase the amount of scaling necessary to get from the second to the third keyframe. Therefore, the Scale effect is much slower from the first to the second keyframe than it is from the second to the third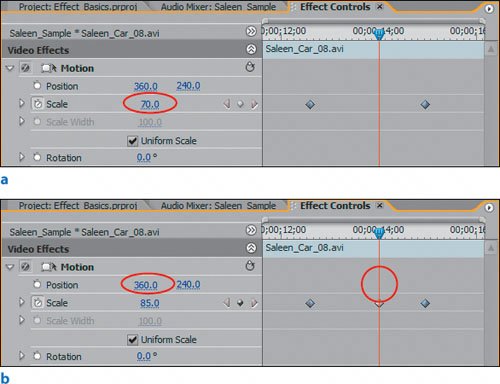 Bezier Keyframes and Easing In and OutThere are a number of new keyframes features for Premiere Pro 2.0; however for this chapter, I want to focus on the basic support of Bezier curved keyframe handles. In Chapters 13 and 14, you will learn how to take keyframing to the next level. Bezier curves enable you to make smooth paths by adjusting and pulling handles associated with specific points on a path. In Premiere Pro, those points are the keyframes that you assign. Say you apply a position adjustment to a clip and want the line between the two points to be slightly curved. You would assign one of the keyframes to have a Bezier handle, then adjust the handle of that keyframe so that there is a curve from that point (Figures 8.18a and b). In the timeline, you can further navigate and manipulate all the keyframes and their handles that you set in the Effect Controls panel; however, the new Value and Velocity graphs allow you more control without leaving the panel After you apply a keyframe, you can right-click on it and specify the type of handle or velocity setting that will be associated with its position (Figure 8.19). You have two main choices: Temporal Interpolation and Spatial Interpolation. Temporal Interpolation addresses the velocity and timing of getting to a keyframe frame value. Spatial Interpolation addresses the curve and path definition for the keyframe. Figures 8.18a and b. The initial motion path for this clip is a Continuous Bezier path, meaning that it smoothes the path between the position keyframes so that the movement between them is more fluid. Each of the position keyframes has a Bezier handle that can be tweaked to alter the curve around the selected keyframe (a). 8.17b shows the same path after the Bezier handles have been readjusted to alter the path even more. Notice how the selection tool becomes smaller and displays only its tip when it selects and adjusts Bezier handles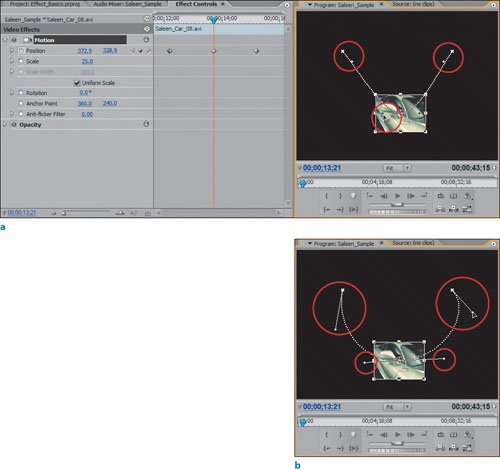 Figure 8.19. By right-clicking on the keyframe in the Effect Controls panel or on the keyframe handle with direct manipulation turned on, you can access the Temporal and Spatial submenus to assign your desired interpolation value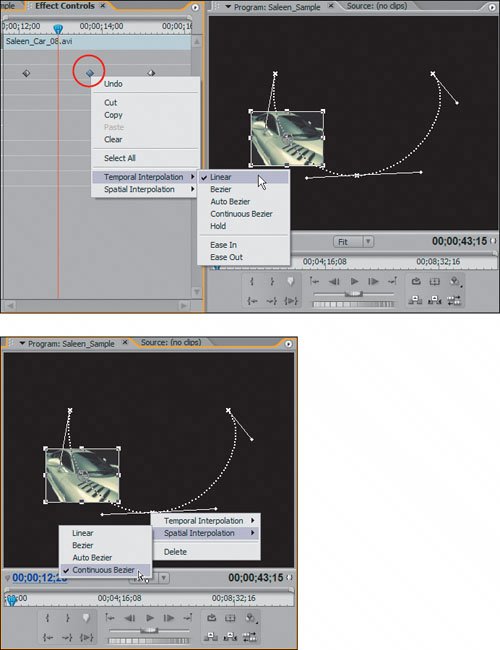 For Temporal Interpolation, you have seven options: Linear, Bezier, Auto Bezier, Continuous Bezier, Hold, Ease In, and Ease Out. Ease In and Ease Out are the most practical and most often used for Temporal Interpolation. The eases affect the speed and velocity of the effect arriving to or leaving from that keyframe (Figure 8.20). Figure 8.20. If you want a clip to slow slightly before arriving at a Position keyframe, turn on Ease In for the selected keyframe. The tightness of the keyframe path dots reflects the velocity of the clip on the path With the new keyframe controls in Premiere Pro 2.0, you can adjust the spatial interpolation keyframes in the Program Monitor and the temporal interpolation keyframes in the new Velocity graph of the Effect Controls panel (Figures 8.21a, b, and c). Figures 8.21a, b, and c. The new Velocity graph in the Effect Controls panel lets you assign and adjust the temporal interpolation values. 8.20a shows a constant velocity value, but notice how each keyframe has a velocity point and Bezier handle for adjusting. Selecting Ease In as the Temporal Interpolation value for the middle (b) updates the Velocity graph. As a result, the graph shows the velocity slow down and reduce as it reaches the keyframe (c). To customize the ramp further you could grab any of the Bezier handles and adjust them as you would any other handle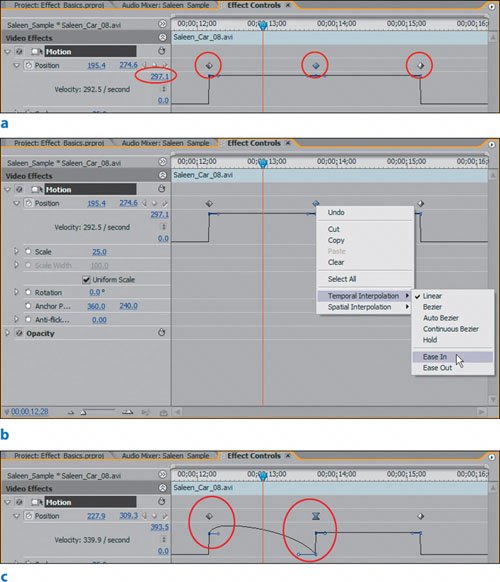 |

EAN: 2147483647
Pages: 200