3.2 Prototyping
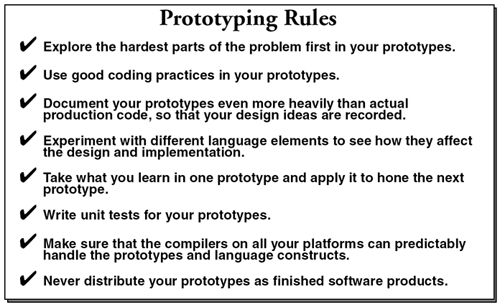
| Our strong recommendation is that any development plan should include some amount of time for prototyping. Prototyping has a number of advantages and can directly affect the success of a commercial software development effort. Our rules of thumb for prototyping are shown in Figure 3.5. Figure 3.5. Prototyping Rules 3.2.1 Why Prototyping WorksIn our own commercial development efforts, we have consistently shown that by including prototyping as part of the process, the product is completed on time with full functionality. Why? Here are some of the reasons:
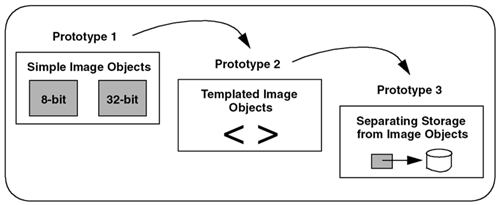
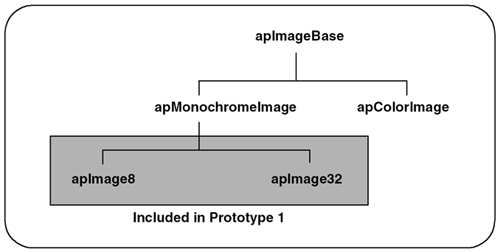
3.2.2 Common FearsThere are a number of common fears and misconceptions about prototyping. We discuss some of the prevalent ones here. One of the most common fears is that prototypes will be turned into the actual released software to save time and effort. This is especially true if your management is shown a prototype that looks like the desired final product. It can give the erroneous impression that the product is closer to completion than is actually the case. The problem with this scenario isn't that the prototype gave an incorrect impression, but rather that the expectations of management weren't properly set. Part of the development manager's role is to clearly set the expectations for any demonstration. Clearly explaining exactly what is being shown is part of that responsibility. If this is done well, management need not get a false impression . Another common misconception about prototyping is that it will delay the actual design and implementation phases and result in making the product late. In actuality, prototyping is an iterative process with the design and implementation phases. By clarifying the most difficult aspects of the design, prototyping can actually result in avoiding costly mistakes and bringing the product in on time. 3.2.3 Our Image Framework Prototyping StrategyIn Chapter 2, we showed our first attempt to design an image object to handle the simple problem of generating a thumbnail image. We presented this test application to show how easy it is to design an object that solves a simple problem. Not unexpectedly, this application is totally inadequate for solving real-world problems and certainly unsuitable for our image framework. In this section, we use the prototyping strategy shown in Figure 3.6 to look at various aspects of image objects, to ensure that our image framework meets the standards of commercial software. Figure 3.6. Image Framework Prototyping Strategy We have chosen a prototyping strategy that lets us investigate three different aspects of the problem. In Prototype 1, we look at the common elements of images with different pixel types (8-bit versus 32-bit) to help us create a cleaner design. In Prototype 2, we explore whether using templates is a better way to handle the similarities between images with different pixel types. Once we started exploring templates, it became clear that there are both image data and image storage components. In Prototype 3, we investigate the feasibility of separating these components in our design. 3.2.4 Prototype 1: Simple Image ObjectsPrototype 1 is designed to explore the similarities between images of different pixel types. Remember that our test application defined a pixel as an unsigned char to specify monochrome images with 256 levels of gray (this is frequently called an 8-bit image, or an 8-bit grayscale image). 8-bit images are still very popular in applications for security, medical imaging, and machine vision, but they represent just one of many image formats. Other popular monochrome formats define pixels with depths of 16 bits and 32 bits per pixel. The larger the pixel depth, the more grayscale information is contained. And while 8 bits may be sufficient for a security application, 16 bits might be necessary for an astronomical application. In some cases, a monochrome image sensor may produce images that contain 10 bits or 12 bits of information. However, images of these odd depths are treated as 16-bit images with the higher-order bits set to zero. Prototype 1 explores two types of monochrome images: an 8-bit image like our test application, and a 32-bit image, as shown in Figure 3.7. Figure 3.7. Image Object Strategy Used in Prototype 1 To be precise, our 8-bit image is represented by an unsigned char , and our 32-bit image is represented by an unsigned int . Each prototype object defines a simple class to create an image and supports one image processing operation, such as creating a thumbnail image. Like any good prototyping strategy, we keep features from the test application that worked and add new features, as shown in Table 3.3. Table 3.3. Features Reused and Added to Prototype 1
The definition for apImage8 is shown here. typedef unsigned char Pel8; class apImage8 { public: apImage8 (); apImage8 (int width, int height); // Creates a null image, or the specified size virtual ~apImage8 (); int width () const { return width_;} int height () const { return height_;} const Pel8* pixels () const { return pixels_.data();} Pel8* pixels () { return pixels_.data();} // Return pointer to start of pixel data Pel8 getPixel (int x, int y) const; void setPixel (int x, int y, Pel8 pixel); // Get/set a single pixel // Image operations (only one for the prototype) virtual apImage8 thumbnail (int reduction) const; // Default copy ctor and assignment are ok protected: apAlloc<Pel8> pixels_; // Pixel data int width_; // Image dimensions int height_; }; The definition for apImage32 is shown here. typedef unsigned int Pel32; class apImage32 { public: apImage32 (); apImage32 (int width, int height); // Creates a null image, or the specified size virtual ~apImage32 (); int width () const { return width_;} int height () const { return height_;} const Pel32* pixels () const { return pixels_.data();} Pel32* pixels () { return pixels_.data();} // Return pointer to start of pixel data Pel32 getPixel (int x, int y) const; void setPixel (int x, int y, Pel32 pixel); // Get/set a single pixel // Image operations (only one for the prototype) virtual apImage32 thumbnail (int reduction) const; // Default copy ctor and assignment are ok protected: apAlloc<Pel32> pixels_; // Pixel data int width_; // Image dimensions int height_; }; The first thing to notice about the apImage8 and apImage32 objects is that a typedef is used to define the pixel type. It not only offers a convenient shorthand, but it is clear in our code when we deal with pixels. And before anyone asks, we did think of calling them apPel8 and apPel32 instead of just Pel8 and Pel32 , but we resisted. You also might notice that we are using an int to represent the width and height of the image. Some might argue that this should be an unsigned int , but for a prototype, we feel it is acceptable to make things simpler. When you ignore the image references, apImage8 and apImage32 are little more than a wrapper around apAlloc<> . This is clear when you look at a few functions: apImage8::apImage8 () : width_ (0), height_ (0) {} apImage8::apImage8 (int width, int height) : width_ (width), height_ (height) { pixels_ = apAlloc<Pel8> (width*height);} apImage8::~apImage8 () {} Pel8 apImage8::getPixel (int x, int y) const { return pixels_[y*width_ + x];} void apImage8::setPixel (int x, int y, Pel8 pixel) { pixels_[y*width_ + x] = pixel;} Our prototype may not break any new ground when it comes to image processing, but it already shows the benefits of using our memory allocation object. Our apImage8 constructor makes apAlloc<> do all the work and our calls to getPixel() and setPixel() use operator[] of apAlloc<> . It gets even better. We don't define a copy constructor or assignment operator, because the default version works fine. If this isn't clear, look at what our copy constructor would look like if we wrote one: apImage8::apImage8 (const apImage8& src) { pixels_ = src.pixels_; width_ = src.width_; height_ = src.height_; } pixels_ is an instance of apAlloc<> and width_ and height_ are just simple types. Since apAlloc<> has its own copy constructor we just let the compiler take care of this for us. The thumbnail() method performs the same function as in our test application; however, its implementation is much cleaner. The output thumbnail image is created like any local variable, and returned at the end of the function. We saw how simple the copy constructor is, so even if the compiler creates some temporary copies, the overhead is extremely low. When we wrote the thumbnail() definition this time, we were careful with our naming convention. Variables x and y refer to coordinates in the original image and tx and ty refer to coordinates in the thumbnail image. So even though there are 4 nested loops , the code is still fairly easy to follow. The thumbnail() method is as follows : apImage8 apImage8::thumbnail (unsigned int reduction) const { apImage8 output (width()/reduction, height()/reduction); for (unsigned int ty=0; ty<output.height(); ty++) { for (unsigned int tx=0; tx<output.width(); tx++) { unsigned int sum = 0; for (unsigned int y=0; y<reduction; y++) { for (unsigned int x=0; x<reduction; x++) sum += getPixel (tx*reduction+x, ty*reduction+y); } output.setPixel (tx, ty, sum / (reduction*reduction)); } } return output; } If you compare the code for apImage8 and apImage32 , you find that they are almost identical. This is no great surprise, but the prototype shows this very clearly. This similarity leads to two thoughts. The first (historically) is to see how derivation can help simplify our design and maximize code reuse. The second is to see how templates can remove all of this duplicate code.
Moving forward, we want to investigate the use of templates in our next prototypes to figure out how the final image class should be implemented. Summary of Lessons LearnedThese are the things that worked well:
3.2.5 Prototype 2: Templated Image ObjectsIn Prototype 1, we extended our test application to show that image objects of different types are actually very similar. Derivation is one possible option for handling this similarity, but it forces all images into a single class hierarchy. Another way to handle this similarity is by the use of templates, with the goal of simplifying the design and maximizing the amount of code reuse. We use Prototype 2 to investigate a number of new features:
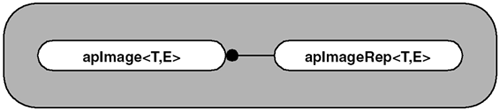
Use of TemplatesForemost in this prototype is the need to verify that a template object is the correct representation to solve our problem. Our test application only handled an 8-bit monochrome image (i.e., unsigned char ), and Prototype 1 added a 32-bit monochrome image (i.e., unsigned int ). Due to the similarity of the apImage8 and apImage32 objects, it makes sense to turn it directly into a template object, as shown in Figure 3.8: Figure 3.8. Templated Image Object Design In Prototype 2, we introduce the handle class idiom , where there is a representation class that contains the data and performs all the operations, and a handle class that is a pointer to the representation class. In our prototype, apImageRep<> is the representation class to which the handle class apImage<> points. We begin Prototype 2 by looking at the relevant parts of our apImage<> object from Prototype 1. It is not always clear from the outset how the prototype will be completed. Converting the apImage<> object into a template object gives us: template<class T> class apImage { public: apImage (); apImage (unsigned int width, unsigned int height); ~apImage (); const T* pixels () const; T* pixels (); T getPixel (unsigned int x, unsigned int y) const; void setPixel (unsigned int x, unsigned int y, T pixel); apImage<T> thumbnail (int reduction) const; protected: apAlloc<T> pixels_; unsigned int width_; unsigned int height_; }; This certainly is very tidy, and with a small addition, we can use this object as a replacement for both apImage8 and apImage32 : typedef apImage<unsigned char> apImage8; typedef apImage<unsigned int> apImage32; Are we done? Unfortunately, templates are not always this simple. The implementation does not work correctly for apImage8 . Let's look at the following example to understand why.
This is easily converted to a template function as shown:
It is still not obvious why it won't work correctly, until you study two lines from this function: T sum = 0; ... sum += getPixel (tx*reduction+x, ty*reduction+y); If T is an unsigned char , the compiler sees this: unsigned char sum = 0; ... sum += getPixel (tx*reduction+x, ty*reduction+y); The variable sum must have enough precision to contain the sum of many pixels. For example, if the reduction factor is 2, sum must be able to hold the summation of four pixels without overflowing. This condition is not true if sum is only an unsigned char . Worse, the compiler will happily accept this code without generating any errors. It is up to you and your unit tests to catch them. You might be tempted to write our first line as: unsigned int sum = 0; This fixes the problem for unsigned char , and probably works well with unsigned int (since images that are represented with 32 bits most likely have fewer significant bits). This fix (really more of a hack), however, does not work for many other pixel types, like float or RGB . As shown in Figure 3.8 on page 52, Prototype 2 defines apImage<T,E> , which has two template arguments; the second argument is how we solve the thorny issue we just discussed. The first argument, T , is still the pixel type, but E now represents the internal pixel type to use during computation. For example, the definition apImage<unsigned char, unsigned int > describes an image of 8-bit pixels, but uses a 32-bit pixel for internal computations when necessary. Here are some other examples: typedef unsigned char Pel8; typedef unsigned int Pel32; apImage<Pel8, Pel8>; // Watch out, round off is a real possibility apImage<Pel8, Pel32>; apImage<Pel32, Pel32>; Now for an interesting design issue. Templates do support default arguments, so we can define our prototype class as either: template<class T, class E> class apImage or template<class T, class E = T> class apImage The difference may look small, but you must consider what happens when people forget the second argument. Default arguments are best used when the developer can predict what the argument is most of the time. One would expect that the template apImage<Pel8,Pel32> is used more often than apImage<Pel8,Pel8> . But if someone writes apImage<Pel8> they are getting the less commonly used object. For this reason, we do not supply a default argument.
Handle Class IdiomThe handle class idiom has been used as long as C++ has been around. See [Coplien92]. This is little more than reference counting attached to an object. It is commonplace to call the shared object the representation object , and to call the objects that point to them the handle objects . The representation class (or rep class, as it is sometimes called) contains the implementation, does all the work, and contains all the data, while the handle class is little more than a pointer to a rep class. A more in-depth discussion can be found in Stroustrup's The C++ Programming Language, Special Edition , Section 25.7 . See [Stroustrup00]. In Prototype 2, apImage<T,E> is our handle object and points to an instance of apImageRep<T,E> , as shown here. template<class T, class E> class apImageRep; // Forward declaration template<class T, class E> class apImage { public: friend class apImageRep<T, E>; apImage (); // A null image, suitable for later assignment apImage (unsigned int width, unsigned int height); ~apImage () { image_->subRef ();} apImage (const apImage& src); apImage& operator= (const apImage& src); // We need our own copy constructor and assignment operator. const apImageRep<T, E>* operator -> () const { return image_;} apImageRep<T, E>* operator -> () { return image_;} // Allow access to the rep object protected: apImage (apImageRep<T, E>* rep); // Construct an image from a rep instance apImageRep<T, E>* image_; // The actual image data }; The implementation of apImage<T,E> is similar to our apAlloc<T> object, since both use reference counting. If you study the implementation, you will see it all comes down to carefully calling addRef() and subRef() in the apImageRep<T,E> object. Besides the obvious constructor/destructor definitions, the most important function is operator-> . This is the crux of the object, and is how you access a method in the rep class. This operator returns a pointer to the apImageRep<T,E> object, so any public method can be accessed. The rep class apImageRep<T,E> object, which is shown here, is very similar to the templated image object shown earlier on page 52. template<class T, class E> class apImageRep { public: static apImageRep* gNull (); // A null image apImageRep () : width_ (0), height_ (0), ref_ (0) {} // Creates a null image, suitable for later assignment apImageRep (unsigned int width, unsigned int height); ~apImageRep () {} unsigned int width () const { return width_;} unsigned int height () const { return height_;} const T* pixels () const { return pixels_.data();} T* pixels () { return pixels_.data();} const T& getPixel (unsigned int x, unsigned int y) const; void setPixel (unsigned int x, unsigned int y, const T& pixel); // Reference counting related unsigned int ref () const { return ref_;} // Number of references void addRef () { ref_++;} void subRef () { if (--ref_ == 0) delete this;} apImage<T, E> thumbnail (int reduction) const; // Default copy ctor and assignment are ok protected: apAlloc<T> pixels_; // Pixel data unsigned int width_; // Image dimensions unsigned int height_; unsigned int ref_; // Reference count static apImageRep* sNull_; // Our null image object }; The first difference between the rep object and the image object (from page 52) is in the definition of the null image. In the rep object, we use a Singleton method, gNull() , to be our null object. We define gNull() as: template<class T, class E> apImageRep<T,E>* apImageRep<T,E>::gNull () { if (!sNull_) { sNull_ = new apImageRep (0, 0); sNull_->addRef (); // We never want to delete the null image } return sNull_; } This is the same behavior as our apAlloc<T> object. When we attempt to allocate an object with zero elements, we actually return an object that allocates a single element. Look at what could happen if we did not define a gNull() object: apImage<Pel8,Pel32> image; if (image->width() == 0) // Null object This would fail if apImage<T,E> contained a null pointer to the apImageRep<T,E> object, and we dereferenced it to get the width. An alternate, and less desirable, approach is to define an isNull() method to test if the pointer is null before using it, as shown: apImage<Pel8,Pel32> image; if (!image.isNull()) // OK to use operator-> Null images are commonplace in applications. For example, an image operation that cannot produce a resulting image returns a null image. To eliminate the need to create many null rep images, we only need to allocate a single gNull() . By calling addRef() when the null image is created, we ensure that this object never gets deleted. The complete source for apImage<T,E> can be found on the CD-ROM. Let's look at one of the constructors to reinforce that this object is little more than a wrapper: template<class T, class E> apImage<T,E>::apImage (unsigned int width, unsigned int height) : image_ (0) { image_ = new apImageRep<T,E> (width, height); image_->addRef (); } The thumbnail() method of apImageRep<T,E> now looks like this: template<class T, class E> apImage<T,E> apImageRep<T,E>::thumbnail (unsigned int reduction) const { apImageRep<T,E>* output = new apImageRep<T,E> (width()/reduction, height()/reduction); for (unsigned int ty=0; ty<output->height(); ty++) { for (unsigned int tx=0; tx<output->width(); tx++) { E sum = 0; for (unsigned int y=0; y<reduction; y++) { for (unsigned int x=0; x<reduction; x++) sum += getPixel (tx*reduction+x, ty*reduction+y); } output->setPixel (tx, ty, sum / (reduction*reduction)); } } // Convert to apImage via the protected constructor return output; } This approach differs from our first attempt at converting thumbnail() to a template function (as shown on page 53). Rep classes are allocated on the heap and our handle classes can be allocated anywhere . For this reason, we must use new to allocate our resulting object output . Although our thumbnail() method returns an apImage<T,E> object, there is no explicit reference to one in the function. We did this to avoid mixing references to apImage<T,E> and apImageRep<T,E> . We end the function by executing: return output; The compiler converts this object into an apImage<T,E> object, using the protected constructor: apImage (apImageRep<T,E>* rep); Our handle definition is looser than some implementations, although it is sufficient for our prototype. For example, there is nothing to stop someone from creating apImageRep<T,E> objects directly. It is a matter of opinion as to whether this is a feature or a detriment. It highlights the fact that it is not always clear what functionality is needed when prototyping. RGB ImagesSo far our prototypes have dealt with monochrome images. Our design has gotten sufficiently complex that we should look at other image types to make sure our implementation and design are appropriate. We will do that now by looking at Red-Green-Blue (RGB) images. Depending on the application, color images may be more prevalent than monochrome images. Regardless of the file format used to store color images, they are usually represented by three independent values in memory. RGB is the most common, and uses the three colors red, green, and blue to describe a color pixel. There are many other representations that can be used, but each uses three independent values to describe an image. An RGB image can be defined as:
With this simple definition, will a statement like the following work? apImage<RGB> image; The answer is no. Although we defined an RGB image, we did not define any operations for it. For example, the thumbnail() method needs to be able to perform the following operations with an RGB image:
Adding support for RGB images entails defining these operations. The compiler will always tell you when you are missing a function, although some of the error messages are somewhat cryptic. While we are adding functions for an RGB data type, we also need to define an RGBPel32 type so that we don't have the same overflow issue we discussed earlier. RGBPel32 is identical to RGB , except that it contains three 32-bit values, rather than three 8-bit values. At a minimum, we need to define these functions: // Our basic color data type (8:8:8 format) struct RGB { Pel8 red; Pel8 green; Pel8 blue; RGB (Pel8 b=0) : red (b), green (b), blue (b) {} }; // Internal definition during computation (32:32:32 format) struct RGBPel32 { Pel32 red; Pel32 green; Pel32 blue; RGBPel32 (Pel32 l=0) : red (l), green (l), blue (l) {} }; RGBPel32& operator += (RGBPel32& s1, const RGB& s2) { s1.red += s2.red; s1.green += s2.green; s1.blue += s2.blue; return s1; } RGB operator/ (const RGBPel32& s1, int den) { RGB div; div.red = s1.red / den; div.green = s1.green / den; div.blue = s1.blue / den; return div; } Now, we are able to define an RGB image: apImage<RGB, RGBPel32 > image; and even write a simple application: apImage<RGB, RGBPel32> p (32, 32); // Initialize the image with some data RGB pel; pel.red = pel.green = pel.blue = 0; for (y=0; y<p->height(); y++) for (x=0; x<p->width(); x++) { p->setPixel (x, y, pel); pel.red++; pel.green++; pel.blue++; } apImage<RGB, RGBPel32> thumbnail = p->thumbnail (2); To run any real applications, we also need to define additional functions that operate on RGB and RGBPel32 images. For example, the unit test we wrote for this prototype adds a few more functions to initialize and test the value of RGB pixels: RGBPel32 operator+ (const RGB& s1, const RGB& s2); RGBPel32 operator+ (const RGBPel32& s1, const RGB& s2); bool operator== (const RGB& s1, const RGB& s2); Summary of Lessons LearnedThese are the things that worked well:
Here is what did not work well:
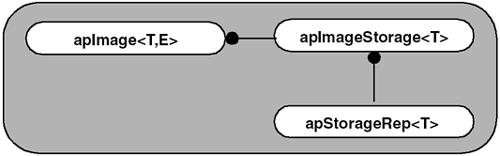
3.2.6 Prototype 3: Separating Storage from Image ObjectsIn Prototype 2, we introduced a handle class idiom. We put all the functionality in the rep class and used a simple handle class to access the methods in the rep class. The light-weight handle, apImage<> , has simple semantics, but we still ended up with a fairly complicated rep class. Since the handle class cannot be used without understanding the functionality in the rep class, we didn't meet our goal of simplifying our code. We need to intelligently manage large blocks of memory and allow access to a potentially large set of image processing functions. Strictly speaking, the use of the apAlloc<> class is what manages our image memory. So what are the advantages of keeping our handle class? It does offer an insulation layer between our client object and the object that does all the work. However, we also need another construct to hold all of the data for storing and describing the image data. The image data, such as the pixels and image dimensions, is contained within the apImageRep<> object, as shown: apAlloc<T> pixels_; // Pixel data unsigned int width_; // Image dimensions unsigned int height_; Given that our final image class will contain even more data, such as the image origin, creating an object that combines all of this data makes even more sense. Another advantage of this strategy is that, given the appropriate design, this object can be used by many different image classes. This allows applications to customize the front end and reuse the image storage object. We use Prototype 3 to separate the image storage from the actual image object by extending the handle idiom we introduced in Prototype 2. Design for Partitioning Image StorageThe purpose of Prototype 3 is to separate the image storage from the image processing. To accomplish this, we create a class, apStorageRep , to encapsulate the image storage, and we define apImage<> to be the object that performs the image processing. We connect the two using a handle class, apImageStorage . The final design for Prototype 3 is shown in Figure 3.9. Figure 3.9. Image Object and Storage Separation Design Note that we have introduced a new naming convention here to make it clear how these objects are related. Finding good names for closely related objects is not always easy. The C++ language does not support a class named apImageStorage and one called apImageStorage<> . The Tmpl suffix is added, renaming apImageStorage<> to apImageStorageTmpl<T> , to make it clear this is a templated class. Evolution of the DesignLet's look at how we arrived at this design. Our first attempt to show how our objects are related is by extending Prototype 2, as shown in Figure 3.10. Figure 3.10. Evolution of Design (Step 1) Although there is no inheritance in this example, the handle ( apImageStorage<T> ) and rep ( apStorageRep<T> ) classes are very closely related. Stacking them vertically in Figure 3.10 helps to show this relationship and clarifies that apImage<T,E> is related to the other two classes.
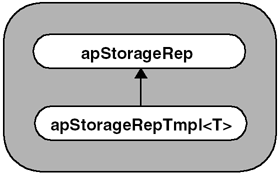
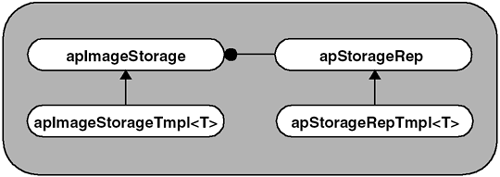
Before we start writing code, let us take one more step in improving our design. The compiler will instantiate a template object for each pixel type. Even if your users only need limited types, the image processing routines may need additional types for temporary images and the like. We have not worried about code bloat issues in our prototype, but now we need to consider how to handle them. Memory is nothing more than a series of bytes that the user 's code can access and treat as other data types. This is pretty much what new does. It retrieves memory from the heap (or elsewhere, if you define your own new operator) and returns it to the user. When coding with C, it was customary to call malloc() , then cast the returned pointer to the desired data type. There is no reason why we cannot take a similar approach and handle allocation with a generic object. Our code will perform all the allocation in a base class, apStorageRep , and perform all other operations through a derived template class, apStorageRepTmpl<T> , as shown in Figure 3.11. Figure 3.11. Evolution of Design (Step 2) Image Storage Rep ObjectsGiven the handle idiom we have decided to use, our rep object, apStorageRep, will contain generic definitions for image storage, as well as the handle-specific functionality, as shown: class apStorageRep { public: static apStorageRep* gNull (); // Representation of a null image storage. apStorageRep (); apStorageRep (unsigned int width, unsigned int height, unsigned int bytesPerPixel); virtual ~apStorageRep (); const unsigned char* base () const { return storage_.data();} unsigned char* base () { return storage_.data();} // Access to base of memory unsigned int width () const { return width_;} unsigned int height () const { return height_;} unsigned int bytesPerPixel () const { return bytesPerPixel_;} unsigned int ref () const { return ref_;} void addRef () { ref_++;} void subRef () { if (--ref_ == 0) delete this;} // Increment or decrement the reference count // Default copy constructor and assignment operators ok. protected: apAlloc<unsigned char> storage_; // Pixel storage unsigned int bytesPerPixel_; // Bytes per pixel unsigned int width_; unsigned int height_; unsigned int ref_; // Current reference count static apStorageRep* sNull_; }; If you compare apStorageRep above with apImageRep<> from Prototype 2, you will find that they both offer the same functionality. The main difference is that apImageRep<> allocates memory as apAlloc<T> , where T is the data type, and apStorageRep allocates memory as apAlloc<unsigned char> . Since apStorageRep is not a template class, let's look specifically at some of the differences, as shown: apAlloc<unsigned char> storage_; unsigned int bytesPerPixel_; storage_ is defined in terms of bytes. When an object derived from apStorageRep wants to allocate storage, it must supply not only the width and height of the image, but also its depth . By depth, we mean the number of bytes it takes to store each pixel. Note that our definition does not support packed data. For example, a binary image where each pixel can be represented by a single bit still consumes the same amount of memory as an 8-bit image. This limitation is not very severe, since images often are aligned on byte boundaries by definition. And those that are not, for example 12-bit images, most likely require 16 bits of storage and fall on byte boundaries anyway. In any event, we are not going to worry about this special case now. Once an image is constructed , we allow access to all the parameters of the object, as well as the memory pointer (as an unsigned char ). We chose to leave the base() method public to allow for future functionality. We continue to use the gNull() definition, so we only have one instance of a null image (remember, this is an image that has a valid pointer, but has a width() and height() of zero). Since apStorageRep is not a templated object, we put its definition in a header file and put much of its implementation in a source file ( .cpp in our case). Not having it be a templated object has the advantage of giving us control of how the object will be compiled, and lets us control code bloat. For example, if this were a templated object, compilers would expect classes to be defined in a single translation unit (or by means of nested include files). This gives the decision of what to inline, and what not to, to the compiler. By putting most of the functionality into the base class, we can have a very simple templated class, apStorageRepTmpl<> , that redefines base() to return a T* pointer (which matches the pixel type) instead of an unsigned char* , as shown here. template<class T> class apStorageRepTmpl : public apStorageRep { public: apStorageRepTmpl () {} apStorageRepTmpl (unsigned int width, unsigned int height) : apStorageRep (width, height, sizeof (T)) {} virtual ~apStorageRepTmpl () {} const T* base () const { return reinterpret_cast<const T*> (apStorageRep::base());} T* base () { return reinterpret_cast<T*> (apStorageRep::base());} // This cast is safe }; Defining our base() method this way is an effective means of hiding the base class version of this method. As you would expect, base() is nothing but a safe cast of the base() pointer from apStorageRep . The base class uses sizeof(T) to specify the storage size of each pixel. This is passed to apStorageRep when it is constructed, as: apStorageRepTmpl (unsigned int width, unsigned int height) : apStorageRep (width, height, sizeof (T)) {} At this point, we are fairly satisfied with Prototype 3's design of the apStorageRep and apStorageRepTmpl<> objects. The base classes do all the real work, and the derived object handles the conversions. Unlike Prototype 2, where we let operator new (via apAlloc<> ) create our pixels, in Prototype 3 we use an explicit cast to change our pointer from unsigned char* to T* . In this context, casting is an efficient way to maximize code reuse. This cast is completely safe and contained within two methods. Image Storage Handle ObjectsOur handle class, apImageStorage , looks very similar to the apImage<> handle object we designed in Prototype 2. A portion of the object is shown here. class apImageStorage { public: apImageStorage (); // A null image storage apImageStorage (apStorageRep* rep); virtual ~apImageStorage (); apImageStorage (const apImageStorage& src); apImageStorage& operator= (const apImageStorage& src); // We need our own copy constructor and assignment operator. const apStorageRep* operator -> () const { return storage_;} apStorageRep* operator -> () { return storage_;} protected: apStorageRep* storage_; }; The one major difference is that our handle object, apImageStorage , is not a template. That is because this object is a handle to an apStorageRep object and not an apStorageRepTempl<> object. The complete definition for the apImageStorage object can be found on the CD-ROM. The apImageStorage object is not of much use to us because operator-> allows us to access the apStorageRep rep object, and we really want to access the derived class, apStorageRepTempl<> . To accomplish this, we add an apImageStorageTmpl<> class that derives from apImageStorage as shown here. template<class T> class apImageStorageTmpl : public apImageStorage { public: apImageStorageTmpl () {} apImageStorageTmpl (unsigned int width, unsigned int height) : apImageStorage (new apStorageRepTmpl<T> (width, height)) {} virtual ~apImageStorageTmpl () {} const apStorageRepTmpl<T>* operator -> () const { return static_cast<apStorageRepTmpl<T>*> (storage_);} apStorageRepTmpl<T>* operator -> () { return static_cast<apStorageRepTmpl<T>*> (storage_);} }; Prototype 3 is a balanced design; we see that each base class has a corresponding derived template class. This symmetry is an indicator that we are getting closer to the final design. Like our rep class, we also have to make a cast to get our operator-> to work correctly. static_cast<> will safely cast the rep class (apStorageRep) pointer, kept by our base class, to an apStorageRepTmpl<> object. These casts may look complicated, but they really aren't. Two casts are needed for an apImageStorageTmpl<T> object to access apStorageRepTmpl<T> . And because of these casts, we can put most of our functionality inside base classes that are reused by all templates. Figure 3.12 shows the relationship between these two objects. Figure 3.12. Image Object and Storage Separation Design We are missing just one piece from this prototype. We need an object that actually performs the image processing operations on our image storage. We chose to use apImage<> for this task with two template parameters: template<class T, class E> class apImage { public: apImage (); apImage (unsigned int width, unsigned int height) : pixels_ (width, height) {} ~apImage () {} unsigned int width () const { return pixels_->width();} unsigned int height () const { return pixels_->height();} const T* pixels () const { return pixels_->base();} T* pixels () { return pixels_->base();} const T& getPixel (unsigned int x, unsigned int y) const; void setPixel (unsigned int x, unsigned int y, const T& pixel); // Image operations (only one for the prototype) apImage<T, E> thumbnail (unsigned int reduction) const; // Default copy ctor and assignment are ok protected: apImage (apImageStorageTmpl<T>& storage); // Construct an image from the storage apImageStorageTmpl<T> pixels_; // The actual image data }; Other than its name , this object is not similar to apImage<> from Prototype 2. In that earlier prototype, apImage<> was nothing more than a handle class to the rep object. It was the rep object that did all the work. In Prototype 3, our apImage<> object is responsible for all of the image processing routines. In this apImage<> object, all aspects of storing and maintaining the pixels are part of the storage object pixels_ . apImage<> exposes only that part of the apImageStorageTmpl<> interface that it needs to for providing access to width() , height() , and pixels() . The definitions for getPixel() and setPixel() as they appear in Prototype 3 are as follows: template<class T, class E> const T& apImage<T,E>::getPixel (unsigned int x, unsigned int y) const { return (pixels_->base())[y*width() + x];} template<class T, class E> void apImage<T,E>::setPixel (unsigned int x, unsigned int y, const T& pixel) { (pixels_->base())[y*width() + x] = pixel;} This class structure is sufficiently complex that trying to define operator T* to avoid the explicit base() reference adds unwarranted complication. For example, we chose to define this operator in our apAlloc<> object because there was little confusion. But in this case, it would only spread the image functionality across three objects, giving rise to potential errors. When we say: pixels_->base() it is clear we are calling the base() method of our rep class by means of the handle. Then, the following statement: (pixels_->base())[y*width() + x] becomes the lookup of a pixel, given its coordinates. The last method we need to look at is thumbnail() , and how it appears in Prototype 3 as: template<class T, class E> apImage<T,E> apImage<T,E>::thumbnail (unsigned int reduction) const { apImage<T,E> output(width()/reduction, height()/reduction); for (unsigned int ty=0; ty<output.height(); ty++) { for (unsigned int tx=0; tx<output.width(); tx++) { E sum = 0; for (unsigned int y=0; y<reduction; y++) { for (unsigned int x=0; x<reduction; x++) sum += getPixel (tx*reduction+x, ty*reduction+y); } output.setPixel (tx, ty, sum / (reduction*reduction)); } } return output; } If you removed the template references, this function is very similar to the thumbnail() method we designed in Prototype 1. This similarity to our very simple example means that we have a nice clean design. Let's contrast Prototype 3's simpler version of thumbnail() with that in Prototype 2 to highlight the differences: Prototype 2 apImageRep<T,E>* output = new apImageRep<T,E> (width()/reduction, height()/reduction); ... output->setPixel (tx, ty, sum / (reduction*reduction)); Prototype 3 apImage<T,E> output(width()/reduction, height()/reduction); ... output.setPixel (tx, ty, sum / (reduction*reduction)); The simple handle object in Prototype 2 meant our image processing routines had to access the computed images using pointers. We were able to access pixels in the current image using a normal method call, but access to a new image required access by means of the handle. In Prototype 3, access is consistent, regardless of which image we are trying to access. Summary of Lessons LearnedThese are the things that worked well:
Here is what did not work well:
|
 template<class T> apImage<T> apImage<T>::thumbnail (unsigned int reduction) const { apImage<T> output (width()/reduction, height()/reduction); for (unsigned int ty=0; ty<output.height(); ty++) { for (unsigned int tx=0; tx<output.width(); tx++) { T sum = 0; for (unsigned int y=0; y<reduction; y++) { for (unsigned int x=0; x<reduction; x++) sum += getPixel (tx*reduction+x, ty*reduction+y); } output.setPixel (tx, ty, sum / (reduction*reduction)); } } return output; }

EAN: 2147483647
Pages: 59