Having Linux Clients Utilize Windows File Shares
| | ||
| | ||
| | ||
Having Linux Clients Utilize Windows File Shares
Samba has been around for a while and it works well. As a general rule, client-side access to Windows file shares is well supported in Linux, as long as you use the command line. But if you want a user -friendly GUI, there are a few significant snags. Fortunately, we've sorted through the available options so that you don't have to.
There are two basic ways Linux clients can access Windows file shares. Some applications "speak" the Windows SMB protocol directly. Most such applications do so by using the libsmbclient library, which is part of the Samba suite. Examples of such applications include the Nautilus file manager, which is a standard part of the GNOME desktop we are using in Fedora.
The alternative is to take advantage of one of two drivers that add SMB file sharing capabilities directly to the Linux kernel. This approach allows applications to see files on a Windows file server as part of the Linux file system without any direct support for SMB in the application. The two SMB kernel drivers, both of which are included in Fedora Core 3, are known as smbfs and cifs . The smbfs driver works well with file shares offered by Windows NT and older versions of Windows, but it does not support SMB signing , a security mechanism designed to prevent nefarious types from potentially hijacking your SMB sessions. SMB signing was an optional step that could be added for protection with Windows NT shares and Windows 2000 shares. However, with Windows 2003 shares, SMB signing became mandatory by default, although SMB signing can still be turned off on the Windows 2003 server to loosen security. An additional overview of SMB signing and how to turn it on or off for various operating systems can be found by checking out MSKB 887429.
Fortunately, smbfs has been replaced by cifs , a driver that supports SMB signing and inter-operates with the latest versions of Windows in their default configurations. cifs is named for the "Common Internet File Sharing" initiative, an effort to create a standard file sharing protocol based on SMB. We mention both drivers because a variety of older file browsing applications for Linux still use smbfs "under the hood." That's why those applications have difficulty talking to Windows 2003 file servers.
We'll discuss the advantages and disadvantages of these two basic approaches in more detail as we go along.
We're almost ready to start taking advantage of SMB file sharing from our Linux client. But first, we'll need to improve our standard Linux user authentication by adding Kerberos to the mix. Without it, user-friendly Linux software has a great deal of trouble connecting to Windows 2003 Server shares.
Kerberos Authentication and Windows File Sharing
As discussed in Chapter 3, Kerberos is a standard for authenticating users and is built into Microsoft's Active Directory at a fundamental level. It's also used by Linux (and other operating systems).
Why Kerberos Authorization Will be Brilliant (and Standard) Eventually
Kerberos has one key advantage: when a user authenticates to a Kerberos-aware client, the Kerberos server verifies that the client is a valid "security principal" (in this case, a user). Then the server hands back a special temporary access key called a TGT (Ticket Granting Ticket) . The TGT can then be presented to obtain tickets to many different services during the user's session.
The client can present the TGT for entry to many different services offered by the server or by an entire Active Directory domain. For instance, it is not necessary to present usernames and passwords over and over when mounting different shares. The TGT allows the client to obtain valid tickets for entry to any of the "rides" in the Active Directory "theme park" for as long as the user is logged in. No more redundant password prompts! Exciting, isn't it?
The Bad News: It's Not Quite That Convenient Yet
As of this writing, in our tests with Fedora Core 3 and Windows 2003, GNOME desktop applications like Nautilus still prompt for a username and password each time you connect to a new share, even if Kerberos is used for logon authentication. However, if we don't use Kerberos authentication at all, connection to shares offered by Windows 2003 server fails altogether with an error message.
The Good News: This Problem Will be Short-Lived
What's the conclusion? It's in our short-term and long- term best interest to turn on Kerberos authentication now. Without it, Nautilus browsing of shares on Windows 2003 server does not work.
Experimental code for full Kerberos support in Nautilus is already appearing in the GNOME development process. When that version of Nautilus becomes part of the Fedora Core distributionpossibly even by the time this book is in your handsthe need for the redundant logons will disappear if you follow our advice and set up Kerberos authentication now.
How to Set Up Kerberos Authentication
We'll set up Kerberos authentication just as we did in Chapter 3 for the adldaplincli1 system. Follow these steps to enable Kerberos authentication on adlincli1 :
-
From the "Applications" menu, select System Settings
 Authentication.
 -
When the Authentication tool appears, click the "Authentication" tab.
-
Check the "Enable Kerberos Support" box.
-
Click "Configure Kerberos" to get the "Kerberos Settings" dialog box.
-
In the "Realm" field, enter AD.CORP.COM in ALL CAPS (as shown in Figure 4.3).
-
In the "KDCs" field, enter windc1.ad.corp.com .
-
In the "Admin Servers" field, enter windc1.ad.corp.com .
-
Click "OK" to exit the "Kerberos Settings" dialog box.
-
Click "OK" to exit the Authentication tool.
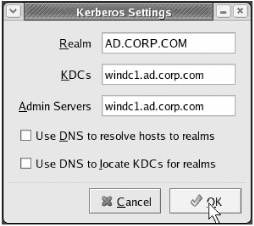
Figure 4.3: Enter the Active Directory NAME and the name of our Active Directory Domain Controller in the Kerberos Settings dialog in the Authentication tool.
Domain Logons and Kerberos Don't Quite Get Along
One more little snag. Recall that in the previous chapter when we configured Active Directory authentication using Winbind, the user was required to enter a logon name with a domain prefix, such as AD\winuser1 . Well, Linux Kerberos authentication doesn't understand logons where the username contains a domain prefix.
But this doesn't have to be a deal breaker for us. We'll tell Winbind to always use the name of the workstation's domain ( AD ) so the user doesn't need to provide one. This way, Kerberos can authenticate the user and Winbind can get details about the user.
| Warning | This works great if you just have one Active Directory domain. However, it breaks down a bit if you have multiple domains, because users will be unable to specify which Active Directory domain they want to log on to. This could be a major problem if you have roaming users who use computers in multiple domains to log in. With any luck, support for domain separator characters in usernames will improve throughout Linux in the future. |
We'll have to make one small change to /etc/samba/smb.conf . Edit that file with your preferred text editor and add the following line:
winbind use default domain = yes
If there is already a line that begins with " winbind use default domain ", be sure the setting after the equal sign is yes .
Restart Winbind with the following command, as root:
service winbind restart
Verifying Kerberos Authentication
How do we test it? Easy! Just log on as the Active Directory user salesperson1 , with the password p@ssw0rd .
If your logon fails, double-check that you
-
Entered the Kerberos realm name in ALL CAPS when you configured AuthConfig
-
Entered the KDC and admin server names correctly
If your logon still fails, check /var/log/messages for additional diagnostic information. If all went well, we're ready to move on to accessing SMB shares from our Linux desktop.
Testing Kerberos Authentication
As of this writing, the best-known application that takes advantage of Kerberos authentication at logon time is a command-line tool called smbclient . This tool is part of the Samba suite.
smbclient is similar to the old command-line FTP client. After you have completed the previous steps, go ahead and log in as salesperson1 . You can then experiment with the command smbclient //windc1/winshare1 -k , which will log into the share winshare1 on the windc1 server without prompting for a username and password.
Once connected, try the ls command to list files. Note that smbclient never prompts you for a username or password. Why? Because it's Kerberized and beautiful. Soon this single-sign-on capability will be standard in GNOME applications as well.
Using Windows File Shares
You can allow Linux clients to utilize Windows shares in two main ways.
Browsing When you need spur-of-the-moment access to a particular Windows share. This is where a GUI is most helpful.
Mounting Your best choice when you need a particular share to be available all the time. Not unlike the "map network drive" option in Windows, mounting an SMB share makes it visible in the Linux file system as a new subdirectory. The biggest advantage is that other Linux applications can use the share without any special code.
It is possible to mount a share automatically every time the Linux machine boots up or to mount a share every time a user logs in. This allows a user's home directory to reside on the Windows server. Like roaming profiles for Windows, this enables Linux client users to roam from workstation to workstation and see the same files and environment.
We'll explore some of the ways you can visit Windows-land from a Linux machine.
Quick Visits to Windows-Land: Browsing SMB Shares with Linux
Browsing SMB shares with Fedora Linux is easy enough now that we've done the grunt work of setting things up.
Pull down the "Applications" menu and select "Network Servers" to bring up a list of all network file servers the client can "see" on the network. For instance, you'll see stuff being shared via Windows-style SMB, and, once we set it up, stuff we export using NFS (described and implemented later). It can take a while to populate the network server windows, though, so be patient.
For now, double-click "Windows Network" to proceed to a list of available domains, which will be similar to the display shown in Figure 4.4. Now double-click the ad domain to browse the servers in our domain. This pops up another window listing those servers, also shown in Figure 4.4. Finally, double-click " WINDC1 " to list the shares available on our main Windows 2003 server.
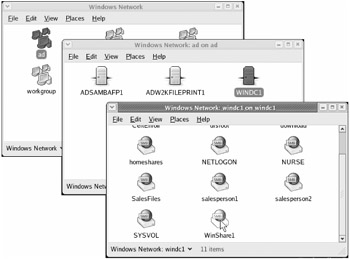
Figure 4.4: Browsing domains via the "Network Servers" window, then browsing our Active Directory domain, then browsing the available shares on WinDC1 .
Now we'll open up the share we created earlier in this chapter by double-clicking " WinShare1 ." As soon as we do that, we'll be prompted for our username, password, and domain name as shown in Figure 4.5. Enter salesperson1 , p@ssw0rd , and ad , respectively. Then check the "Save password in keyring" box. This allows Fedora to store your domain logon information in a special encrypted " keyring " file so that it can be automatically reused. Although this is not as convenient as using proper Kerberization, it will save us from entering credentials again the next time we browse the share.
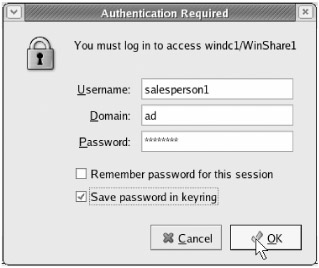
Figure 4.5: You can use the "Save password in keyring" option to avoid having to re-enter credentials for each share.
| Warning | The credentials in the keyring are not updated when users change their Active Directory passwords; the user must update the keyring credentials manually the next time the share is accessed following a password change. The client will prompt the user for the password again and give the user a new opportunity to save it in the keyring. |
When you're finished, click "OK." You will be prompted for, yes, another password (see Figure 4.6)! Now, don't screamnot too loudly, anyway. This password only has to be given once per session; it's used to control access to the keyring. Enter a password and click "OK." (We used p@ssw0rd in our tests.) A window opens displaying the files in the share.
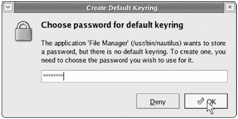
Figure 4.6: Users are asked to set a password for their individual keyring.
To demonstrate access to a file on the WinShare1 share, double-click " winfile1.txt ." This launches the standard GNOME text editor, gedit, but before we can read the file we'll have to answer one last security- related prompt.
gedit and the Nautilus file manager are two separate applications, and GNOME doesn't allow a new application to access passwords stored in your keyring until you grant permission to that application.
When you see the "Allow application access to keyring?" prompt, click "Always Allow" to add gedit to the list of programs that can use passwords saved in the keyring. At last you'll see the contents of winfile1.txt displayed in gedit, as shown in Figure 4.7.
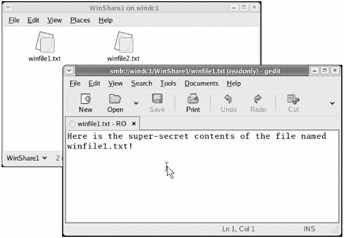
Figure 4.7: You can browse and open the file on Windows shares. This simple file opens with Linux's gedit.
Congratulations, we've been on safari in Windows land for SMB!
| |
Nautilus is a fine, general-purpose file manager that also happens to work with SMB shares. It's also smart enough to work with the requirement that shares on Windows 2003 use SMB signing by default.
The file manager for KDE, Konqueror, also handles SMB shares about as well as Nautilus.
In your travels , you might come across other utilities that promise the allure of browsing and mounting SMB shares. But beware: that tool might not be able to look within Windows 2003 shares if it depends on older tools that don't support SMB signing. The message you receive is hysterical: "SMB signing is mandatory and we have disabled it." It's specifically funny to me because I would expect them to say, "We don't have support for it" or, "We haven't enabled it." It sort of reminds me of that video game which declared "All your base are belong to us"but I digress. Regardless, most alternative SMB browsing tools won't work with Windows 2003 signed shares.
Here's a list of tools we tested . None are part of Fedora Core 3 installation, but you can download them and get them going in no timebut again, be aware of the limitations in browsing SMB-signed shares.
gnomba This application's homepage is the mightily sparse page at http://gnomba. sourceforge .net , but I was able to download a Fedora Core 2specific rpm for an easy install from http://dag.wieers.com/packages/gnomba/ . (Yes, I did say Fedora Core 2, but it installed and worked just fine.) It worked, and I could poke around, buuuut it couldn't show me any shares on Windows 2003 machines.
linneighborhood This application seems to have lost its support some time back. It's a shame, too; it's quite cute. The homepage for Linneighborhood is http://www.bnro.de/~schmidjo/ , but I was able to download a Fedora Core 3specific rpm for an easy install from http://dag.wieers.com/packages/linneighborhood/ . It worked and I could poke around, buuuut it couldn't show me any shares on Windows 2003 machines.
smb4k The homepage for smb4k is at http://smb4k.berlios.de/ , but I was able to download a Fedora Core 3specific rpm for an easy install from http://dag.wieers.com/packages/smb4k . The first time you run it at the command line takes a little while, and then a little green and blue computer icon appears next to the "Up2Date" exclamation in the upper right-hand corner. Just click it and it drops down to open. It worked and I could poke around, buuuut it couldn't show me any shares on Windows 2003 machines.
To summarize, these tools aren't prepared to talk with Windows 2003 shares that use the default of SMB signing. Nautilus is, however, so we continue to recommend that you use that. You could disable Windows 2003 SMB signing, but it's not recommended. With that in mind, stay away from these tools until you see that they explicitly support SMB signing.
| |
Automatically launching gedit is a fine solution for text files, but what if we needed to look at a different kind of file? Nautilus and other GNOME applications support SMB file sharing directly without actually " grafting " the share into the Linux file system, but non-GNOME applications won't necessarily understand what to do with one of their files on an SMB share.
We can work around this problem by copying files to the local drive, working with them there, and copying them back. For instance, it's not overly difficult to drag a Microsoft Word document from the "Windows Network" window to the desktop, double-click it there, edit it in OpenOffice, save it, and drag it back. But doing this kind of thing on a regular basis becomes aggravating. That's why it is often preferable to mount an SMB share to make it appear as part of the Linux file system. All applications can automatically use it, not just those that are GNOME-aware or otherwise speak SMB themselves .
Long-Term Stays in Windows-Land: Mounting SMB Shares with Linux
Browsing with Nautilus is a useful for learning what's out there and making the occasional quick visit, and for working with files that a GNOME application fully supports, it can be a complete solution. However, if you need to get to the same files on SMB shares over and over, especially when you want to use a non-GNOME application, you need a better plan.
Mounting an SMB Share
You want to "mount" the share so that it appears to be part of the local file system . This way, every application on the local workstation believes the file is local (and automatically understands how to work with it).
| Tip | This is analogous, sort of, to mapping a drive letter in Windows. Some Windows applications are smart enough to handle UNC paths, such as \\ server \ sharename , but even the most poorly designed Windows application can handle a mapped drive letter when opening and writing to files. In Linux, mounting an SMB share offers exactly the same benefits. The application doesn't need to know how to handle SMB shares in order to be useful. Just point the application toward the "mount point" that you're about to create, and you'll be in clover. |
It takes two pieces of information to mount a share:
-
The UNC path of the share. Thanks to our explorations with Nautilus, we already know that the share named WinShare1 is located on the server Windc1 . (Case is not really significant here, but we'll use the same uppercase and lowercase letters we saw while browsing.)
-
Where we want to mount the share locally. The Linux command-line utility mount can " graft " the share into the file system using an empty folder as a mount point.
Let's mount the Windc1\WinShare1 share onto our salesperson1 's desktop. That allows us to marry the convenience of desktop access with the power of a mount from the command line.
The mount command is actually the same utility that Linux uses to mount all types of file systems, including CD-ROM drives, flash media, even stuff located elsewhere on the local hard drives . The general syntax for mount is
mount -t <filesystem type you are mounting> <what you want to mount> <where you want to mount it>
But first things first: Let's create a folder on our desktop where we can mount the share. We'll place the mount point at /home/AD/salesperson1/Desktop/WinShare1 . The mount command requires an existing, empty directory, so we'll first create this directory with the mkdir command as follows :
mkdir /home/AD/salesperson1/Desktop/WinShare1/
Now that we have the directory prepared, we're ready to formulate the mount command and provide it the key things it needs to know:
-
The -t option tells mount what type of file system we want to work with. As discussed earlier, we should use the cifs driver to talk to Windows 2003 servers, so we'll give cifs as the value for the -t option.
-
We'll also need to specify the full name of the share. This is done much the same as on a Windows system, except that the usual Unix slash (/) character is used in place of the Windows backslash character (\). The full name of the share is //Windc1/WinShare1 .
-
SMB file systems require logon credentials. Local and NFS file systems don't, so we need to pass some extra options to the mount command that most file systems wouldn't require. The -o option allows us to pass a series of additional options through mount, directly to the mount.cifs program that does the dirty work. We'll use this feature to pass the Windows username by providing user=salesperson1 as the value for the -o option. We could also supply the password by adding a comma and pass=p@ssw0rd after the user information, but because it's a best practice to avoid putting passwords on the command line, we'll leave off the password and allow mount to ask us for it.
| Warning | Why do we avoid placing passwords on the command line? Because Linux is a multiuser operating system. All users have access to the process table (via the ps -aux command), which lists the commands that are currently running. If another user happened to spot our command while it was executing, they would learn our SMB password! Because you may use your Linux system in a multiuser fashion somewhere down the road, it's best to stick to the most secure practices. |
At the terminal prompt, as the root user , enter the following command:
mount -t cifs //Windc1/WinShare1 /home/AD/salesperson1/Desktop/WinShare1/ -o user=salesperson1
You will be prompted for salesperson1 's password. Enter p@ssw0rd and press Enter.
You should be returned to the prompt with no further output. If you do receive an error message, double-check that you created the directory with the mkdir command and that the username and share name arguments are correct. (Make sure you used the Unix slash and not the Windows backslash!)
Now that we have a mapped share, how do we take advantage of it? We already have! Just take a look at your desktop and double-click the " WinShare1 " folder. Inside, you'll find winfile1.txt waiting for you. Additionally, you can also open this file from any Linux application that browses for files, such as OpenOffice (as we'll explore in Chapter 9). This is the key advantage of mounting shares instead of just browsing them.
Unmounting a Share
If you want to stop accessing the share, you can unmount a share using the umount command (yes, the command is umount , not unmount ). As root, you'd enter the following command:
umount /home/AD/salesperson1/Desktop/WinShare1/
However, an annoying quirk of the GNOME desktop may prevent you from unmounting the share. Since folders within the desktop are generally kept open internally by Nautilus, you will probably receive a "Device is busy" error if you try this command, although the share will still unmount properly when you shut down the workstation. If this behavior bothers you, you might prefer to use a mount point that is not inside the Desktop folder.
Buying a Condo in Windows-Land: Mounting SMB Shares at Boot Time
You've seen how to graft an SMB/CIFS share into the Linux directory structure. What if we wanted to make a Windows SMB share visible to all users who logged on to our Linux machine every time we boot the machine? For example, perhaps we have a share containing read-only files that all company employees should seeemployee manuals in PDF format, for instance. Wouldn't it be nice to have this material visible in a standardized place (say, /mnt/<smb_sharename> ) so that all users could get to it easily?
To do this, we'll tell Linux to mount the SMB share at boot time, and voil ! All users will be able to see the share.
Linux file systems are automatically mounted when you boot your workstation via a configuration text file called /etc/fstab , which lists all of the file systems with their mount points and mount options. However, /etc/fstab isn't a great choice for SMB. That's because mounting an SMB share requires a password, and /etc/fstab is readable by all users on the workstation. We need to exercise some restraint in handling the password.
So how can we set up the share to be mounted automatically? Well, we already know the Bash shell commands for mounting a share. With just two additional commands, we can mount the share without ever putting the password on the command line of a program or typing it at a prompt. Once you know how to do that, we can turn those four commands into a Bash "shell script," a simple program much like a Windows .BAT batch file. By tying that script into the sequence of things that happen when the computer boots up, we can automatically mount our share on every boot.
The mount.cifs "back end" supports an alternative way of providing the password. By setting the PASSWD "environment variable," which is visible only to the shell script we're writing, we can provide mount.cifs with the password without using the command line or answering a prompt. Bash supports setting environment variables just like Windows .BAT batch files dobut the syntax is a little bit different. First, we set the variable with a simple variablename=value command. Then we must "export" the variable with export variablename . This makes the variable visible in the environment for commands, like mount , that we launch from Bash. Finally, we run mount in the usual way, and no password prompt is needed.
These four commands, when given as root, will do the job:
PASSWD=p@ssw0rd export PASSWD mkdir -p /mnt/WinShare1/ mount -t cifs //Windc1/WinShare1 /mnt/WinShare1/ -o user=salesperson1
| Note | In our example, we mount the share with the privileges of the salesperson1 user. That's fine for a demonstration, but in a production environment you should use a Windows user created just for this purpose. That user should have no other unnecessary privileges and a password that doesn't change or expire. |
After executing these commands, the contents of WinShare1 are visible at /mnt/WinShare1/ . You can verify this with the ls command, which will list the files present in WinShare1 :
ls /mnt/WinShare1/
We have the commands we need to do the job. Now all we need to do is turn them into a Bash shell script. A shell script is nothing more than a series of shell commands, one per lineyou already know how to write one! The only things you need to do differently are
-
The first line must be #!/bin/sh . This tells Linux what program to use to interpret the rest of the commands in the file. For Bash, we traditionally use /bin/sh , which is the name of the original Unix sh shell that Bash imitates and replaces . You can also put #!/bin/bash here if you prefer.
-
After you create the file, you need to make it executable with the chmod command. In this case, because the file contains a password, we don't want anyone except root to be able to read it.
We're ready to create our shell script! With your preferred text editor, create the file /usr/local/sbin/mountwinshare and type the following:
#!/bin/sh PASSWD=p@ssw0rd export PASSWD mkdir -p /mnt/WinShare1/ mount -t cifs //Windc1/WinShare1 /mnt/WinShare1/ -o user=salesperson1
Now we'll use the chmod command to deny all access, except for execution by root. Of course, root can always read and write a file, but it never hurts to be thorough.
chmod a-rwx,o+x /usr/local/sbin/mountwinshare
Finally, make sure the file belongs to root using the chown command:
chown root /usr/local/sbin/mountwinshare
At this point, typing /usr/local/sbin/mountwinshare as root should mount the share at /mnt/winshare1 without the need for any password entry on your part. However, we still haven't tied it into the startup sequence for when your Linux machine reboots.
Linux has a powerful and complex system for deciding what happens at boot time and in what order. Fortunately, we don't need to understand it thoroughly to add one little command! The file /etc/rc.d/rc.local is a shell script in its own right, and it is there for your benefit. Fedora runs it last, after everything else that must happen at boot time.
All we need to do is add one command to the end of /etc/rc.d/rc.local :
/usr/local/sbin/mountwinshare
That's it! Try rebooting the adlincli1 workstation. Log into the desktop as any user you wish, then feel free to use the Nautilus desktop file manager or the ls command at the command line to verify that you can see the contents of the share at /mnt/winshare1 .
| |
We've shown how to mount a share from the command line as needed. And we've shown how to mount a share at boot time. But you'll note that we haven't yet shown how to mount a share each time the user logs on. In particular, we haven't shown how to mount a Linux user's home directory from a Windows file server.
Alas, there are sound reasons for that. Is it possible? Barely, but we can't recommend it, at least not at this time. However, we'll point out areas where improvements are coming quickly and will likely fill this gap in the near future.
Why can't we mount shares automatically when users log on? After all, Windows clients can easily mount "home drives" and other mapped drives configured for that user. Well, there are two ways that can be done under the hood. Let's look at why Linux options that attempt to cover both of those methods don't quite stand up to serious use at this time. We'll also point out the most effective alternatives available at this time.
The First Method: Mount a smb/cifs Share Re-Using the Linux User's Logon Credentials This is how Windows NT 4 does it. The user's logon information is first presented for authentication and then presented again to file servers to map drives. There is an implementation of this for Linux called pam_mount , and it works by plugging in an additional PAM module, like the pam_mkhomedir module we configured in Chapter 3. Because it is part of the Pluggable Authentication Module system, pam_mount can see the user's credentials and reuse them to mount shares. Unfortunately, in our tests, we were unable to make pam_mount a happy and stable part of the Fedora environment. While we were able to configure it to mount drives in our tests, we could not reliably convince Fedora to unmount drives when logging out of sessions. An unrelated problem with the current version of the cifs file system prevents the mounting of two shares from the same server as two different users. So a second Linux user can't log on and get to his home share on Windows, even after the first logs out. Equally bad, when logging in via the regular Fedora desktop, we were prompted twice for the password exactly the thing we wanted to avoid by installing pam_mount ! To try to get this to work, we went the extra mile and installed it from source code, but it still couldn't do the job. In general, the PAM subsystem needs more tender loving care from the Linux community before this method can be relied on. If you're interested in experimenting, you can find more information about pam_mount at: www.flyn.org/projects/pam_mount/
The Second Method: Kerberos Authorization We've set up Kerberos authentication on our Linux clients, so we ought to be able to mount Windows shares without a password prompt, right? Every Windows 2000 and 2003 server uses Kerberos, right? Absolutely right! Unfortunately, the cifs file system driver has not yet been Kerberized. This is particularly unfortunate in the short term, because it would otherwise offer a very simple solution to the problem. For the long term, though, we've verified that Kerberos authentication does eliminate the need for a password in the Samba suite's smbclient tool, a simple command-line application similar to an FTP client. We saw this earlier in the "Testing Kerberos Authorization" section. This is small consolation today, as it doesn't yield a particularly practical solution. However, it does show that Samba has all of the necessary pieces of plumbing just waiting to be put together. All that is required is for Kerberos to be integrated into Samba's cifs file system driver so that mount-t cifs can work without a password. This should lead quickly to a clean and elegant solution. As of today, however, the pieces haven't been put together yet.
The Icing on the Cake: Symbolic Links Don't Work Both the GNOME and the KDE desktop environments like to create symbolic links from the user's home directory to places outside of it. In theory, cifs can represent symbolic links even though Microsoft's file systems don't use them. In practice, support for symbolic links is very limited and they cannot "point" outside of the share, so both of the major desktop environments will refuse to run properly when the user's Linux home directory is an SMB share.
As of Today: the Best Workaround Available We've seen that the GNOME desktop does support Samba. And the GNOME keyring system means that, in practice, users won't need to provide credentials to their Windows shares every time, although it is not as clean as Kerberization would be. As we've pointed out, GNOME will soon be fully Kerberized. When that happens, "single sign-on" to Windows shares will be a reality, at least for GNOME-enabled applications. This is expected to happen soon.
But stay tuned . We can make a unified home drive (for Linux, home directory) for both Linux and Windows clients, it's simply going to take a little elbow grease with NFS. That's coming up a little later in the "Leveraging NFS on Your Servers" section.
| |
| | ||
| | ||
| | ||
EAN: N/A
Pages: 71