Samba as a PDC: File Sharing, Roaming Profiles
| | ||
| | ||
| | ||
In Chapter 2, we learned how to create a Linux-based PDC. When we did this, it created our own NT 4-style domain named CORP. Our Linux Samba PDC, linserv1 , provides authentication services to unmodified Windows clients . linserv1 also authenticates Linux clients via LDAP.
In this section, you'll see how the same Linux server can also offer file shares, including "home drives " and roaming profiles, to Windows users. We'll set this up using Samba's SMB file sharing support. Later in this chapter, we'll show you how to provide equivalent file access to Linux users via NFS. In this scenario, Windows servers are out of the picture for both file sharing and authentication.
Figure 4.8 shows how we'll use Samba to share files and home directories to both our user accounts which reside on the Samba PDC. These users can log on to either a Windows or Linux client and get to the same files.
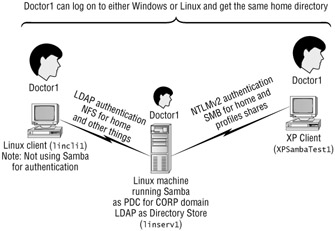
Figure 4.8: Linux and Windows client computers can authenticate to Samba as a PDC and share files.
Sharing Folders with Samba
Since Samba's smbd server process is already up and running and providing authentication services on linserv1 for the CORP domain, adding SMB shares is a snap. All it takes is a few clicks in our favorite administration tool, Webmin. But first, we'll need to create something to share.
Our Linux server, linserv1 , has two groups of users in its LDAP database: doctors and nurses . If you chose not to complete the LDAP exercises in Chapter 2, be sure to create the local users and groups shown in the following table:
| User | Primary Group |
|---|---|
| doctor1 | doctors |
| doctor2 | doctors |
| nurse1 | nurses |
| nurse2 | nurses |
| Tip | See "Using Webmin to Manage OpenLDAP Server Graphically" in Chapter 2 to ensure you created the appropriate user and group accounts. |
Let's assume we have a need to make certain files available to everyone who relates to these two groups. We want nurses to see nursing files. We want doctors to see doctoring files.
We'll create directories for each of these groups with the following simple commands, all but two of which you've seen before. Be sure to execute these as root:
mkdir /doctorfiles echo "It worked" > /doctorfiles/test.txt chgrp -R doctors /doctorfiles chmod a+r,g+rw /doctorfiles mkdir /nursefiles echo "It worked" > /nursefiles/test.txt chgrp -R nurses /nursefiles chmod a+r,g+rw /nursefiles
We now have directories called /doctorfiles and /nursefiles that are writable by all doctors and all nurses, respectively, and readable by everyone. Now we'll demonstrate how to share them using Samba. To access the "Create File Share" page, follow these steps:
-
Log into Webmin as usual.
-
Click the "Servers" button.
-
On the "Servers" page, click the "Samba Windows File Sharing" button.
-
On the "Samba Windows File Sharing" page, click "Create a New File Share."
-
The "Create File Share" page appears, as shown in Figure 4.9.
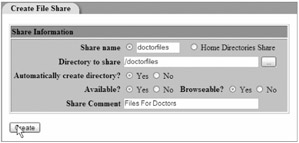
Figure 4.9: You can use Webmin to create a Samba share.
The Create File Share page prompts us for information about the new share. Let's create our share for doctorfiles . The entries we place here are seen in Figure 4.9.
Share name This is the label that users see when browsing. Enter doctorfiles here.
Directory to share This is the directory we are going to share. In our case, we're sharing right off the root (/). Enter /doctorfiles here.
Automatically create directory? If the directory doesn't exist, Webmin can automatically create it for us. Since we've already created it manually, selecting "Yes" here has no effect.
Available? This is useful if we wish to create a share without enabling it right away. Select "Yes" here to make the share immediately available.
Browseable? This determines whether users can see the share when browsing the available shares on the server. Not advertising a share doesn't provide real security, but it can help to keep clueless users from trying to access unauthorized files. We will advertise this share. Select "Yes" here.
Share Comment This is a comment that's displayed when the share is browsed. Enter Files for Doctors here, and then click "Create."
The main "Samba Windows File Sharing" page now reappears, featuring our new share in the list of existing shares. To create our second share, click "Create a new file share" again and repeat the preceding steps, substituting nurse for doctor in every case.
That's it! Nothing left to do but try it out. Return to the Windows XP client that you joined to the Samba-based CORP domain in Chapter 2 (in our examples and our diagram in 4.8, we're calling it XPSambaTest1).
Log in as doctor1 . The account will be validated by the Samba server. Then follow the steps covered earlier in this chapter in the "Having Windows Clients Utilize Windows File Shares" section, browsing the CORP domain instead of the AD domain. You'll be able to access the doctorfiles share and read and write the file test.txt in the doctorfiles share. If you log in as nurse1 , you'll find that you can read the file but can't write to it. That's because we created the file to be readable by everyone but writable only by members of the doctors group.
Sharing Home Drives and Roaming Profiles with Samba
Now that you understand the basics of creating SMB shares with Samba, it's time to move on to more exciting stuff! Windows NT file sharing offers the potential for users to have roaming profiles and network home drives.
Roaming profiles Allow users to hop from Windows machine to Windows machine and see their desktop and such on each machine.
Home drives Allow users to plunk down files that belong only to them and put them on a network share.
| Tip | I cover roaming profiles and best practices therein in my book Group Policy, Profiles and IntelliMirror for Windows 2003, Windows XP, and Windows 2000 (Sybex, 2004). Come to www.GPanswers.com for help on this subject in a pure Windows environment. |
We'll set these up now. Ideally, you'll want to isolate your users' home drives and profile shares such that a user cannot poke around inside their profile. The goal is to hide the profile out of plain sight where confused users won't stomp on the files inside. We'll take care of that chore in the next section.
Home Drives with Samba
Samba offers a convenient way to set up home drive shares on a per-user basis. Normally, when we create a share with a particular name, such as salesstuff , Samba expects us to also specify the name of the directory to be shared. However, when a share specifically named homes is present in the /etc/samba/smb.conf file, special behavior is activated in Samba. When a user named doctor1 attempts to mount a share called doctor1 , Samba automatically connects that share to the Linux home directory of doctor1 . On linserv1 , that directory is /home/doctor1 . Presto, instant home drive! As you'll see later in this chapter, when doctor1 logs in from a Linux client, she'll see exactly the same files via NFS. Cross-platform nirvana!
So how do we set it up? Well, remember that "Home Directories Share" radio box we didn't use in Figure 4.9? It's time to go back and take advantage of it:
-
Log into Webmin.
-
Access the "Create File Share" page as described earlier.
-
Select the "Home Directories Share" radio box.
-
Leave the "Share name" and "Directory to share" fields empty .
-
Leave "Automatically create directory" set to "Yes."
-
Make sure "Available?" is set to "Yes."
-
Make sure "Browseable?" is set to "Yes."
-
Enter Home Directory in the "Share Comment" field.
-
Click "Create."
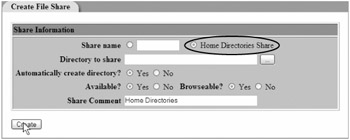
Figure 4.10: Creating home directory shares with Webmin
Roaming Profiles with Samba
At this point, we could log right into our XP workstation as, say, doctor1 and take advantage of our home drive, which Samba automatically mounts as drive Z by default. Typically, however, administrators assign alternate drive letters , such as H in lieu of Z.
If this interests you, you can change the drive letter by setting the logon drive option in /etc/samba/smb.conf to a specific drive letter, like this:
logon drive = H:
However, we're going to wait on that a bit. If we log in now, our roaming profile will be created as a subdirectory of our home drive, called profile , which puts it right where the average user can see it. Unfortunately, when some users see a folder they don't recognize, their first impulse is to delete it! A better solution is to place the profile in a separate share, which is not mounted with a drive letter, where the user won't casually stumble across it.
Creating the Roaming Profiles Share
How do we pull off this stunt ? By adding a profile share. All we need to do is follow the usual steps, except that we won't make this share browseable. This makes it highly unlikely that any user will stumble across their own profile and delete it. Of course, we use Linux file permissions to prevent them from tampering with anyone else's profile at all.
To make the share, just do the following:
-
Log into Webmin.
-
Access the "Create File Share" page, as described earlier.
-
Enter profile in the "Share name" field and make sure the radio box to the left of it is selected.
-
Enter /profiles in the "Directory to share" field.
-
Leave "Automatically create directory?" set to "Yes."
-
Make sure "Available?" is set to "Yes."
-
This time, make sure "Browseable?" is set to "No."
-
Enter Profiles in the "Share Comment" field.
-
Click "Create."
Telling Clients to Use the Profiles Share
Now we have a share to store roaming profiles in. But how do Windows clients know to store their profiles there and not on the home drive? When a user logs into a Windows PDC, the PDC tells the client where the profile can be found. The great news is that Samba fully supports this. The mildly annoying news is that Webmin doesn't provide us with a convenient place to set the "hint" for the client. However, we can easily do it by changing one line of /etc/samba/smb.conf by hand.
The Samba configuration file offers an option called logon path . This option is used to tell every Windows client that logs on to the PDC where their roaming profile can be found. There's just one problem: a separate roaming profile directory is needed for every user. Fortunately, Samba allows us to use the special variable %U to represent the name of the user who is logging on . This means that we can specify \\linserv1\profile\%U as the logon path, automatically storing profiles in the correct place for each user.
Edit /etc/samba/smb.conf with your preferred text editor and add the following line. Please note that if an existing setting for the logon path option exists, you should change the logon path setting to this one:
logon path = \linserv1\profile\%U
To activate this change, we'll need to restart the Samba smbd process as root with the service command:
service smb restart
Are we ready to go? Not quite yet! One hurdle remains. Don't worry, we'll clear it, with room to spare.
Creating User Subdirectories in the Profiles Share
At this point, we have a profiles share on our Samba server and users logging in to the Samba-based CORP domain can find it, but there is one little problem. We need a subdirectory in that share for each and every user. We also need those subdirectories to have the right permissions so that only the correct user can modify them.
Wouldn't it be nice if account administration tools on Linux made the profiles directory for us? Alas, they don't. That's because Linux doesn't have separate concepts of home drives and user profiles.
| Note | Why doesn't Linux have separately stored user profile directories? Because instead, Linux has "dotfiles." Filenames that begin with a period, such as .bashrc , are not listed by the ls command unless a special -a option is used to show all files. GUI-based file browsers for Linux also tend to respect this convention. Such files are typically used to hold user configuration information, analogous to a Windows user profile, in such a way that clueless users are not tempted to delete it. |
To do the job right, all we need is a simple tool that regularly checks for users who don't have a subdirectory in /profiles . Then that tool just creates the missing subdirectory. We've written exactly that tool for you as a simple script in the Perl programming language. This isn't a programming book, so if you're not a programmer don't fret. We're not going to expect you to know anything about it; we're just giving you this script for your use.
We won't go line by line through makeprofiles.pl . As we mentioned in Chapter 2, teaching Perl is well beyond the scope of this book. Consider makeprofiles.pl a "ready-to-run" application like any other we use in this book. Because it's quite short, however, we'll present the full listing at the end of this section in Listing 4.1. You can also pick up a fully commented copy from our website at www.winlinanswers.com . Just look for the makeprofiles.pl script.
| |
Perl has come up earlier in the book, but we haven't had an opportunity to tell you why it comes in handy for jobs like this and why, as a Linux system administrator, you might want to pick up a good book on Perl and master the basics.
The executive summary is this: Perl has all of the good features of the Bash shell and most other Unix command-line tools, easily accessible as part of a single programming language. Some people consider Perl unfriendly because it is possible to write ugly, unmaintainable Perl codebut that's true in most languages. It is also very possible to write simple, elegant Perl scripts that do exactly what we want, in a hurry. Our makeprofiles.pl script is a good example of that. (But not a modest one, apparently.)
| |
Once you have downloaded or typed the script, mark it as executable by the owner (root), so that Linux knows it is a program to be run:
chmod o+x /usr/local/sbin/makeprofiles.pl
Now we'll need to create profiles for the first time. Just execute this command to create our profile subdirectories:
/usr/local/sbin/makeprofiles.pl
If all goes well, you will see no output. No output is good, since when we have this job running automatically, any output that would normally go to the screen will be emailed to us automatically. No errors = no emails, and that's a good thing. If you receive error messages, verify that you typed or downloaded the script correctly, then try again.
Once you have run the script successfully, you can use the ls -l command to verify that profile subdirectories for individual users were created:
ls -l /profiles
The output should include the following, among other lines for users we're not concerned with:
drwx------ 2 doctor1 doctors 4096 Feb 16 00:58 doctor1 drwx------ 2 doctor2 doctors 4096 Feb 16 12:52 doctor2 drwx------ 2 nurse1 nurses 4096 Feb 16 12:53 nurse1 drwx------ 2 nurse2 nurses 4096 Feb 16 12:54 nurse2
We don't need to discuss every aspect of ls -l output here, but note the third and fourth columns . These are the names of the user and group that own each directory. Note that makeprofiles.pl correctly created the directories as the property of the appropriate users and their default groups. Also, take a look at the first column:
drwx------
Here's how this breaks down:
-
The first character, d , means we're looking at a directory rather than a file.
-
The next three characters represent the r ead, w rite, and e x ecute permissions for the owner of the directory rwx means that the owner has full control over the directory.
-
The next three characters represent the permissions for the group that owns the directory. Dashes mean the group has no rights here, which is correct: no one but doctor1 should be able to alter her profile.
-
The last three characters represent permissions for all other users, who of course should have no rights here either.
We now have profile directories that are ready to use. But what happens when we create new users in the future? How will they get profile subdirectories? Easy! We'll just schedule a cron job to run once an hour , creating folders for users who don't already have them. For complete information about how to do this, see the "Scheduling Tasks with cron " sidebar next. Here's the crontab entry you'll need:
0 * * * * perl /usr/local/sbin/makeprofiles.pl
| Warning | If your system has thousands of users, running this script every hour may be impractical . You may find the performance impact more acceptable if you run it once a day. Just replace the " * " in the second position with a 0, and the script will run at zero hours and zero minutes (midnight) every day. If you have very large numbers of users, you'll want to consider modifying the "LDAP Users and Groups" Webmin module to make profile directories as users are added. This avoids the need to scan the entire user database for users who still need a profile directory. Easier said than done, but if you're a programmer, the world is your oyster. |
| |
The cron service allows each user to specify jobs to be run at various times of day, days of the week, and so on. You can set this up by first fetching a listing of any existing cron jobs for the user root:
crontab -l > /tmp/jobs.root
The crontab -l command outputs a list of the scheduled jobs for the current user, and the > character indicates that the output should be written to the filename that follows rather than to the terminal window. /tmp , the temporary folder, is a good place for files we won't be needing permanently, particularly if they do not contain secure information. When running commands as root it is always a good idea to be careful not to overwrite existing files in whatever the current working directory may be.
Next, edit the file /tmp/jobs.root with your favorite text editor and add the following line at the end:
0 * * * * perl /usr/local/sbin/makeprofiles.pl
The last part is the command we want to execute every hour. But what about the zero and the asterisks ? Those * characters occupy each of the following places: minutes, hours, days of the month, months of the year, and days of the week. Leaving an * rather than specifying a number indicates that the job should be run every time. For instance, 30 2 * 2 * executes a job at 2:30 in the morning every Tuesday. With five * characters, a job is run once per minute, all day, every day. In this case, we've configured cron to run our command at the top of the hour (zero minutes after the hour), every hour of every day.
Finally, submit the file as the new crontab file for the user root using the following command:
crontab /tmp/jobs.root
| |
Logging onto Our New Home Drive and Roaming Profile
That's it! Just sit down at the XP workstation you joined to the corp domain (in our examples XPSambaTest1) and log on as doctor1 . You'll discover an H: drive, which is your new home drive and contains the same files regardless of which workstation you log into. You'll also discover that your profile (containing desktop settings and other personal registry items) follows you from workstation to workstation.
| |
#!/usr/bin/perl -w my $line; mkdir("/profiles/", 0755); open(USERS, "/usr/bin/getent passwd"); while ($line = <USERS>) { my ($name, $password, $uid, $gid) = split(/\:/, $line); if ($name !~ /^[\w\ \-\+]+$/) { next; } if (-e "/profiles/$name") { next; } if (($uid =~ /^\d+$/) && ($gid =~ /^\d+$/)) { mkdir("/profiles/$name", 0700); chown($uid, $gid, "/profiles/$name"); } } close(USERS); | |
| |
One way of using the material in this section would be to walk away from Active Directory and have nothing but NT 4 functionality on a Linux Samba Server. Again, a Samba 3 server can only act like an NT 4 PDC, not an Active Directory server.
Because of this, the crown jewel of Active Directory (in my opinion) is lost if you walk away from Active Directory and "downgrade" to a pure Samba domain acting as an NT 4 domain. That crown jewel is Group Policy.
You might be familiar with my Sybex book Group Policy, Profiles and IntelliMirror for Windows 2003, Windows XP, and Windows 2000 (2004), which covers the ins and outs of Group Policy, troubleshooting, and more. You can check it out at www.GPanswers.com (hope you don't mind the little commercial). That aside, Group Policy is a super-powerful tool to help you centrally control many aspects of your Windows client and server environment, including desktop settings, software deployment, security, and a lot more.
However, one adventurous company, Nitrobit is making an interesting promise: Group Policy for Samba where there is no Active Directory. The idea is that you set up your Samba server with an OpenLDAP back end (just as we did in the last chapter) and Group Policy Objects are stored inside OpenLDAP and downloaded by Windows 2000, Windows 2003, and Windows XP clients.
Of course, adding Nitrobit doesn't get you a lot of the other major Active Directory features such as pure Kerberos authentication, delegation of control, a full PKI, Remote Installation Services, a full LDAP directory that is extensible, and more and more and more.
Again, if you're sticking with Active Directory as your main source for authentication, this product won't do you much good. However, if you're planning on ditching Active Directory in lieu of Samba and OpenLDAP, and want to keep delivering Group Policy to your clients, then check out www.nitrobit.com .
| |
| | ||
| | ||
| | ||
EAN: N/A
Pages: 71
- The Four Keys to Lean Six Sigma
- Key #1: Delight Your Customers with Speed and Quality
- Key #3: Work Together for Maximum Gain
- Making Improvements That Last: An Illustrated Guide to DMAIC and the Lean Six Sigma Toolkit
- The Experience of Making Improvements: What Its Like to Work on Lean Six Sigma Projects