Displaying Images
 | |||||||||||
| Chapter 19 - Graphics with GDI+ | |
| bySimon Robinsonet al. | |
| Wrox Press 2002 | |
One of the most common things you may want to do with GDI+ is display an image that already exists in a file. This is actually a lot simpler than drawing your own user interface, because the image is already pre-drawn. Effectively, all you have to do is load the file and instruct GDI+ to display it. The image can be a simple line drawing, an icon, or a complex image such as a photograph. It's also possible to perform some manipulations on the image, such as stretching it or rotating it, and you can choose to display only a portion of it.
In this section, just for a change, we'll present the sample first. Then we'll discuss some of the issues you need to be aware of when displaying images. We can do this, because the code needed to display an image really is so simple.
The class we need is the .NET base class, System.Drawing.Image . An instance of Image represents one image if you like, one picture. Reading in an image takes one line of code:
Image myImage = Image.FromFile("FileName"); FromFile() is a static member of Image and is the usual way of instantiating an image. The file can be any of the commonly-supported graphics file formats, including .bmp , .jpg , .gif , and .png .
Displaying an image is also very simple, assuming you have a suitable Graphics instance to hand a simple call to either Graphics.DrawImageUnscaled() or Graphics.DrawImage() will suffice. There are quite a few overloads of these methods , allowing you a lot of flexibility in the information you supply in terms of where the image is located and how big it is to be drawn. But we will use DrawImage() , like this:
dc.DrawImage(myImage, points); In this line of code, dc is assumed to be a Graphics instance, while myImage is the Image to be displayed. points is an array of Point structs, where points[0] , points[1] , and points[2] are the coordinates of top left, top right, and bottom left corner of the image.
Images are probably the area in which developers familiar with GDI will notice the biggest difference with GDI+. In GDI, displaying an image involved several nontrivial steps. If the image was a bitmap, loading it was reasonably simple, but if it was any other file type, loading it would involve a sequence of calls to OLE objects. Actually getting a loaded image onto the screen involved getting a handle to it, selecting it into a memory device context, then performing a block transfer between device contexts. Although the device contexts and handles are still there behind the scenes, and will be needed if you want to start doing sophisticated editing of the images from your code, simple tasks have now been extremely well wrapped up in the GDI+ object model.
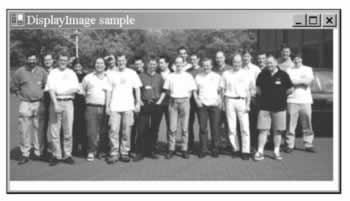
We'll illustrate the process of displaying an image with an example called DisplayImage . The example simply displays a .jpg file in the application's main window. To keep things simple, the path of the .jpg file is hard coded into the application (so if you run the example you'll need to change it to reflect the location of the file in your system). The .jpg file we'll display is a group photograph of attendees from a recent COMFest event.
COMFest (www.comfest.co.uk) is an informal group of developers in the UK who meet to discuss the latest technologies and swap ideas. The picture includes all the attendees at COMFest 4, except for the author of this chapter who was (conveniently) taking the picture!
As usual for this chapter, the DisplayImage project is a standard C# Visual Studio .NET-generated Windows application. We add the following fields to our Form1 class:
Image piccy; private Point [] piccyBounds;
We then load the file in the Form1() constructor:
public Form1() { InitializeComponent(); piccy = Image.FromFile(@"C:\ProCSharp\GdiPlus\Images\CF4Group.bmp"); this.AutoScrollMinSize = piccy.Size; piccyBounds = new Point[3]; piccyBounds[0] = new Point(0,0); // top left piccyBounds[1] = new Point(piccy.Width,0); // top right piccyBounds[2] = new Point(0,piccy.Height); // bottom left }
Note that the size in pixels of the image is obtained as its Size property, which we use to set the document area. We also set up the piccyBounds array, which is used to identify the position of the image on the screen. We have chosen the coordinates of the three corners to draw the image in its actual size and shape here, but if we'd wanted the image to be resized, stretched , or even sheared into a non-rectangular parallelogram, we could do so simply by changing the values of the Point s in the piccyBounds array.
The image is displayed in the OnPaint() override:
protected override void OnPaint(PaintEventArgs e) { base.OnPaint(e); Graphics dc = e.Graphics; dc.ScaleTransform(1.0f, 1.0f); dc.TranslateTransform(this.AutoScrollPosition.X, this.AutoScrollPosition.Y); dc.DrawImage(piccy, piccyBounds); }
Finally, we'll take particular note of the modification made to the code wizard-generated Form1.Dispose() method:
protected override void Dispose(bool disposing) { piccy.Dispose(); if(disposing) { if (components != null) { components.Dispose(); } } base.Dispose(disposing); } Disposing of the image as soon as possible when it's no longer needed is important, because images generally eat a lot of memory while in use. After Image.Dispose() has been called the Image instance no longer refers to any actual image, and so can no longer be displayed (unless you load a new image).
Running this code produces these results:
Issues When Manipulating Images
Although displaying images is very simple, it still pays to have some understanding what's going on behind the scenes.
The most important point to understand about images is that they are always rectangular. That's not just a convenience, but because of the underlying technology. It's because all modern graphics cards have hardware built-in that can very efficiently copy blocks of pixels from one area of memory to another area of memory, provided that the block of pixels represents a rectangular region. This hardware-accelerated operation can occur virtually as one single operation, and as such is extremely fast. Indeed, it is the key to modern high-performance graphics. This operation is known as a bitmap block transfer (or BitBlt ). Graphics.DrawImageUnscaled() internally uses a BitBlt , which is why you can see a huge image, perhaps containing as many as a million pixels, appearing almost instantly. If the computer had to copy the image to the screen individually pixel by pixel, you'd see the image gradually being drawn over a period of up to several seconds.
BitBlt s are very efficient; therefore almost all drawing and manipulation of images is carried out using them. Even some editing of images will be done by BitBlt ing portions of images between DCs that represent areas of memory. In the days of GDI, the Windows 32 API function BitBlt() was arguably the most important and widely used function for image manipulation, though with GDI+ the BitBlt operations are largely hidden by the GDI+ object model.
It's not possible to BitBlt areas of images that are not rectangular, although similar effects can be easily simulated. One way is to mark a certain color as transparent for the purposes of a BitBlt, so that areas of that color in the source image will not overwrite the existing color of the corresponding pixel in the destination device. It is also possible to specify that in the process of a BitBlt , each pixel of the resultant image will be formed by some logical operation (such as a bitwise AND ) on the colors of that pixel in the source image and in the destination device before the BitBlt . Such operations are supported by hardware acceleration, and can be used to give a variety of subtle effects. We're not going to go into details of this here. We'll remark however, that the Graphics object implements another method, DrawImage() . This is similar to DrawImageUnscaled() , but comes in a large number of overloads that allow you to specify more complex forms of BitBlt to be used in the drawing process. DrawImage() also allows you to draw ( BitBlt ) only a specified part of the image, or to perform certain other operations on it such as scaling it (expanding or reducing it in size) as it is drawn.
EAN: 2147483647
Pages: 244