Drawing Text
 | |||||||||||
| Chapter 19 - Graphics with GDI+ | |
| bySimon Robinsonet al. | |
| Wrox Press 2002 | |
We've left the very important topic of displaying text until this late in the chapter because drawing text to the screen is (in general) more complex than drawing simple graphics. Although displaying a line or two of text when you're not that bothered about the appearance is extremely easy it takes one single call to the Graphics.DrawString() method, if you are trying to display a document that has a fair amount of text in it, you rapidly find that things become a lot more complex. This is for two reasons:
-
If you're concerned about getting the appearance just right, you need to understand fonts. Where shape drawing requires brushes and pens as helper objects, the process of drawing text correspondingly requires fonts as helper objects. And understanding fonts is not trivial task.
-
Text needs to be very carefully laid out in the window. Users generally expect words to follow naturally from one another to be lined up with clear spaces in between. Doing that is harder than you'd think. For a start, unlike the case for shapes , you don't usually know in advance how much space on the screen a word is going to take up. That has to be calculated (using the Graphics.MeasureString() method). Also, how much space on the screen a word occupies will affect whereabouts on the screen every subsequent word in the document gets placed. If your application does line wrapping then it'll need to carefully assess word sizes before deciding where to place the break. The next time you run Word for Windows, look carefully at the way Word is continually repositioning text as you do your work: there's a lot of complex processing going on there. The chances are that any GDI+ application you work on won't be anything like as complex as Word, but if you need to display any text then many of the same considerations still apply.
So, good quality text processing is tricky to get right, but putting a line of text on the screen, assuming you know the font and where you want it to go, is actually very simple. Therefore, the next thing we'll do is present a quick example that shows how to display a couple of pieces of text. After that, the plan for the rest of the chapter is to review some of the principles of fonts and font families before moving on to our more realistic text-processing example, the CapsEditor sample, which will demonstrate some of the issues involved when you're trying to control text layout on-screen, and will also show how to handle user input.
Simple Text Example
This example, DisplayText , is our usual Windows Forms effort. This time we've overridden OnPaint() and added member fields as follows :
private System.ComponentModel.Container components = null; private Brush blackBrush = Brushes.Black; private Brush blueBrush = Brushes.Blue; private Font haettenschweilerFont = new Font("Haettenschweiler", 12); private Font boldTimesFont = new Font("Times New Roman", 10, FontStyle.Bold); private Font italicCourierFont = new Font("Courier", 11, FontStyle.Italic FontStyle.Underline); protected override void OnPaint(PaintEventArgs e) { base.OnPaint(e); Graphics dc = e.Graphics; dc.DrawString("This is a groovy string", haettenschweilerFont, blackBrush, 10, 10); dc.DrawString("This is a groovy string " + "with some very long text that will never fit in the box", boldTimesFont, blueBrush, new Rectangle(new Point(10, 40), new Size(100, 40))); dc.DrawString("This is a groovy string", italicCourierFont, blackBrush, new Point(10, 100)); }
Running this example produces this:
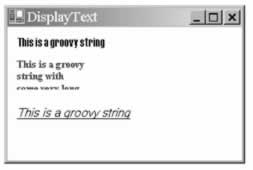
The example demonstrates the use of the Graphics.DrawString() method to draw items of text. DrawString() comes in a number of overloads, of which we demonstrate three. The different overloads all, however, require parameters that indicate the text to be displayed, the font that the string should be drawn in, and the brush that should be used to construct the various lines and curves that make up each character of text. There are a couple of alternatives for the remaining parameters. In general, however, it is possible to specify either a Point (or equivalently, two numbers ), or a Rectangle .
If you specify a Point , the text will start with its top left corner at that Point and simply stretch out to the right. If you specify a Rectangle, then the Graphics instance will lay the string out inside that rectangle. If the text doesn't fit into the bounds of the rectangle, then it'll be cut off, as you see from the screenshot. Passing a rectangle to DrawString() means that the drawing process will take longer, as DrawString() will need to figure out where to put line breaks, but the result may look nicer, provided the string fits in the rectangle!
This example also shows a couple of ways of constructing fonts. You always need the name of the font, and its size (height). You can also optionally pass in various styles that modify how the text is to be drawn (bold, underline, and so on).
EAN: 2147483647
Pages: 244