A Straw Poll Control
 | |||||||||||
| Chapter 16 - User Controls and Custom Controls | |
| bySimon Robinsonet al. | |
| Wrox Press 2002 | |
Next we'll use and build on the techniques we've covered so far to make a more involved custom control. The end result of this will enable the following ASP.NET code:
<form method="post" runat="server" ID="Form1"> <PCS:StrawPoll Runat="server" ID="strawPoll1" PollStyle="voteonly" Title="Who is your favorite James Bond?"> <PCS:Candidate Name="Sean Connery" Votes="101"/> <PCS:Candidate Name="Roger Moore" Votes="83"/> <PCS:Candidate Name="George Lazenby" Votes="32"/> <PCS:Candidate Name="Timothy Dalton" Votes="28"/> <PCS:Candidate Name="Pierce Brosnan" Votes="95"/> </PCS:StrawPoll> </form>
to give us:
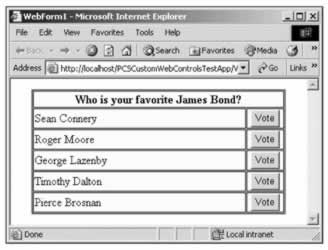
And when we click on a vote button the display will change to a straw poll control:
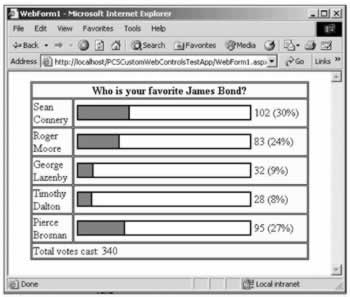
Alternatively, we can view results and voting buttons at the same time, and allow multiple votes, mainly for testing purposes.
The ASP.NET code explicitly sets the Name and Votes property for each Candidate . This is fine for this example, although it is foreseeable that a more advanced version of this control might be data-bound to get these results. However, we won't cover this in this chapter, because that could get quite involved.
When the ASP.NET code is parsed, structures such as this one are interpreted in a consistent way: each child element is interpreted in the way that we specify in a control builder class associated with the parent control. This control builder, for which we'll see the code shortly, handles anything nested inside the control it is associated with, including literal text.
The two controls we need to create are Candidate to hold individual candidates, and StrawPoll , which will contain and render the straw poll control. Both of these will be placed in a new source file: StrawPoll.cs .
The Candidate Controls
To start with, we'll create our Candidate controls, each of which will store a name and the number of votes cast for that candidate. In addition, these controls will maintain a voting button, and handle any clicks of this button.
So, we need:
-
Code for the Name and Votes properties (stored in the ViewState )
-
Initialization code in CreateChildControls()
-
Code for our button click handler
We'll also include a utility method, Increment() , which will add a vote to the current vote count for the Candidate instance. This utility method will be called by the button click handler.
We'll also need to support INamingContainer , as we'll have multiple instances of these controls with their own children.
The code for the Candidate class will go in Candidate.cs , which we should add to our project along with the standard namespace and using statements as per the RainbowLabel controls we saw earlier. The code is as follows :
public class Candidate : System.Web.UI.WebControls.WebControl, INamingContainer { public string Name { get { object rawName = ViewState["_name"]; if (rawName != null) { return (string)rawName; } else { ViewState["_name"] = "Candidate"; return "Candidate"; } } set { ViewState["_name"] = value; } } public long Votes { get { object rawVotes = ViewState["_votes"]; if (rawVotes != null) { return (long)rawVotes; } else { ViewState["_votes"] = (long)0; return 0; } } set { ViewState["_votes"] = value; } } public void Increment() { Votes += 1; } public void Reset() { Votes = 0; } protected override void CreateChildControls() { Button btnVote = new Button(); btnVote.Text = "Vote"; btnVote.Click += new System.EventHandler(btnVote_Click); Controls.Add(btnVote); base.CreateChildControls(); } protected void btnVote_Click(object sender, System.EventArgs e) { Increment(); } }
Note that Render() hasn't been overridden here. This is because this control has a single child, the voting button, and no other information to display. So, we can just go with the default, which will simply be a rendering of the button.
The StrawPoll Control Builder
Next we'll look at how we can translate the ASP.NET code for each option into a control that is a child of our StrawPoll control. To do this we need to associate a control builder with the StrawPoll class (defined in StrawPoll.cs ), using the ControlBuilderAttribute attribute. We also need to specify that child controls should not be parsed as properties of the StrawPoll class by setting the ParseChildren attribute to false :
[ ControlBuilderAttribute(typeof(StrawPollControlBuilder)) ] [ ParseChildren(false) ] public class StrawPoll : System.Web.UI.WebControls.WebControl, INamingContainer { }
Here we are using a class called StrawPollControlBuilder , defined in StrawPollControlBuilder.cs , as follows:
internal class StrawPollControlBuilder : ControlBuilder { public override Type GetChildControlType(string tagName, IDictionary attribs) { if (tagName.ToLower().EndsWith("candidate")) return typeof(Candidate); return null; } public override void AppendLiteralString(string s) { // Do nothing, to avoid embedded text being added to control } }
Here we override the GetChildControlType() method of the base ControlBuilder class to return the type of our Candidate class in response to a tag named < Candidate >. In fact, to make sure things work smoothly in as many situations as possible, we just look for any tag name that ends with the string " candidate ", with letters in upper or lower case.
We also override the AppendLiteralString() method so that any intervening text, including white space, is ignored and won't cause us any problems.
Once this is set up, and assuming we don't place any other controls in StrawPoll , we will have all of our Candidate controls contained in the Controls collection of StrawPoll . This collection won't contain any other controls.
Note that the control builder makes use of a collection of attributes. In order to support this we need to add the following using statement to our namespace:
using System.Collections; Straw Poll Style
Before we look at the StrawPoll class itself, there is one more design consideration. The straw poll should be able to display itself in three forms:
-
Voting buttons only
-
Results only
-
Voting buttons and results
We can define an enumeration for this that we can use as a property of our StrawPoll control ( putting this in StrawPoll.cs is fine):
public enum pollStyle { voteonly, valuesonly, voteandvalues }
As we saw earlier, properties that are enumerations are easy to use ( we can simply use the text names as attribute values in ASP.NET.
The Straw Poll Control
Now we can start putting things together. To start with we'll define two properties, Title for the title to display for the control, and PollStyle to hold the enumerated display type. Both of these will use the ViewState for persistence:
[ ControlBuilderAttribute(typeof(StrawPollControlBuilder)) ] [ ParseChildren(false) ] public class StrawPoll : System.Web.UI.WebControls.WebControl, INamingContainer { public string Title { get { object rawTitle = ViewState["_title"]; if (rawTitle != null) { return (string)rawTitle; } else { ViewState["_title"] = "Straw Poll"; return "Straw Poll"; } } set { ViewState["_title"] = value; } } public pollStyle PollStyle { get { object rawPollStyle = ViewState["_pollStyle"]; if (rawPollStyle != null) { return (pollStyle)rawPollStyle; } else { ViewState["_pollStyle"] = pollStyle.voteandvalues; return pollStyle.voteandvalues; } } set { ViewState["_pollStyle"] = value; } } } The remainder of this class is taken up with the Render() method. This will display the whole straw poll control along with any options, taking into account the poll style to use. We'll display voting buttons simply by calling the RenderControl() method of child Candidate controls, and display the votes cast graphically and numerically using the Votes properties of child Candidate controls to generate simple HTML.
The code is as follows, commented for clarity:
protected override void Render(HtmlTextWriter output) { Candidate currentCandidate; long iTotalVotes = 0; long iPercentage = 0; int iColumns = 2; // Start table, display title if (PollStyle == pollStyle.voteandvalues) { iColumns = 3; } output.Write("<TABLE border='1' bordercolor='black' + " bgcolor='#DDDDBB'" + " width='90%' cellpadding='1' cellspacing='1'" + " align='center'>"); output.Write("<TR><TD colspan='" + iColumns + "' align='center'" + " bgcolor='#FFFFDD'>"); output.Write("<B>" + Title + "</B></TD></TR>"); if (Controls.Count == 0) { // Default text when no options contained output.Write("<TR><TD bgcolor='#FFFFDD'>No options to" + " display.</TR></TD>"); } else { // Get total votes for (int iLoop = 0; iLoop < Controls.Count; iLoop++) { // Get option currentCandidate = (Candidate)Controls[iLoop]; // Sum votes cast iTotalVotes += currentCandidate.Votes; } // Render each option for (int iLoop = 0; iLoop < Controls.Count; iLoop++) { // Get option currentCandidate = (Candidate)Controls[iLoop]; // Place option name in first column output.Write("<TR><TD bgcolor='#FFFFDD' width='15%'> " + currentCandidate.Name + " </TD>"); // Add voting option to second column if required if (PollStyle != pollStyle.valuesonly) { output.Write("<TD width='1%' bgcolor='#FFFFDD'>" + "<FONT color='#FFFFDD'>.</FONT>"); currentCandidate.RenderControl(output); output.Write("<FONT color='#FFFFDD'>.</FONT></TD>"); } // Place graph, value, and percentage in third // column if required if (PollStyle != pollStyle.voteonly) { if (iTotalVotes > 0) { iPercentage = (currentCandidate.Votes * 100) / iTotalVotes; } else { iPercentage = 0; } output.Write("<TD bgcolor='#FFFFDD'>" + "<TABLE width='100%'>" + "<TR><TD><TABLE border='1' bordercolor='black'" + " width='100%' cellpadding='0'" + " cellspacing='0'>"); output.Write("<TR><TD bgcolor='red' width='" + iPercentage + "%'><FONT color='red'>.</FONT></TD>"); output.Write("<TD bgcolor='white' width='" + (100-iPercentage) + "%'><FONT color='white'>." + "</FONT></TD></TR></TABLE></TD>"); output.Write("<TD width='75'>" + currentCandidate.Votes + " (" + iPercentage + "%)</TD></TR></TABLE></TD>"); } // End row output.Write("</TR>"); } // Show total votes cast if values displayed if (PollStyle != pollStyle.voteonly) { output.Write("<TR><TD bgcolor='#FFFFDD' colspan='" + iColumns + "'>Total votes cast: " + iTotalVotes + "</TD></TR>"); } } // Finish table output.Write("</TABLE>"); }
There is one more thing to do. If the straw poll is being displayed in voteonly mode then voting should trigger a change of display to valuesonly mode. To do this we need a minor modification in the voting button handler in our Candidate class:
protected void btnVote_Click(object sender, System.EventArgs e) { Increment(); StrawPoll parent = (StrawPoll)Parent; if (parent.PollStyle == pollStyle.voteonly) { parent.PollStyle = pollStyle.valuesonly; } } Now you are free to vote for you favorite James Bond to your heart's content!
Adding an Event Handler
It is often the case with custom controls that you want to raise custom events, and allow users of the control to act on them. This can be used to excellent effect, as is immediately apparent if you look at the existing server controls that ASP.NET supplies . For example, the Calendar control is nothing more than a well-formatted selection of hyperlinks . We could build something like that ourselves using the techniques built up above. However, it has the useful function that when you click on a date other than the selected one it raises a SelectionChanged event. We can act on this event, either ignoring it if the selection is OK to change, or performing some processing, which we did in the last chapter when we checked to see if the selected date was already booked. In a similar vein, it would be nice if our straw poll control had a Voted event, which will notify the form that a vote has been made, and supply it with all the information needed to act on this.
To register a custom event we have to add code such as the following to a control:
public event EventHandler Voted; protected void OnVoted(EventArgs e) { Voted(this, e); }
Then, whenever we want to raise the event, we simply call OnVoted(), passing the event arguments.
Whenever we call OnVoted() an event is raised that the user of the control can act on. To do this the user needs to register an event handler for this event:
strawPoll1.Voted += new EventHandler(this.strawPoll1_Voted); The user will also need to provide the handler code, strawPoll1_Voted() .
We'll extend this slightly by having custom arguments for our event, in order to make the Candidate that triggers the event available. We'll call our custom argument object CandidateEventArgs , defined in a new class, CandidateEventArgs.cs, as follows:
public class CandidateEventArgs : EventArgs { public Candidate OriginatingCandidate; public CandidateEventArgs(Candidate originator) { OriginatingCandidate = originator; } }
We've simply added an additional public field to the existing EventArgs class. As we've changed the arguments we're using, we also need a specialized version of the EventHandler delegate that can be declared in the PCSCustomWebControls namespace as follows:
public delegate void CandidateEventHandler(object sender, CandidateEventArgs e);
We can use these examples in StrawPoll as follows:
public class StrawPoll : System.Web.UI.WebControls.WebControl, INamingContainer { public event CandidateEventHandler Voted; protected void OnVoted(CandidateEventArgs e) { Voted(this, e); } ... We'll also have a method to raise the event, called from child Candidate controls when voting buttons are clicked:
internal void ChildVote(CandidateEventArgs e) { OnVoted(e); }
We also need to make a further modification to the button click handler in Candidate to call this method, supplying it with the correct parameters:
protected void btnVote_Click(object sender, System.EventArgs e) { Increment(); StrawPoll parent = (StrawPoll)Parent; if (parent.PollStyle == pollStyle.voteonly) { parent.PollStyle = pollStyle.valuesonly; } CandidateEventArgs eCandidate = new CandidateEventArgs(this); parent.ChildVote(eCandidate); } Now we're ready to implement the handler on the page using the control. We simply have to specify it in our ASP.NET page, adding a label to use in the handler:
<form id=Form1 method=post runat="server"> <PCS:StrawPoll Runat="server" ID=strawPoll1 PollStyle="voteonly" Title="Who is your favorite James Bond?" Voted="strawPoll1_Voted"> <PCS:Option Name="Sean Connery" Votes="101"/> <PCS:Option Name="Roger Moore" Votes="83"/> <PCS:Option Name="George Lazenby" Votes="32"/> <PCS:Option Name="Timothy Dalton" Votes="28"/> <PCS:Option Name="Pierce Brosnan" Votes="95"/> </PCS:StrawPoll> <br> <br> <asp:Label Runat="server" ID="resultLabel" Text="No vote cast."/> </form>
Then we add the event handler itself:
protected void strawPoll1_Voted(object sender, CandidateEventArgs e) { resultLabel.Text = "You voted for " + e.OriginatingCandidate.Name + "."; }
We also need to register this event handler in InitializeComponent()(we'll need a using statement for PCSCustomWebControls to do this) :
this.strawPoll1.Voted += new PCSCustomWebControls.CandidateEventHandler(this.strawPoll1_Voted);
Now when we vote we will get feedback on our vote:

EAN: 2147483647
Pages: 244