Chapter 11. Parenting and Binding to a Skeleton
|
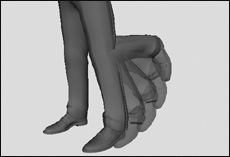
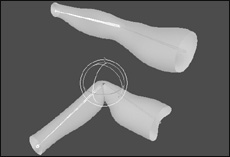
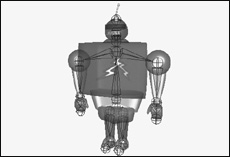
| Once you've created a skeleton, you need to either parent or bind the surfaces to the joints in order for the surfaces to move with the skeleton. Anything that doesn't need to bend, like a hat, glasses, or eyeballs, can be parented to the joints. Anything that does need to bend, like an arm, leg, or torso, must be bound to the skeleton (Figure 11.1). Figure 11.1. For the leg to bend at the knee, it needs to be bound to a skeleton. Parenting to joints works much like parenting to anything else. The bone is the parent, and the surface is the child, so the surface rotates and moves when the bone is rotated. Binding, however, is a bit different. When a surface is bound to a skeleton, only a portion of that surface will move with a bone. For example, an arm has a shoulder joint and an elbow joint. However, only the forearm should move when the elbow is rotated; the shoulder and biceps should remain in place (Figure 11.2). When you bind the arm geometry to the skeleton, you make the forearm part of the arm (attached at the elbow joint) and the shoulder and biceps part of the arm as well (attached to the shoulder joint). Figure 11.2. When the elbow joint is rotated, only the forearm rotates with it. At the heart of binding are clusters. A cluster is like a set of points that have weight. Weight represents the amount of influence a cluster wields over each point in the set. Understanding clusters and weight is an important step in understanding binding. In this chapter, we'll take a close look at clusters and their effect on surfaces. There are two kinds of bindingrigid bind and smooth bind. Rigid bind works well for things like arms, legs, and fingersthings that bend clearly at a joint and are rigid in between. Smooth bind works well for things like torsos, tails, and snakesthings that bend gradually along a surface (Figure 11.3). Either can be used for any kind of surface, and in some cases it just boils down to a matter of personal preference. Figure 11.3. These two objects have identical geometry and the same joints, which are rotated equally. However, the one on the left is smooth bound, and the one on the right is rigid bound. The surface on the left bends more smoothly; the one on the right bends more abruptly and is straighter between joints. The surface of a simple character, such as a robot, can sometimes be parented, rather than bound, to a skeletonfor example, if all the parts are made out of metal and don't bend. Parenting a character that does not have bending joints is a good way to create your first character since it's easy to set up and quick to animate. To parent surfaces to joints:
|


 Tip
Tip
|