| Spline IK gives you a way of controlling many joints using a curve rather than by rotating them directly. This is especially useful when you have many joints in a continuous chain (such as in a spine or a tail), because you can move the skeleton quickly into the shape you desire without rotating each individual joint (Figure 10.34). Figure 10.34. By creating an IK spline on these joints, you can animate a spine skeleton by moving just one point. Keyframing the rotation of each joint to achieve the same effect would be much more difficult. 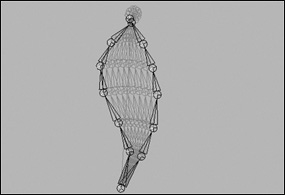
To create a Spline IK: 1. | Create a spine skeleton, starting from the bottom and working your way up (Figure 10.35).
Figure 10.35. The human spine has a natural curve. When creating a spine for a character, it's helpful to match the shape of the character's back. 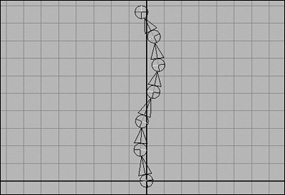
| 2. | From the Skeleton menu, select IK_Spline Handle Tool.
| 3. | Click the top joint of the skeleton.
| 4. | Click the second joint from the bottom of the skeleton.
Two things are created, the Spline IK handle and a curve. By default, the curve is automatically parented to the joints.
| 5. | Select Twist in the Channel Box.
| 6. | With the middle mouse button, drag from left to right.
The bones rotate around.
| 7. | From the Hypergraph select the curve you just created (Figure 10.36).
Figure 10.36. It's easier to select the curve in the Hypergraph because the icon can be isolated. 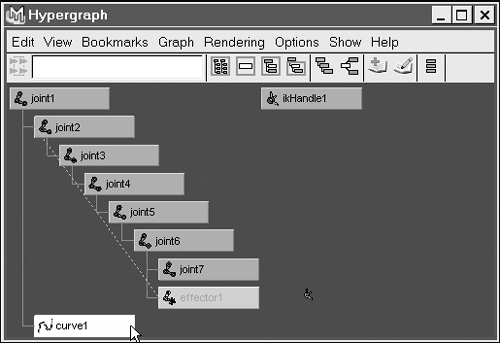
| 8. | In the Pick mask, select component mode.
You can now see the CVs of the curve.
| 9. | Select and move a CV (Figure 10.37).
Figure 10.37. When the CV is moved, the spine bends to form the shape of the control curve. 
The joints rotate in response and stick to the shape of the control curve.
|
 Tip Tip
In general, you don't want to use the root joint of the skeleton as part of your Spline IK chain. If you do, when you move the CVs, the whole skeleton will rotate. To avoid this, choose one joint above the root joint of the skeleton as the base of your Spline IK.
When you are using Spline IK to animate your character, you move and keyframe CVs. However, CVs don't have their own node: Since they're components, they don't show up in the Hypergraph or Outliner as a node that can be animated. It can be helpful to make a cluster for each CV of the curve so that there is a node you can keep track of when animating. A cluster can also aid in the selection process since you can move a cluster handle away from the spline curve, making it easier to select. To create clusters for a Spline IK's CVs: 1. | Using the Spline IK created in the previous task, select one of the CVs of the control curve.
Be sure that the root joint of the skeleton is not included in the IK chain.
| 2. | From the Deform menu select the box next to Create Cluster. The Cluster Options dialog box opens.
| 3. | Check the box next to Relative (Figure 10.38).
Figure 10.38. In the Cluster Options dialog box, Relative is checked. 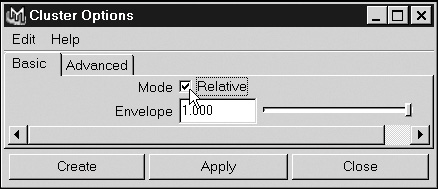
Checking this box will make the cluster move in relation to the curve. If you don't check Relative, the cluster will do a double transform, which means it will move twice as much when the root joint is moved.
| 4. | Click Create.
The cluster is created and is represented as a C (Figure 10.39).
Figure 10.39. A C (for cluster) appears where the CV is. The cluster controls the CV. 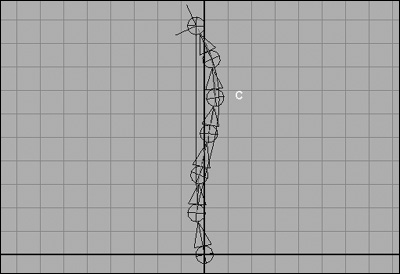
| 5. |  -select the root joint of the skeleton. -select the root joint of the skeleton.
| 6. | Press  . .
The cluster is now parented to the root joint so that it will move with the whole skeleton.
| 7. | Repeat Steps 2 through 7 for all but the bottom CV of the control curve.
There are now clusters for each of the CVs, which you can easily select and animate (Figure 10.40).
Figure 10.40. The Cs are used as selection tools for the spine's rotation. 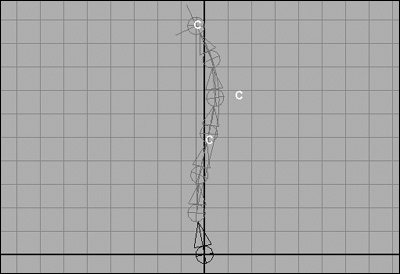
|
Tip
Understanding the Hypergraph and Skeletons When you're creating characters, the Hypergraph plays an important role in hierarchy order and selection. In fact, it's the best tool Maya offers to help you understand the way hierarchies are formed as well as how Maya's various elements relate to one another. The Hypergraph provides two layout options: Freeform and Automatic, with Automatic being the default. If you choose the Automatic option, Maya lays out the Hypergraph for you, with the root node at the top of the hierarchy and each child indented below its parent with a line connecting child and parent. In addition, nodes are locked in place so that the hierarchies remain visually consistent and organized. In contrast, if you select Freeform from the Options > Layout menu, you can move the nodes around and organize them to your liking. In addition, you can import an image of your character into the background of the Hypergraph so that you can align its joints to their proper positions on top of the image, making it much easier to select individual joints. In a simple hierarchy this may not be necessary, but when you have hundreds of joints and surfaces, selection can become quite cumbersome without this aid. The Hypergraph displays each of your joints with a blue joint icon  . When a single joint is selected in the view pane, all of its children are highlighted to indicate their relationship to the selected joint. As children of the joint, they will be affected if the selected joint is rotated. Be aware that although the children are highlighted in the view pane, they haven't been individually selected. . When a single joint is selected in the view pane, all of its children are highlighted to indicate their relationship to the selected joint. As children of the joint, they will be affected if the selected joint is rotated. Be aware that although the children are highlighted in the view pane, they haven't been individually selected. Select a joint and open the Hypergraph. The joint you clicked is selected (yellow), but the joints underneath it (its children) are not. Because the parent is selected, the children will follow. If in the Hypergraph you -select the children and then rotate the joints, you will see that each joint will rotate. Although you will rarely select the joints in this fashion, it's important to understand what is and is not selected in a hierarchy. You can move joints from one hierarchy to another or disconnect them from a hierarchyall from within the Hypergraph. You use the middle mouse button to move joints in and out of hierarchies. To move a joint (and its children) into another hierarchy, simply drag the joint (using the middle mouse button) onto the node you want to serve as its parent. Once you do this, you will see that the selected node (and its children) are connected to the new hierarchy. To remove a joint (and its children) from a hierarchy, select its node with the middle mouse button and drag it away from the hierarchy (releasing the mouse when the node has been moved away from the hierarchy). This technique also works well for removing objects from a group within the Hypergraph. |
|