Overview of Station Device Features Supported by CallManager
CallManager supports numerous station device features, which are discussed by feature category. You'll also learn about the architectural capabilities required to provide the feature functionality.
User/Station Distinction
A user is a person or software application that uses a station to communicate with another user. For the purposes of this chapter, a user has a station with one or more directory numbers that can be dialed to communicate with the other user.
You assign each user a directory number, or more simply, a phone number, which users or software applications dial when they want to call each other or route calls to users. All stations have at least one directory number. A station can also have multiple directory numbers, one directory number per line.
Users communicate over a media path, typically audio, that is established between two stations during a call. CallManager allows devices with dissimilar signaling protocols to establish a connection and communicate. The protocol of the caller might be SCCP, for example, whereas the protocol of the destination might be H.323.
Line Appearance Model
The line appearance model of the station devices applies to all station devices and encompasses the concept of multiple line appearances and shared line appearances. Each station device has one or more lines, and each line is associated with a specific directory number. A user dials a directory number to place a call. Each station has at least one line and associated directory number, but can also have multiple lines, each with a separate and unique directory number. The term multiple line appearances refers to when a single station has multiple directory numbers.
You can associate one directory number with one or more stations. The term shared line appearances refers to when the same directory number appears on multiple devices. With a shared line appearance, users can have stations in multiple places (main office, remote office, or home) with the same line appearance and can receive calls at any of these locations. When a user dials a directory number, CallManager rings all stations that have an appearance of that directory number. When a user dials a directory number, CallManager rings all stations that have an appearance of that directory number. The call can then be answered at any station with that line appearance.
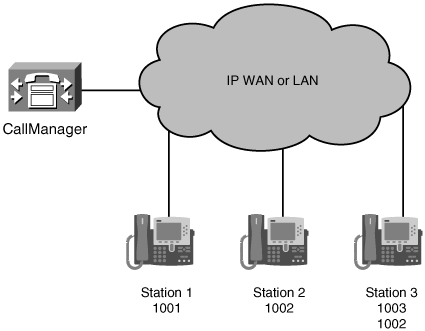
Figure 3-3 shows three stations. Each station has a unique directory number. In addition, Station 3 has a second directory number that is a shared line with Station 2. This allows the station to answer calls directed to either Station 2 or Station 3 (directory number 1002 or 1003). When a caller dials directory number 1002, both Stations 2 and 3 indicate an incoming call, and the call can be answered at either station.
Figure 3-3. Station Devices and Directory Numbers
Every station feature that is call related involves one or more calls in progress. Each call is associated with a particular line on a specific station device, referred to as a line appearance. A line appearance on a station is where incoming calls arrive or outgoing calls originate. A line appearance can support an active call as well as calls that are on hold. An active call can be an arriving call, a call being initiated, or a call that has been connected and at least two parties in the call are exchanging media (voice media in the case of a voice call). When you invoke a feature on the currently connected call that causes the media to the far end of the connection to be suspended, the far end connection is placed on hold. This can be done by invoking the hold feature explicitly via the Hold softkey or indirectly by accepting a new incoming call or by initiating a transfer or conference, for example. An active call on a shared line appearance is active on one station and classified as remote-in-use on other stations with a shared line appearance. Remote-in-use shows you that the call is currently active on another phone with the same line appearance.
As of CallManager release 4.0, a line appearance on a station can support an active call and many calls that are on hold. The configuration for a line appearance includes two settings:
- Maximum Number of Calls Enables you to control how many call instances can be present on the line appearance, including active, held, and remote-in-use
- Busy Trigger Enables you to control when an incoming call will be rejected, triggering the call to be sent to the call forward busy destination, if configured
These two settings control the point at which no new incoming calls are allowed as well as the upper limit on the total calls for the line. Some station devices can handle more calls than other devices. The configuration of these fields establishes maximum settings, but the station may do less if it is not configured to support the maximum that is configured on another device. Because the configuration fields are set per line appearance, you can allow some phones to accept more calls than other phones in a shared line appearance. As more calls come into a directory number that is a shared line appearance, some stations might ring whereas others do not because some of the stations reach the configured busy trigger and do not accept new incoming calls.
Multiple stations can share a common line, meaning that there is a line with the same directory number on each of these stations. Stations that share a line can also have other lines that are present on the station independent of the shared line. The other lines each have a directory number that might be present on other stations. This means that a station can share one line with a particular group of stations and share other lines on the station with other groups of stations. For example, Station A shares line 1 (DN 1000) with Station B and Station C. Station C shares line 2 (DN 2000) with Station A and Station D. Station C also has a third line, DN 3000, which is not shared with any other station. You set up the directory numbers that appear on each station to meet the particular needs of the user for the particular station. The lines on a station that are shared lines provide some unique functionality to the stations that share the line. When a user places a call from a shared line on one particular station, the other stations that share the line see that a call is in progress. When the user receives an incoming call on the shared line, the call is presented to every station that has a line appearance with that directory number, and any of the stations can answer the incoming call. All calls, including active, held, and remote-in-use calls, are visible at the station with the shared line appearance unless the call initiator or receiver blocked the information with the privacy feature or the station has already exceeded the maximum number of configured calls. After the user places a call on hold, any station with the shared line appearance can retrieve the held call and resume the conversation. A new call can be initiated on a shared appearance line as long as the maximum number of calls configured for the directory number of the shared line has not been reached. The maximum number of calls that can be in progress for the shared line appearance applies to the combined total for the line, regardless of which station or stations have active calls in progress or which station put a particular call on hold.
Use up/down navigation control on the station or the Select softkey to select a particular a call on a line. In the case of shared line, the calls that you can select are the calls that are not active or locked by another device. A call is locked by another device when it is currently in the middle of a feature such as transfer or conference or if it is selected on another station. You select a particular call to take a particular action on the call, such as joining the selected call to another call.
Shared Line Examples
Sharing the same line on multiple phones enables a group of users to spread the call volume when there are more calls than one person can handle. The calls ring on multiple stations. The following sections examine a few examples of the value of shared lines.
Shared Line for Small Support Group
Shared lines can prove valuable for small teams that handle numerous incoming calls, such as a customer product group. Because the group typically takes an initial call requesting assistance, the shared line can deliver the call to all the phones in the small group that provides the needed support. Although not practical for a large support organization, which would be better handled by a call center application, the shared line can be leveraged in small teams that want all calls to ring at all available stations.
Consider a small support team of five people that provides technical assistance for a particular product in your organization. The support calls are not frequent, and there are seldom more active calls than the team can handle. Each member of the small team is trained to handle general product questions so it's not important who takes the initial call. If there are detailed questions in a particular area, one member of the team has more detailed knowledge about the hardware, another has detailed knowledge about the software, and a third has specialized knowledge of the database. If you configure a shared line appearance on each phone of the support team, any available member of the support team will be able to take an incoming support call. If the call is for a general support question, the assistance will be provided by the initial support team member and requires no other action. If one team member takes a call and discovers that the caller needs another of the team members with a particular special knowledge, you can put the call on hold and ask the team member with that expertise to pick up the call. When you make the request, you indicate which call is to be retrieved by the call number assigned to the call when it arrived. When a call arrives and receives a call number, the call number does not change as other calls arrive and terminate on the line.
As shown in Figure 3-4, if the call is call number five, and while the call is on hold, calls three and four hang up, the calls are not renumbered, and call number five stays call number five. New calls will arrive and replace calls three and four that were terminated. As long as call five stays on the original line, even if it is held and retrieved repeatedly, it will stay call number five.
Figure 3-4. Caller Number Assignments

Shared Line for Executive Support
Shared line appearances can also add value for an executive assistant. If an executive needs support at all times, there might be a need for more than one assistant to be able to handle the calls. If the first assistant is currently busy on a call, the backup assistant will be able to see that the call needs to be answered and can take the call. Multiple assistants can have a line appearance of several executives on their phone and provide backup support for the other assistants. Shared lines make it possible to have one or more backup assistants and handle temporary overload situations and still be able to provide adequate coverage for the executive.
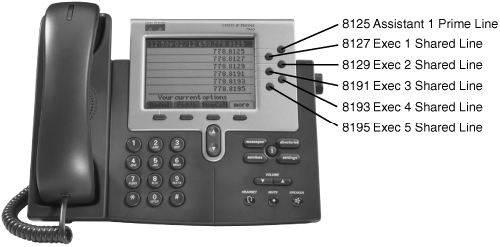
To provide backup coverage for multiple executives with a group of executive assistants, you can configure a shared line appearance of each of the executives on all of the phones of the assistants. As an example, assume that five executives each have their own assistant. Backup coverage by the other assistants if one particular assistant was on a call would provide improved coverage for each executive and allow the assistants to provide backup coverage for each other. As shown in Figure 3-5, the primary line for each assistant would be the number assigned to the assistant. The second line would be a shared line appearance of the executive that the assistant supported. The other four lines on the assistant phones would be shared lines of the other four executives. With this configuration, each assistant has access to incoming calls to any of the five executives.
Figure 3-5. Executive Assistant Coverage
Station Features
Several key station features were introduced in CallManager releases 3.1 through 4.1. The sections that follow cover each of these features in more detail.
Distinctive Ring per Line
Stations can have more than one line configured, which also means that there is more than one directory numbered configured on the station. A visual indication is provided by default for incoming calls on the line on which the incoming call is ringing, but there is no audible difference to indicate which line is ringing unless the station is configured with a different ring for each line. The distinctive ring feature allows end users to configure the ring type for each line, if desired. If each line has a distinctive ring, the ring itself, in addition to the visual line indication, helps identify the line on which the incoming call is ringing. The option to change the ring settings for each line is provided in the settings menu on the phone (press the settings button).
Change Ring Settings
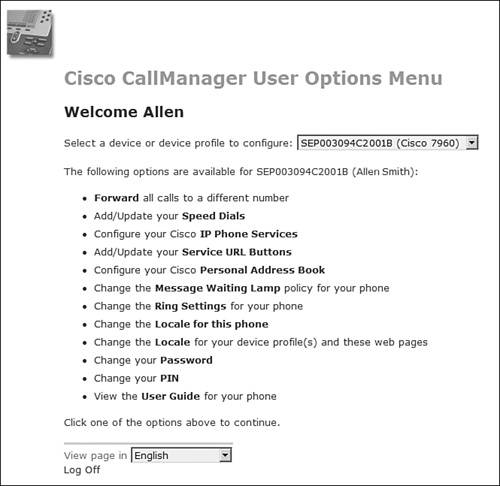
When an incoming call arrives at a station, the station device notifies you of the incoming call audibly and visually by default. Audible and visual notification of incoming calls is configurable based on whether the station is currently in use or currently idle. If the phone is in use (for example, active on a call), you might or might not want the phone to audibly ring when another call arrives at your station. As shown in Figure 3-6 later in this chapter, the option to Change the Ring Settings for your phone in the Cisco CallManager User Options web page (CCMUser) allows users to set the ring behavior of the phone when it is idle and when it is in use; each condition can employ a different notification behavior. The following options are available when the phone is idle:
- Ring normally
- Ring once
- Flash only
- Do nothing
Figure 3-6. Cisco CallManager User Options Web Page
The following options are available when the phone is in use:
- Ring normally
- Ring once
- Flash only
- Beep only
- Do nothing
Each line on a phone can have a different ring setting depending on whether the phone is idle or in use. Users can configure their own preferences via CCMUser if you have enabled the enterprise parameter Show Ring Settings (System > Enterprise Parameters). The parameter is disabled by default.
Block Calling ID on a Per-Call Basis
Sometimes you want to control whether your calling line identification is sent to the far-end device when you make an external call. In fact, in some states and countries, the ability to block calling information is required by law. Be sure to check local requirements to ensure you are providing this capability when needed.
When a call is placed from a station, the directory number of the line that was used to make the call is sent to the far-end device that is receiving the call. Transmission of this information is Calling Line Identification Presentation (CLIP). For some calls, users might want or need the ability to block CLIP from being transmitted. The ability to restrict the calling line identification presentation for a particular call is possible through Call Line Identification Restrictions (CLIR).
You set up the CLIR for either a gateway or for a route or translation pattern. By configuring CLIR for a gateway, the CLIR feature is enabled for all external calls that are made through that gateway. To control the CLIR on a call-by-call basis, you configure a particular route pattern or translation pattern that will apply CLIR for all calls that use the route pattern or translation pattern. For example, a route pattern of *679.@ could be defined with CLIR set for the route pattern. Using this route pattern, users can dial *679 and the destination number. Doing so would block transmission of the calling line identification to the far end (destination) of the call. For those calls that users don't mind having CLIP sent, the normal 9.@ pattern can be used. Additional route patterns blocking CLIP for OnNet calls can also be configured, allowing users to block the calling information for both internal (OnNet) and external (OffNet) calls.
Malicious Call Identification
The Malicious Call Identification (MCID) feature enables users to mark the active call as malicious. When a call is flagged as malicious, several events occur:
- An alarm record is generated and you can configure a text message to be delivered to you detailing the date, time, and physical identifier of the device in use by the victim of the malicious call
- The call detail record (CDR) for the active call is flagged with a Malicious Call Trace (MCT) indication
- For OffNet calls via ISDN PRI circuits on MGCP gateways, the OffNet PSTN is notified of the malicious call. This notification allows the OffNet system to take appropriate action, such as notifying legal authorities
The user can invoke MCT from any SCCP-based phone or SCCP-based gateway such as the VG248 and ATA-186. Chapter 4, "Trunk Devices," offers more details on the OffNet PSTN notification of malicious calls. Chapter 7, "Call Detail Records," addresses the CDR details for malicious calls.
To extend malicious call trace functionality to users, you must configure the MCID softkey on the softkey template. The user presses the MCID softkey during an offending call. An audible tone confirms that the call was registered as malicious and, for phones with a display, a visual indication of the calling line ID and caller's name displays. After invoking MCID, the user can either continue with the call or hang up.
Barge/cBarge/Privacy
The barge and cBarge features allow you to add yourself to (that is, barge into) a call that is active on another station on a line that you share with a remote station. Privacy controls whether other users who share a line with you can see call information and have the ability to barge or cBarge into a call on your station. Barge utilizes the conferencing capability of the station device, whereas cBarge uses a conference bridge resource. Because the conferencing capability of the station device is more limited than the conference resource device, cBarge offers additional functionality than barge. Privacy controls the ability of others sharing the line to see the call or to barge into the call.
Privacy
Privacy allows you to control the visibility of call information displayed at other stations that have a shared line appearance of a line on your station. It also controls the ability of someone at another station to be able to barge or cBarge into your conversation. You can configure a Privacy button and whether a tone plays to all parties when a user barges into the call. The privacy feature is configured at the device level via the Privacy field on the Phone Configuration page in Cisco CallManager Administration (Device > Phone) and at the system level via the clusterwide CallManager service parameter Privacy Setting. The Privacy Setting parameter is enabled by default, so if you want to disable privacy for certain stations, you can do so in the Phone Configuration page only for those stations that you do not want to have access to the privacy feature. The CallManager service parameter Party Entrance Tone controls whether a tone plays when a user barges into a call; it is enabled by default (Service > Service Parameters > select a server > Cisco CallManager). You must configure the Privacy button on a button template and assign that template to all phones you want to have the Privacy button.
The Privacy button enables you to toggle the privacy setting on or off and control the privacy treatment of all new calls to or from your station and any existing active call at your station. If you currently have an active call, press the Privacy button to invoke privacy so that no one will be able to barge into the call and the information about your calls will be removed from the display at all stations that have a shared line appearance with you. The privacy setting remains active until you press the Privacy button again. Even after the call has ended, privacy will apply to new calls until you toggle privacy off. The Privacy button has an icon to indicate on/off status. The status is maintained through phone reset as well as CallManager reset; however, in the case of a CallManager reset and the Publisher being down at the same time, the Privacy setting that was stored in the database prior to the Publisher crash is what will be reflected on the phone when the Publisher is restored. If the user changed the Privacy status during the Publisher and CallManager outage, the new setting will not be maintained when the Publisher and CallManager connection gets restored.
Barge
The barge feature enables you to add yourself into an active call on a shared line appearance, forming a three-party conference utilizing the barged station's conference capability. To define terminology, the following parties are involved in a barged call:
- The barger or barging station is the party pressing the Barge softkey to be added to a call that is active on one of the phone's shared line appearances.
- The barged station is the phone that has an active call on a shared line appearance.
- The third party is in an active call with the barged station. The third party can be a station or a device external to the system if the call is connected through a gateway or it can be a conference bridge if the barged station is currently in a conference call.
As described in the previous section, if you are in an active call on a line that also appears on other stations, you control whether others who share the line appearance can barge into the call. If you do not want others to be able to barge into the call, you can use the Privacy button to prevent others from seeing the call information or barging into the call.
To barge into a call that is in progress on a shared line, you must first press the line button of the call you want to barge into and then use the navigation control to scroll to the specific call. After the active call is highlighted, press the Barge softkey to be added to the call in progress. If the Party Entrance Tone service parameter is enabled, a barge tone plays to the active participants in the call to alert them that someone has barged into the call. After you have been added to the call and a tone has announced your arrival, you should begin talking and announce your presence.
The Barge softkey adds you to the current call by using the conference capability of the station device. The station device is capable of supporting a three-way conference, so adding a third party to the existing conversation does not interrupt the active voice communication. If another user attempts to barge into the call, that barge attempt will not succeed and the barging party receives the message "Exceed Maximum Parties." The cBarge function, described in the following section, is similar to barge, but it uses a separate conference bridge resource rather than the limited station conference capability. Because of this, more than three parties can be added to the conference. Although the station's conference capability is limited, the advantage of barge over cBarge is that no additional conferencing resources are required and there is no momentary break in the conversation while the parties are moved to the conference device. Barge has some limitations:
- Supported on Cisco IP Phone models 7940, 7941, 7960, 7961, 7970, and 7971 only.
- G.711 is the only supported codec.
- Both stations involved in the barge operation must support the barge feature.
- The barged station must have the built-in bridge enabled.
The cBarge feature eliminates many of these limitations. See the following section, "cBarge," for more information.
After you barge into an existing call, in addition to a barge tone (if configured) announcing your presence, the station line display updates to reflect the current call status. Only your display for the active call updates to reflect the barge; the active call display of the other two parties in the call does not change.
If you are the first party to hang up from the barged call, the other two parties are still connected to each other and hear no break in the voice stream. A "beep beep" tone announces your departure. If you barge into a call and the barged station disconnects, a momentary break in the voice stream occurs and then you and the remaining person in the call (the third party) will be connected and you can continue the conversation. Your line display updates to reflect the call as a call between you and the third party. If the barged station terminates the call, the call disconnects and all three parties are released.
After you barge into a call, the person at the barged station can initiate a feature such as hold, transfer, conference, or call park, that causes the barged call to be put on hold. In this case, you, the barging party, are disconnected from the call and the barged party's feature request (for hold, and so on) proceeds normally. However, if the third party in the call initiates a feature that results in a hold, both you and the barged station remain in the call and the feature proceeds normally. Likewise, if you barge into a call and initiate a feature that results in a hold operation, both the barged station and the third party remain in the call and the feature proceeds normally. When a hold results in two parties remaining in the call while a feature is being initiated, no music is sent to the held parties, and they are still connected and can continue a conversation.
cBarge
The conference barge (cBarge) feature allows you to add yourself to an active call on a shared line appearance, forming a multiple-party conversation utilizing a conference bridge shared resource device. As described in the previous section, if you are in an active call on a line that also appears on other stations, you control whether others that share the line appearance can barge into the call. If you do not want others to be able to barge into your calls, press the Privacy button.
To cBarge into an active call that is in progress on a shared line, press the line button of the call you want to cBarge into and then press the cBarge softkey to be added to the call in progress, forming a multiple-party conference. The active participants in the call hear a barge tone to signify that someone has been added to the call. After you have been added to the call and a tone has announced your arrival, you should begin talking and announce your presence.
Pressing the cBarge softkey adds you to the current call by using the conference resources that are defined for the system. The conference resource devices are capable of multiple-party conferences, up to the maximum number of participants that you configured for the conference resource device. Barging into the existing conversation causes a momentary interruption in the active voice communication while the call moves to the conference bridge. Other bargers who have the same shared line and try to barge into the same call will succeed in their cBarge attempt so long as there are available conference bridge resources and the total number of participants has not exceeded the maximum number allowed by the conference bridge device configuration. If the cBarge attempt does not succeed, the barger receives notification that the cBarge operation did not complete.
The same terminology used to describe the barge feature also describes the following cBarge scenarios. After you press the cBarge softkey to barge into an existing call, a barge tone announces your presence and the station line display updates to reflect the current call status. Your display and the display of the barged station updates to "To Conference" to reflect the cBarge operation. If possible, the third party's display also reflects the cBarge operation (if the third party is OnNet using a Cisco IP Phone).
If you are the first party in the cBarged call to disconnect, the other two parties are removed from the conference bridge and reconnected as a direct connection between the formerly barged station and the third party. A momentary break in the voice stream occurs while the connection is changed. A "beep beep" tone announces your departure, and the displays of the barged station and the third party change to reflect the direct connection between the two devices. If you cBarged into a call and the barged station disconnects, a momentary break in the voice stream occurs, after which you and the remaining person in the call are connected directly and you can continue the conversation. Your line display updates to reflect the call as a call between you and the other party. If the third party in the call disconnects, a momentary break in the voice stream occurs, and then you and the barged station are connected and you can continue the conversation. Your line display and the barged station's line display updates to reflect the call as a call between you and the barged station.
After you barged into a call via cBarge, either the person at the barged station or the third party can initiate a feature such as hold, transfer, conference, or call park. In this case, both you and the remaining party, either the barged station or the third party, remain in the call and the feature proceeds normally. Likewise, if you initiate a feature that results in a hold operation, both the barged station and the third party remain in the call, and the feature proceeds normally. When a hold results in two parties remaining in the call while a feature is being initiated, no music is sent to the held parties, and they are still connected and may continue a conversation.
Join
The join feature allows you to select a number of calls in the same line appearance and join together with these calls in a conference. You will be a participant in the conference. Alternatively, the direct transfer feature offers the ability to connect two selected calls but not participate in the call, as described later in the "Direct Transfer" section. Both join and direct transfer are limited to calls that are in the same line appearance and cannot be used for calls on different lines.
Join makes it easy to form a conference between you and other calls that already appear on the same line appearance on your station. First, select the calls in progress at your station that you want to conference. To select the calls, use the phone's navigation control to highlight the calls that you want to join, and then press the Select softkey for each call that you want to select. A check mark appears next to the selected call to indicate that it has been selected. You can select your currently active call and any other held calls that are not marked remote in use, meaning that they are active calls on another station. Second, press the Join softkey to connect you with the selected calls in a conference.
Tip
To save keystrokes when selecting calls, if no calls have been selected via the Select softkey, the currently active call and the currently highlighted call are the default selected calls for the feature. If you just want to join the currently active call and a single held call, for example, you just highlight the held call and press Join during an active call.
You can join individual calls as well as one existing conference call if you are the controller of the existing conference call. If you select two conference calls to be joined, the join operation will not succeed.
Note
A CallManager service parameter, Drop Ad Hoc Conference, determines how conferences such as those created with the join feature are terminated. See the section "Dropping Conference Participants" for more information.
Direct Transfer
Direct transfer enables you to join two calls from the same line appearance together into a single call. You will not be included in the call. If you want to form a conference in which you do participate, use the join feature described in the preceding section.
Direct transfer is an easy way to form a new call between two calls that already appear on your line appearance. First, use the navigation control on your phone to select the calls at your station that you want to connect together directly. Next, press the DirTrfr softkey to connect the selected calls together. The two parties will be connected to each other in a new call and will no longer be present on your station.
Generally, one of the two calls you plan to connect with another call is your currently active call. If that is the case, simply use the navigation control to highlight the other call and then press the DirTrfr softkey. You do not have to be in an active call to use direct transfer. You can scroll to any two held calls (so long as they are not marked remote in use, meaning that they are active at another station), select each one by highlighting the call, press the Select softkey, and then press the DirTrfr softkey to directly connect the two selected calls.
You can use direct transfer for individual calls as well as one existing conference call if you are the controller of the existing conference. In the case of a conference call, the individual call that you select will be added to the existing conference when you press the DirTrfr softkey and you will no longer be a part of the conference. If you select two conference calls to be directly transferred, the direct transfer will not succeed.
Note
A CallManager service parameter, Block OffNet To OffNet Transfer, determines whether transfers between external (OffNet) parties are blocked (not allowed). Allowing external transfers could result in toll fraud issues.
iDivert
The immediate divert (iDivert) feature enables you to divert a call to voice mail. You must have a voice mailbox configured for the iDivert feature to work. The following types of calls can be used with the iDivert feature:
- Incoming call that is currently ringing but not yet answered Press the iDivert softkey when you have an incoming call to immediately transfer the call to your voice mail.
- Call on hold Highlight the held call and press the iDivert softkey to immediately transfer the held call to voice mail.
- Active call Inform the caller that you are sending him or her to voice mail to leave a message, and then press the iDivert softkey to send the call to your voice mail.
- Outbound call that you initiated After you are connected to the called party, you can request the information that you want to have in the form of a voice message, and then press the iDivert softkey to immediately transfer the person you called to your voice mailbox. If you make an outbound call, and are interrupted and have to put the person on hold, you may explain, prior to putting the person on hold, that you will either get back to the person right away or transfer the call to voice mail. If after you put the call on hold, you realize that you'll be detained and not be able to resume the call, you can highlight the held call and press the iDivert softkey to transfer the call to voice mail.
Service URLs/Speed Dials
The buttons along the right side of the station are considered line/feature buttons. Any line/feature buttons that are not configured for lines can be used for other functions, including speed dial numbers, or service URL buttons, which allow users to press a one-button shortcut to an XML service. You assign line/feature buttons via the phone button template assigned to users' phones (Device > Device Settings > Phone Button Template).
After you have assigned a button template with a combination of lines, speed dial buttons, and service URLs, advise users that they can assign speed dials and/or service URLs via the Cisco CallManager User Options web page, as shown in Figure 3-6.
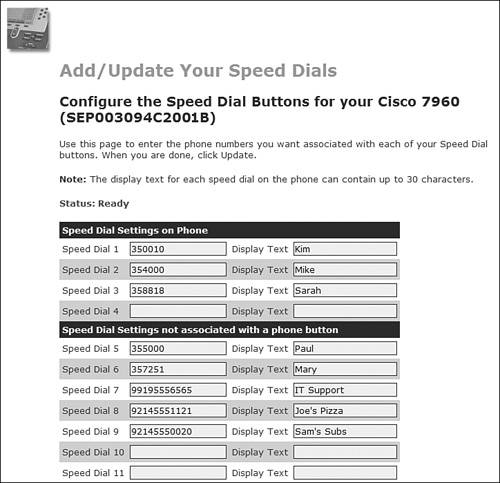
Configuring line/feature buttons for speed dial or service URLs provides users with access to the desired number or service with one quick button press. In addition to the line/feature buttons that you assign to the phone button template, the abbreviated dialing feature provides more speed dial buttons for a grand total of up to 99 speed dials, all configurable in the Cisco CallManager User Options web page. As shown in Figure 3-7, the speed dials are broken into two groups:
- Speed dial settings on the phone These speed dials refer to speed dial buttons you have configured on the phone button template.
- Speed dial settings not associated with a phone button These speed dials refer to speed dials associated with the abbreviated dialing feature (described in the section that follows).
Figure 3-7. Configuring Speed Dial Numbers in Cisco CallManager User Options Web Page
Abbreviated dialing is described in the following section.
Abbreviated Dialing (AbbrDial)
Abbreviated dialing allows you to dial a one- or two-digit index number that has been associated with a speed dial number. After you start dialing the index number, an AbbrDial softkey dynamically appears on the phone. Press the AbbrDial softkey to speed dial the number associated with the index number that was entered.
Users configure the speed dial numbers for abbreviated dialing in the Cisco CallManager User Options web page, as shown in Figure 3-7. The speed dials are numbered; the number is the index number that a user must dial prior to pressing the AbbrDial softkey. For example, using the speed dial settings shown in Figure 3-7, when Allen wants to order lunch at Joe's Pizza, he dials 8 and then presses the AbbrDial softkey. CallManager automatically dials 9, the access code Allen's company requires to call an OffNet destination, followed by the number: 214-555-1121.
To use abbreviated dialing, the phone must be on-hook. The AbbrDial softkey is not configurable on the softkey template. It appears dynamically when users begin entering a digit on the phone. However, the softkey only functions if the user has configured an associated speed dial number via the Cisco CallManager User Options web page.
Tip
Another way to access frequently called numbers is the IP phone service My Fast Dials. By using this service, you can create fast dials that you access through the services button or via a services URL button that has been configured on the phone button template. Because you can assign a specific IP phone service to a line/feature button that has been configured for service URL, you can access the My Fast Dials service with a single button press, and then select the fast dial of your choice by dialing a one- or two-digit index number for the entry that you want to call. Single-button access to a service is not limited to the My Fast Dials service, but this is probably one of the more frequently used service URLs that users will want to assign to a line button. You can learn more about My Fast Dials in the section "Cisco Personal Address Book" in Appendix A, "Feature List."
Dropping Conference Participants
You can drop conference participants from an Ad Hoc conference if you are the conference controller. An Ad Hoc conference is a type of conference in which a controlling station, the conference controller, manually adds conference participants one at a time. The conference controller can remove participants from a conference using two different Ad Hoc conference features:
- Drop Last Party Enables you to drop the last party who joined the conference
- Drop Any Party Enables you to drop a specific participant in the conference
A CallManager service parameter, Drop Ad Hoc Conference, determines how an Ad Hoc conference such as those created via the Confrn, Barge, and Join softkeys, terminates. The options are as follows:
- Never The conference remains active a) after the conference controller hangs, and b) after all OnNet parties hang up. Choosing this option means that if OnNet parties conference in OffNet parties and then disconnect, the conference stays active between the OffNet parties, which could result in potential toll fraud.
- When Conference Controller Leaves Terminate the conference when the conference controller hangs up or when the conference controller transfers, redirects, or parks the conference call and the retrieving party hangs up.
- When No OnNet Parties Remain in the Conference Terminate the conference when there are no OnNet parties remaining in the conference.
You can learn more about Ad Hoc conferences in Chapter 5, "Media Processing," and in the section "Conference/Confrn" in Appendix A.
Drop Last Party
During an active or held Ad Hoc conference, the conference controller can press the RmLstC softkey to drop the last party who joined the conference. You must configure the RmLstC softkey on the softkey template and assign the template to phones for it to be available (Device > Device Settings > Softkey Template). Alternatively, the ConfList softkey enables the conference controller to view a list of conference participants and drop the selected station, as discussed in the following section.
Drop Any Party
During an active Ad Hoc conference, conference participants (including the conference controller) can press the ConfList softkey to view the list of conference participants. Pressing the ConfList softkey invokes an application that runs as a service on the station and provides a list of conference participants. The conference controller can drop a participant by using the phone's navigation control to scroll through the list to highlight a name/number and then pressing the Remove softkey to drop the highlighted participant from the conference. You can repeat this operation until all parties who you want to drop from the conference have been removed. The ConfList softkey is automatically available and requires no configuration.
Configurable Display of Forwarded Call Information
You can specify, on a per-line basis, the types of information that users see when calls are forwarded to their stations. Each line on a station can display different forwarded call information based on the settings configured in the Forwarded Call Information Display area on the Directory Number Configuration page in CallManager Administration (Device > Phone > find and select a phone > click a line number).
To better understand the display capabilities that can be configured for each line on a station, the following explanations help to clarify some common terms.
Each line on your station that can be used for calls has an associated directory number. If you originate a call, the line that you use to place the call, for display purposes, is referred to as the calling line ID (CLID) or simply calling party number. There is also a display name associated with that line on your station, and it is referred to as the calling name ID (CNID) or simply the calling party name.
When you make a call by dialing the directory number of the person you want to reach, the number that you dial is referred to as the original dialed number (ODN). Because calls might be forwarded one or more times, the original dialed number might not be the actual number of the line that is answered when the call is completed. The final directory number used to extend the call when the call is actually completed is referred to as the redirected dialed number (RDN).
The following check boxes are provided on the Directory Number Configuration page in CallManager Administration. All can be enabled or disabled by selecting/deselecting the check box. These check boxes control the display of information for calls that have been forwarded to the phone. By default, for forwarded calls that arrive at your phone, you will see the original dialed number and the calling party name.
- Caller name (also known as calling name ID [CNID]) Enabled by default
- Caller number (also known as calling line ID [CLID]) Disabled by default
- Redirected number (also known as redirected dialed number [RDN]) Disabled by default
- Dialed number (also known as original dialed number [ODN]) Enabled by default
Consider the following example: A call arrives at John's station on the line associated with directory number 4444. Delon Whetten originated the call on line 1111, and called Anne Smith at 2222. Anne had forwarded 2222 to Chris Pearce at 3333. Chris had forwarded 3333 to you at 4444. In this example, the calling party name is Delon, and the calling party number is 1111. The original dialed number is 2222. The redirected dialed number is 3333. When the phone arrives at John's station, the information that displays depends on the display options that you configured for John's station. Table 3-1 shows the information that displays for each of the display option combinations you can configure.
|
Caller Number |
Caller Number |
Caller Number |
Caller Number |
|
|---|---|---|---|---|
|
Dialed Number Enabled Redirected Number Disabled |
Forward 1111 For 2222 |
Forward Delon Whetten For Anne Smith |
Forward Delon Whetten (1111) For Anne Smith (2222) |
Forwarded For 2004 |
|
Dialed Number Enabled Redirected Number Enabled |
Forward 1111 For 2222 By 3333 |
Forward Delon Whetten For Anne Smith By Chris Pearce |
Forward Delon Whetten (1111) For Anne Smith (2222) By Chris Pearce (3333) |
Forwarded For 2222 By 3333 |
|
Dialed Number Disabled Redirected Number Enabled |
Forward 1111 By 3333 |
Forward Delon Whetten By Chris Pearce |
Forward Delon Whetten (1111) By Chris Pearce (3333) |
Forwarded By 3333 |
|
Dialed Number Disabled Redirected Number Disabled |
Forward 1111 |
Forward Delon Whetten |
Forward Delon Whetten (1111) |
Forwarded |
Configurable Text Label per Line
The Line Text Label field on the Directory Number Configuration page (Device > Phone > find and select a phone > click a line) enables you to configure a line with a text display rather than a directory number display.
For a station with only a few lines (perhaps a private line and a second line that is shared with another station), using the directory numbers for identification will probably suffice. For users who typically answer calls for multiple people and have numerous shared lines, however, the text display with names for each line is much more acceptable. If a line has an incoming call for John Alexander, a quick glance will let the user know that it is a call on John's line. It is then much easier to quickly answer with a greeting such as "Hello, John Alexander's office."
Alerting Name
The Alerting Name field enables you to configure the name that you want displayed on the calling station when a call is in the Alerting (ringing) state. For example, if you dial John Alexander at 214-555-1000, while the call is ringing at John's phone, the display on your phone shows "To John Alexander (2145551000)." The QSIG protocol uses this field as part of the Identification Services, but this field applies to all calls and is a part of the caller ID information that CallManager sends. The alerting name may differ from the name that displays when the call is connected. If you do not configure an alerting name, only the phone number or "Name Not Available" might display on the calling phone.
Auto Answer
Auto answer means that an incoming call is automatically answered at the station. A headset or speakerphone must be enabled and idle (not in use) for auto answer to occur. Two types of auto answer are available:
- Auto answer with headset Provides hands-free operation with the use of a headset
- Auto answer with speakerphone Provides a hands-free point-to-point intercom between two IP stations
These capabilities prove especially useful for users who receive many calls during the day and need hands-free operation. You can configure the auto answer functionality on the Directory Number Configuration page for any line on a station (Device > Phone > find and select a phone > click a line).
When auto answer with headset is enabled for a particular line on a station, the user hears a single beep (also called a zip tone) announcing the call, and then the call is automatically answered. If the user is currently in an active call, the new incoming call is not automatically answered. Auto answer with headset requires the use of a headset. The call is not automatically answered if the headset is not plugged into the back of the station and the HEADSET button enabled. Because the feature is designed so that calls will be answered automatically, auto answer with headset cannot be assigned to shared line appearances.
Auto answer with speakerphone provides a hands-free intercom between two stations. If a call is already active on the station when another incoming call arrives, auto answer will not occur and the call continues as a normal incoming call.
To allow a station to use intercom functionality to reach another station, you configure auto answer with speakerphone on a dedicated line on a station. The dedicated line has a directory number associated with it, for example 1111. Any user who dials 1111 is immediately connected to the station via the speaker. You should probably limit the number of people who could dial the intercom number, and you can achieve that limitation by defining a partition for 1111 and restricting the stations that have access to the 1111 partition in their calling search space. To provide single-button intercom capability, assign a speed dial to the line button on the stations that can access the intercom number, and the stations will be able to use the intercom line by simply pressing the speed dial button.
Media Termination at Route Points
The media termination route points enable an application to answer a call, determine the appropriate action to take for the call, and then route the call based on that determination. To allow you to direct calls to an application and allow the applications to process the calls, you can define a route point associated with a directory number as a virtual station capable of receiving calls and taking action on the calls. You can provision calls to be sent to route points based on the appropriate criteria that qualify the calls that need processing by a particular application. The route point will receive the calls and allow the application to do whatever processing is required for the call. The call answered by the application can later be redirected to a CTI port or a station. The route point can receive multiple simultaneous calls, and therefore the media and port for the each new call is provided by the route point. The following features are available for your use in the application:
- Answer
- Multiple active calls
- Redirect
- Hold
- Un-hold
- Drop
With these features available to applications to take action on calls that are sent to the application, you can develop very powerful applications for special call handling at a route point. In a simple call distribution example, your application would do the following:
- Answer a call answered at the route point.
- Play an announcement that the call will be directed to the next available agent.
- Place the call on hold.
- Monitor the available agents and when one becomes available redirect the call to the available agent.
The route point provides a place to hang on to the call and direct the activities of the call to get it to the right destination.
Cisco CallManager Architecture
- Cisco CallManager Architecture
- Circuit-Switched Systems
- Enterprise Deployment of CallManager Clusters
- Regions
- Summary
Call Routing
- Call Routing
- The Three Responsibilities of Call Routing
- The Seven Fundamentals of Call Routing
- Route Patterns and Route Filters
- Dialing Transformations
- Translation Patterns
- Call Hunting Constructs
- Calling Search Spaces and Partitions
- Case Studies
- Miscellaneous Solutions
- International Numbering Plans
- Troubleshooting
- Summary
Station Devices
- Station Devices
- Definition of Station Devices
- Overview of Station Device Features Supported by CallManager
- Overview of Station Devices Supported by CallManager
- SCCP Station Devices
- Cisco VT Advantage
- Computer Telephony Interface (CTI) Devices
- H.323 Endpoint Devices
- Summary
Trunk Devices
- Trunk Devices
- Architectural Overview of Trunk Devices
- Overview of Circuit-Switched Interfaces
- VoIP Gateway Security
- H.323 Gateways
- MGCP Gateways
- SIP
- Summary
Media Processing
- Media Processing
- Media Processing Overview
- Architecture and Functionality of the Media Control Layer
- Ad Hoc Conferencing
- Meet-Me Conferencing
- Summary
Manageability and Monitoring
Call Detail Records
- Call Detail Records
- Overview of CDR Data
- Creation and Usage of CDR Data
- Storage and Maintenance of CDR Data
- Understanding Field Data in CDRs
- Understanding Field Data in CMRs
- Identifying CDR Data Generated for Each Call Type
- Accessing CDR Data in the Central CDR Database
- Hints on Processing CDR Data
- Troubleshooting CDR Data Generation and Storage
- Summary
Appendix A. Feature List
Appendix B. Cisco Integrated Solutions
- Appendix B. Cisco Integrated Solutions
- Infrastructure Solutions
- Telephony Service Solutions
- Client Solutions
- Application Solutions
- System Tools
Appendix C. Protocol Details
- Appendix C. Protocol Details
- H.323 Signaling
- QSIG
- SIP Signaling
- SCCP Call Signaling
- Application Protocols
Index
EAN: 2147483647
Pages: 141
