Now it's time to get back to the guestbook you created in Lesson 8. You set everything to collect data from your visitors , but now you have to add ActionScript to send the data to the server.
-
Open guestbook7.fla from the FlashTFS folder on your hard drive.
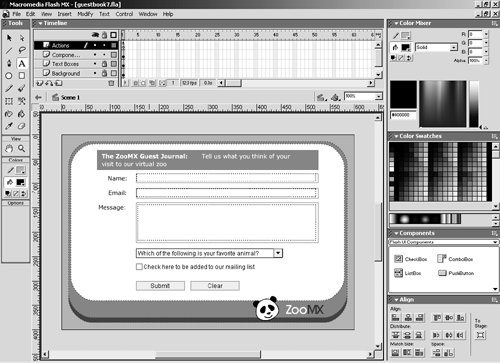
You created the guestbook7.fla file in Lesson 8 and should have saved it in the FlashTFS folder. If for some reason you can't find the file, you can open guestbook7.fla from the Lesson09/Starting folder. Make sure to save the file to the FlashTFS folder on your hard drive before you continue.
-
Select frame 1 of the Actions layer, and add the following ActionScript:
function showList(success) { if (success) { animal.removeAll(); animal.addItem("Which of the following is your favorite animal?"); for (var i = 0; i<this.numAnimals; i++) { animal.addItem(this["common"+i], this["ID"+i]); } } } function getList() { aList = new LoadVars(); aList.load(dataURL+"animals.php", aList); aList.onLoad = showList; } dataURL = "http://www.flashtfs.com/data/"; 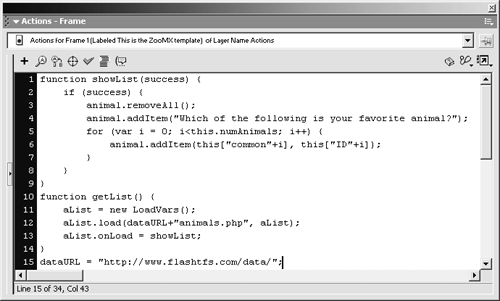
TIP
If you don't want to type all this code, you can import it into the Actions panel. Just make a new line at the start of the code that's already there, and be sure the pointer is in that new line. Click the Options menu control in the Actions panel, and choose Import from File in the drop-down menu. In the Open dialog box, browse to the Lesson09/Assets folder, locate list.as, and click Open. Flash will import the code in list.as to the Actions panel.
Add this ActionScript before any other code in the Actions panel. This code should look familiarit's similar to the code you added to the map movie to add values to the ListBox component instance. In this case, you're adding values to the ComboBox component instance, using values loaded from the animals.php file on the server. The getList function creates a new LoadVars object named aList , and requests the data from the server using the load method. When the onLoad event is triggered, the showList function removes all the existing values from the animal instance of the ComboBox component and adds all the items returned by animals.php. Unlike what happens with the ListBox component instance in the map movie, the data value for each item in the animal ComboBox instance receives a value from the animals.php file. That value corresponds to the ID number of the selected animal in the database.
As you learned earlier in this lesson, Flash expects this format. When this data is loaded by the movie, Flash can use each of the variables in this external data source as a variable in the aList object.
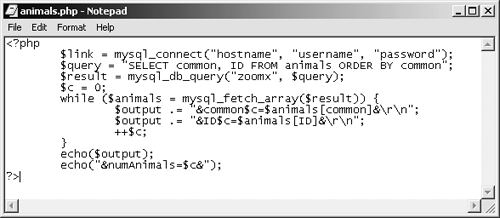
You can find a copy of animals.php in the Lesson09/Assets folder. If you'd like to take a look at it, just open the file in a text editor.
-
Add this code to the Actions panel:
getList();
You set up the getList function, but now you have to call it. Adding this line of code, which should follow the dataURL variable, will do just that. After you add this code, you can test your movie to make sure the combo box gets the values from the server.
-
Now add the following ActionScript:
function processForm(btn) { if (btn._name == "clear") { } else if (btn._name == "submit") { } } 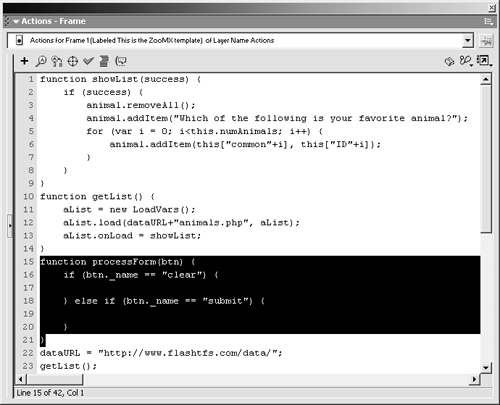
NOTE
This ActionScript should follow the getList function, but it should come before the dataURL variable.
You already added instance names and click handlers to the PushButton instances in Lesson 8. The PushButton instance labeled Submit has an instance name of submit, and the PushButton instance labeled Clear has an instance name of clear .
The click handler for each instance is processForm . When the processForm function is called by either PushButton instance, the path of the clicked button is sent to the processForm function. The code you just added creates the processForm functionthis function expects a parameter called btn , which is the path of the PushButton instance you clicked.
The if statement inside the processForm function checks to see which instance of the PushButton you clicked. If the instance name is clear , the if statement will run. If the instance name is submit , the else if statement will run. We're starting with the clear case because, as you'll see in the next step, it's much easier to write.
-
Add this ActionScript to the first part of the if statement inside the processForm function:
visitorName = ""; visitorEmail = ""; visitorMessage = ""; animal.setSelectedIndex(0); mailList.setValue(false);
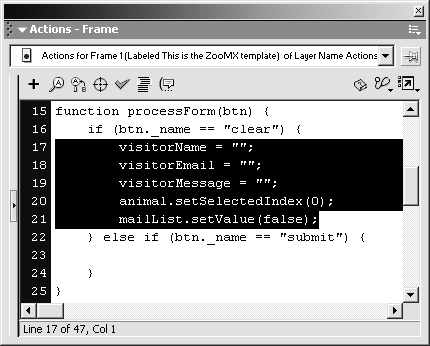
After you add this code, the processForm function should look like this:
function processForm(btn) { if (btn._name == "clear") { visitorName = ""; visitorEmail = ""; visitorMessage = ""; animal.setSelectedIndex(0); mailList.setValue(false); } else if (btn._name == "submit") { } } This code is pretty simple. It sets the values of the visitorName , visitorEmail , and visitorMessage variables to "" , which effectively removes any value that might be in the text boxes assigned those variable names. Then it sets the selected index for the animal instance of the ComboBox component to , using the setSelectedIndex method of the built-in FcomboBox object. The argument for this method is the index number you want the component instance set tousing will set it to the first item in the list, which is the default value. Finally, using the setValue method of the built-in FCheckBox object, the code sets the value of the mailList instance of the CheckBox component to false .
-
Add the following code inside the else if statement:
formData = new LoadVars(); formData.vname = visitorName; formData.email = visitorEmail; formData.message = visitorMessage; formData.AID = animal.getSelectedItem().data; if (mailList.getValue()) { formData.mlist = 1; } else { formData.mlist = 0; } formData.action = "add"; 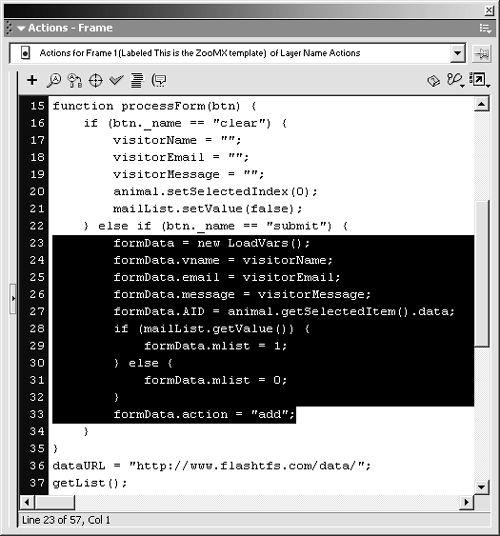
After you add the code, the processForm function should look like this:
function processForm(btn) { if (btn._name == "clear") { visitorName = ""; visitorEmail = ""; visitorMessage = ""; animal.setSelectedIndex(0); mailList.setValue(false); } else if (btn._name == "submit") { formData = new LoadVars(); formData.vname = visitorName; formData.email = visitorEmail; formData.message = visitorMessage; formData.AID = animal.getSelectedItem().data; if (mailList.getValue()) { formData.mlist = 1; } else { formData.mlist = 0; } formData.action = "add"; } } The code you just added should look familiar. You simply created a new instance of the LoadVars object, named formData . Then you set the values of the vname , email , message , AID , and mlist variables of the new formData object. The values of these variables will be set to the values of the visitorName , visitorEmail , and visitorMessage variables. Those variables are set by the corresponding text boxes in the movie. The AID variable will have a value of animal.getSelectedItem().data , which is simply the data value for the selected item in the animal instance of the ListBox component. Finally, if the mailList instance of the CheckBox component is selected (checked), mailList.getValue() will be true, and the mlist variable will be set to 1 . Otherwise the mlist variable will be set to .
The last line of the code that was added in this step of this code creates another variable in the formData object. This variable, named action , is used by the guestbook.php script on the server. It lets the PHP script know that you want to add a record to the database.
-
Add the following ActionScript after the code you just added:
formData.sendAndLoad(dataURL+"guestbook.php", formData); formData.onLoad = showResult;
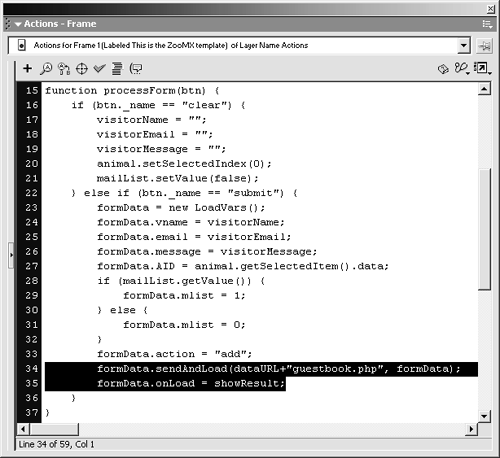
Add this code to the else if statement, following the code you added in the last step. This ActionScript simply sends the data in the formData object to the guestbook.php file on the server. The onLoad event then triggers the showResult function, which you'll add next. The completed processForm function should look like this:
function processForm(btn) { if (btn._name == "clear") { visitorName = ""; visitorEmail = ""; visitorMessage = ""; animal.setSelectedIndex(0); mailList.setValue(false); } else if (btn._name == "submit") { formData = new LoadVars(); formData.vname = visitorName; formData.email = visitorEmail; formData.message = visitorMessage; formData.AID = animal.getSelectedItem().data; if (mailList.getValue()) { formData.mlist = 1; } else { formData.mlist = 0; } formData.action = "add"; formData.sendAndLoad(dataURL+"guestbook.php", formData); formData.onLoad = showResult; } } -
Add the showResult function to the Actions panel:
function showResult(success) { if (success) { trace("record added"); } } 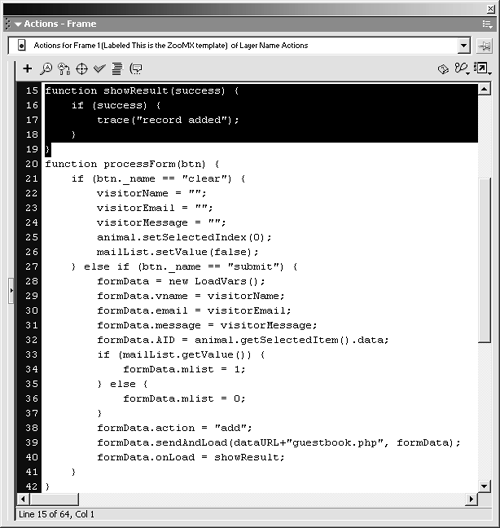
This function should be added before the processForm function. The showResult function is very much like the showList function in the map movie. Instead of actually showing a result if the variables in the formData object loaded successfully, this function simply writes the string "record added" in the Output window when you test the movie.
-
Choose Control > Test Movie. Save the file as guestbook8.fla when you're finished.
When you test the movie, you should be able to use both the Submit and Clear buttons . Try typing some values in the text boxes, and select an animal from the list. Then click each button to see what happens.