Working with Loops in ActionScript Sometimes you need to apply the same ActionScript several times. Rather than writing the ActionScript each time, you can use an ActionScript-based loop to repeat the same ActionScript a set number of times. ActionScript has several different actions to create loops: for , forin , while , and do while . In the following exercise you will add a for statement to your movie to add several instances of the Menu Piece movie clip. You will also customize the appearance of each Menu Piece instance using the for statement. You should still have zoo31.fla from the last exercise open when you start this exercise. -
Add this code to frame 1, following the ActionScript already in the script pane: for (var i=0; i<menu.length; i++) { } 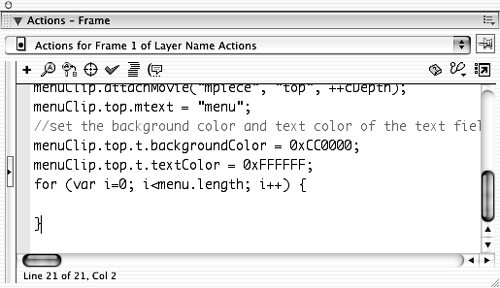 Select frame 1 of the Actions layer, and add this code to the script pane in the Actions panel. It should follow the code already in frame 1. The first and last lines of code create a loop: for (var i=0; i<menu.length; i++) { } This is a for statement, which is a loop with a built-in counter. The syntax for a for statement is as follows : for (initial expression; condition; post expression) { } Any code inside the curly braces of the for statement will run as many times as the condition is true. The initial expression , which is var i=0 in the code you added, initializes the built-in counter for the for statement. It sets the value of a variable named i to an initial value of . The var before the variable assignment simply tells Flash that this is a local variableit will exist only inside the for statement. That way, if you use a variable named i in another part of the code, it won't be affected by this variable named i . The post expression , which is i++ in your code, tells the for statement what to do to the counter each time it runs through the for statement. So in the case of the ActionScript you added, the counter is a variable named i , which starts with a value of , and is changed by an increment of 1 each time the for statement is run ( i++ ). NOTE When you used the increment operator ( ++ ) before, it was placed before the name of the variable, which increases the value of the variable by 1 and returns the new value. In this for statement, the increment operator follows the name of the variable and changes the variable's value by an increment of 1, but it returns the value before it was incremented. The condition is a logical expression that determines how many times the for statement is run. The statement runs as long as the condition expression is true. In this case, the condition checks to see if i is less than the value of menu.length , which is the length property of the menu array. The length property of the built-in Array object, of which the menu array is a copy, checks to see how many elements are in the array. The menu array has six elements, so menu.length has a value of 6 . If you add or remove elements from the menu array, the value of menu.length changes accordingly . Once the value of i reaches 6 , the condition is no longer true, and the for statement will not run anymore. NOTE The for statement does not require a semicolon following the closing curly brace ( } ). The curly braces act as the "punctuation" for the statement, enclosing any code inside. -
Inside the for statement's curly braces ( { and } ) add the following code: menuClip.attachMovie("mpiece", "item"+i, ++cDepth); menuClip["item"+i].mtext = menu[i]; menuClip["item"+i]._y = menuClip.top._height + menuClip["item"+i]._height*i; 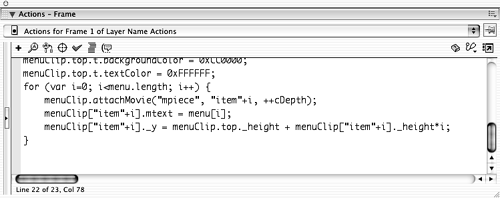 After you add the code, the for statement should look like this: for (var i=0; i<menu.length; i++) { menuClip.attachMovie("mpiece", "item"+i, ++cDepth); menuClip["item"+i].mtext = menu[i]; menuClip["item"+i]._y = menuClip.top._height + menuClip["item"+i]._height*i; } TIP You are not required to indent the code inside the for statement, but the code may be easier to read if you do. You can click the Auto Format button above the script pane to have Flash automatically indent the code for you. Don't let this code intimidate you! It may appear to be very complex, but after you break it down, you'll see that it's actually rather simple. The first line attaches an instance of the Menu Piece movie clip inside the menuClip instance, giving it a new instance name of "item"+i . So the first time through the for statement, when i is , the instance name will be item0 . The second time through, it will be item1 , and so on. The depth for the attached movie clip is the incremented value of cDepth . You already increased the value of cDepth by one once, when you attached the top instance, so the first time through the for statement, it should have a value of 2, and it will increase by one more each time the for statement runs this code. The second line of code sets the value of the mtext variable inside the attached movie clip to a value from the menu array. This second line sets up your ActionScript to use the dynamically generated instance name for the attached Menu Piece movie clip. Notice that no dot follows the word menuClip . Flash understands the value inside the brackets ( ["item"+i] ) as though the dot were used. This syntax is known as associative array syntax, which is one way of placing expressions in the target path of an object. The element from the menu array that the mtext variable is assigned depends on the value of i . If i is 0, then the first element in the array is used. If it's 3, then the fourth element in the array is used. The last line of code you added in this step sets the _y property of the attached movie clip. The _y property is one of the many properties of the MovieClip object; the attached movie clip instance is a copy of the MovieClip object. It refers to the y position of the movie clip, relative to the timeline it's inside of. So in this case, it's the y position relative to the menuClip movie clip. This value is set to an expression, which bases the y position on the heightthe _height propertyof the top movie clip, plus the height of the attached movie clip times the value of i . This ingenuous bit of code places each attached movie clip below the one before it. NOTE While the coordinate system on the main timeline starts at the top-left corner of the stage, the coordinate system for a movie clip starts at its registration, or center point. So 0,0 on the main timeline is at the top-left corner of the stage, and 0,0 in a movie clip is the registration for the movie clip. -
Select frame 12 of the Actions layer, and add: menuClip._visible = true; 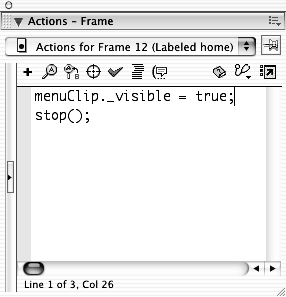 Select frame 11 of the Actions layer, and make sure you have the Actions panel open. Then type the code in the script paneit should still be in Expert Mode. This code sets the instance of the menuClip movie clip's _visible property to true . When the movie reaches frame 11, the menu becomes visible on the screen. -
Choose Control > Test Movie. 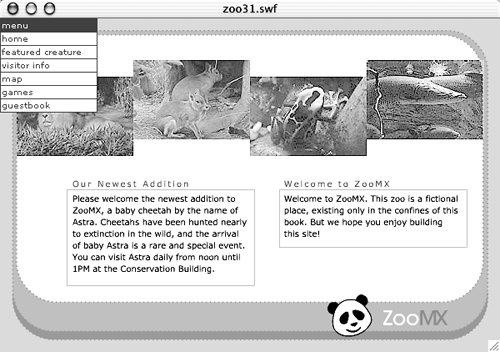 When you test the movie, a menu should appear on the screen when the movie reaches frame 11. The top of the menu should have a red background, with the word menu in white. The rest of the menu items should have a white background with red text. The text should correspond to the elements in the menu array. Each menu item should have a red border. -
Save the file as zoo32.fla in the FlashTFS folder on your hard drive. You still have quite a bit to do to your menu. So save your work, just in case you have to go back to this version. |