Flash has several built-in objects, which you can use to customize many aspects of your movies. One of the built-in objects is the TextField object. Every instance of a dynamic or input text box in Flash is a copy of the TextField object. The TextField object has a number of properties, including background , backgroundColor , border , and borderColor . You can use these properties to customize the look of your text boxes with ActionScript, as you'll do in the next exercise.
Start this exercise with zoo30.fla from the last exercise open .
-
Select the dynamic text box in frame 12 of the Menu layer, and choose Insert > Convert to Symbol. When the Symbol Properties dialog box opens, type Menu Piece in the Name text box, set the Behavior to Movie Clip, and set the Registration to the topleft corner.

You are going to use the dynamic text box as the basis for each piece of the menu. But before you do, you have to place the dynamic text box inside a movie clip. You are going to use ActionScript to dynamically attach instances of the movie clip containing the dynamic text box to the movie.
It's important that you set the Registration for this new movie clip to the top-left corner. The ActionScript you'll add to create the menu will be based on the assumption that the registration point for the Menu Piece movie clip is in the top-left corner of the symbol. If it's not, the menu may look strange . If you complete the menu and it looks a little off, check to make sure the top-left corner of the dynamic text box is at the center of the Menu Piece symbol. The dynamic text box should look like the figure below.

-
Click the Advanced button in the Symbol Properties dialog box. In the expanded dialog box, select the "Export for ActionScript" option and type mpiece in the Identifier text box. Make sure the "Export in first frame" option is also selected, and click OK.
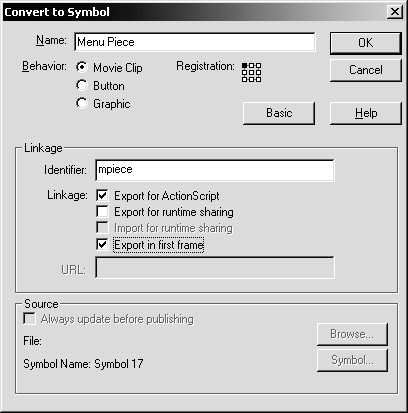
When you click the Advanced button in the Symbol Properties dialog box, several additional options appear in the dialog box, including the Linkage settings.
Before you can attach a movie clip directly from the library, you need to set the movie clip to export with the movie. By default, symbols that are not on the stage are not exported with the movie. There's currently an instance of the Menu Piece movie clip on the stage, but you will remove that instance by the end of this exercise. So first you need to select the "Export for ActionScript" option in the Linkage area of the Symbol Properties dialog box. When you select this setting, Flash automatically selects the "Export in first frame" optionleave this option selected, or the symbol must be added to the stage in order to export it with the movie.
Once the movie clip is set to be exported with the movie, you have to give it an identifier. An identifier is simply a name that Flash can use to reference the exported movie clip in ActionScript, since there is no instance of the movie clip in the movie, and thus no instance name for the movie clip. When you select the "Export for ActionScript" option, the Identifier field becomes editable. Type mpiece in that field, so Flash knows to call this movie clip mpiece when it's time to attach it to the movie.
-
Open the Menu Piece movie clip in symbol-editing mode. Select the text box on the stage, and set its instance name to t.
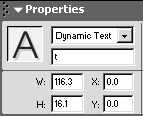
You can open the Menu Piece movie clip in symbol-editing mode by double-clicking on the instance that was created on the stage in the last step. Or you can open the library, locate the Menu Piece movie clip, and double-click the icon to the left of that symbol's name.
In order to use the built-in TextField object, which you're going to do in the next step, you need to give the dynamic text box an instance name. That way Flash knows which text box the ActionScript should modify. In this case, the instance name of the text box, which is set in the Property inspector, should be t .
-
Name the existing layer Text, and add a new layer above it named Actions. Select frame 1 of the new Actions layer, and add the following ActionScript to the Actions panel:
t.background = true; t.border = true; t.borderColor = 0xCC0000;
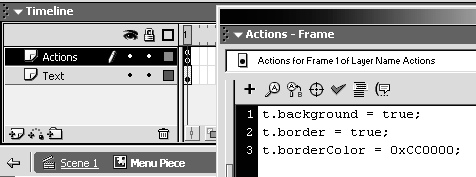
When you used the built-in Array object to create a new array in the last exercise, you had to use the new operator and a constructor function:
menu = new Array();
You do not need to use the built-in TextField object in Flash. You simply need a text box, or text field in the movie. The instance name of the text box is the name of the object, so the TextField object in this case is called t . It would be like adding this code:
t = new TextField();
You don't have to add this code, though, because Flash "knows" that you have a TextField object when you add a dynamic text box to the movie.
NOTE
All dynamic and input text boxes are instances of the TextField object.
TIP
Click the Insert a Target Path button to open the Insert Target Path dialog box. Select the movie clip, text field, or button you want to use as your object, be sure the Notation is set to Dots, set the Mode to Relative, and click OK. See the figure on the following page.
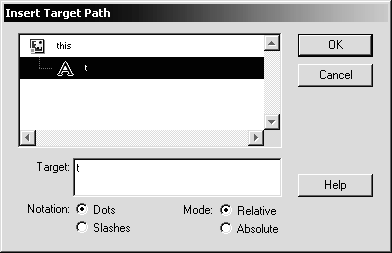
Once you've added a new object to the movie, you can access its built-in properties using dot syntax. Simply type the name of the object, followed by a dot, and then followed by the property you want to modify or read. In the ActionScript you just added, the name of the object is t , and the properties are background , border , and borderColor .
You can use dot syntax to target anything with an instance name, such as a text box or a movie clip. A dot syntax target path looks much like a file path on your computer, except the slashes (/) or colons (:) are replaced with dots (.). So if you refer to the fish instance, which is inside the seal instance, you would use seal.fish .
Dot syntax target paths can be absolute or relative. Dot syntax uses two special aliases, _root and _parent . The _root alias refers to the main timeline (root), and the _parent alias refers to the timeline in which the current movie clip is nested.
In addition to using dot syntax to identify target paths, ActionScript uses dot syntax to refer to properties of an object. State the name of the object (or the target path of a movie clip), followed by a dot, and name the property you want to reference. For example, if you want to reference the speed property of an object called cheetah , you would reference cheetah.speed .
Referring to a method of an object works almost the same way. Methods have arguments, or parameters, that are placeholders for values passed to the method. These arguments follow the name of the method in parentheses, using the following syntax: methodName(arguments) . To use dot syntax to refer to a method of an object, you would first state the name of the object (or the target path of a movie clip), followed by a dot and then the method. For example, if you want to reference the eat method of the cheetah object with no arguments, you would reference cheetah.eat() . If you want to pass an argument called victim with a value of "antelope" , the syntax would be cheetah.eat("antelope") . The victim argument is specified in the definition of the object method.
Properties are basically like variables they can hold values. In the background property of the built-in TextField object, the value can be a Boolean, which means it can be either true or false . Setting it to true will cause a background to appear behind the text box. By default, that background will be white. The border property's value can also be a Boolean. Setting this value to true will cause a border to appear around the text box. The default color for this border is black. Finally, the borderColor property can have a number value. In this case, the value should be a hexadecimal number. Setting this value to the hexadecimal number 0xCC0000 will create a dark red border around the text box.
-
Return to the main movie's timeline, and delete the Menu layer. Choose frame 1 of the Actions layer, and add the following ActionScript to the Actions panel:
// create a new movie clip to hold the menu this.createEmptyMovieClip("menuClip", 1); menuClip._visible = false; cDepth = 0; 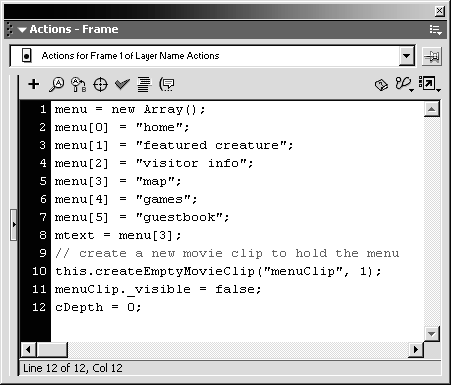
You don't need the Menu layer anymore, because you're going to use ActionScript to add the menu to the movie. Select the Menu layer, and click the Delete Layer button at the bottom of the timeline.
The first line of this ActionScript is a comment. When you add it to the Actions panel, the comment is highlighted in gray. The comment reminds you what a particular piece of ActionScript does, and it's helpful for other programmers who might need to use your code.
The next line of ActionScript creates a new, empty movie clip. The createEmptyMovieClip portion of this code is a method of the MovieClip object, another built-in object in Flash. Every movie clip added to the stage is considered an instance of the MovieClip object, so as with the TextField object, you don't have to use a constructor function to make a copy. The createEmptyMovieClip method, as its name might suggest, creates a new, empty movie clip inside its object. In this case, the object is this , which refers to the current timeline.
The arguments for the createEmptyMovieClip method are the instance name of the new movie clip and its depth. In this code, you set the instance name to "menuClip" , which will become a new instance of the MovieClip object once the movie clip is added. The depth is the z-index, or stacking order, of the attached movie clip. Attached movie clips are always higher in the stacking order than anything else in the movie. For this bit of code, the depth is set to 1. The depth value can be any positive number, and the higher the number, the higher in the stacking order the movie clip will be.
The MovieClip object has a number of properties, one of which is the _visible property. This property determines whether or not the referenced movie clip is visible on the screen. A Boolean value of true makes the movie clip visible, while false makes it disappear. In this case, you'll set the _visible property of the menuClip object (movie clip) to false , so it will not appear on the screen. Why go through the hassle of adding it if it's not visible? Because you don't want the menu to appear on the screen until you're ready! You'll add more code later to make the menu appear.
Finally, you added a line of code that initializes a variable called cDepth . The value of this variable is a number, namely . It's a good idea to initialize variables before you use them so you don't end up with undefined values later. You will use this variable to set the depths of several movie clips later in the code.
-
Add the following ActionScript:
// attach an instance of mpiece menuClip.attachMovie("mpiece", "top", ++cDepth); menuClip.top.mtext = "menu"; 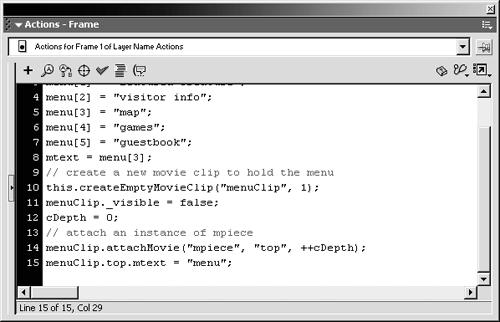
You should add this ActionScript following the script already in frame 1 of the Actions layer. Just add a new line and start typing.
Once again, the first line of this ActionScript is a comment. It's there to remind you, or another programmer, what's going on.
The next line of code uses another method of the MovieClip object: attachMovie . As you already know, a method needs an objectin this case, menuClip , which refers to the movie clip you created in the last step.
The arguments for the attachMovie method are idName (the identifier for the attached movie clip), newName (the new instance name of the attached movie clip), and depth (the depth of the attached movie clip). You set the identifier for the Menu Piece movie clip to mpiece when you created it. The instance you attach inside the menuClip movie clip will have an instance name of top when this code is run. Finally, the depth is the z-index, or stacking order, of the attached movie clip. In this case, you're using a variable ( cDepth ), but it has the increment operator in front of it. That changes the value of the variable cDepth by 1 before it returns a value. When you use the increment operator, you can increase the value of the affected variable by 1. You initialized cDepth at 0, so this code will set the depth (the value of cDepth ) to 1. It will keep the new value of cDepth in memory for the next time that variable is used.
Be sure to put the values for the idName and newName arguments in quotation marks. You want the string "mpiece" to be used for the idName argument and the string "top" to be used for the newName argument. If you forget the quotation marks, Flash tries to use the values of variables called mpiece and top for those arguments. Because no such variables exist, your ActionScript won't work. The value for the depth argument doesn't need quotation marks, because it's a variable.
Finally, the last line of code sets the mtext variable inside the attached movie clip to "menu" . So when the instance of the Menu Piece movie clip is attached inside the movie clip instance named menu , the word menu should appear inside. In the next step you'll modify the text box so it has a unique background color and text color.
-
Add this ActionScript:
// set the background color and text color of the text field menuClip.top.t.backgroundColor = 0xCC0000; menuClip.top.t.textColor = 0xFFFFFF;
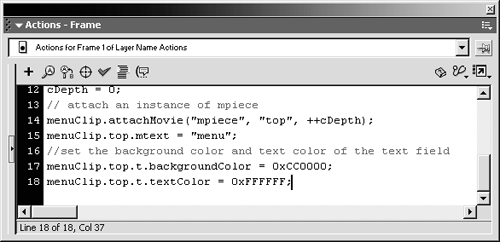
Add this ActionScript to frame 1 of the Actions layer, following the code already there.
As before, the first line of this code is a comment. You'll see quite a few comments throughout this lesson. It's very useful to add comments to your code as you learn ActionScript so you can remember what all those strange lines of code do the next time you look at them.
The next line of code uses the backgroundColor property of the built-in TextField object. It sets the background color of the t instance, which is inside the top instance, which is nested in the menuClip instance, to a dark red color (#CC0000). In step 4 of this exercise, you set the background property of the text field named t to true the background property must be true in order for the color set by the backgroundColor property to be visible.
The last line of code sets the textColor property of the built-in TextField object, which is applied to the dynamic text box with an instance name of t . The textColor property, as its name suggests, sets the text color of the affected text box. So this code will set the text color of the t text box to white (#FFFFFF).
-
Save the file as zoo31.fla in the FlashTFS folder on your hard drive.
Since the menu movie clip is invisible ( _visible is false ) right now, there's no point in testing because you won't be able to see anything. If you'd like to check your work anyway, just go back and comment out the line that sets the menuClip 's _visible property to false add two slashes (//) at the start of that line. Then test the movie to see what happens. Remember to remove the two slashes from the start of the line before you continue.
Make sure you save your work at this point! You've added a lot of ActionScript and significantly changed the movie.


