-
Select frame 1 of the Actions layer. Add a new line after line 14, and add the following ActionScript:
menuClip.top.useHandCursor = false;
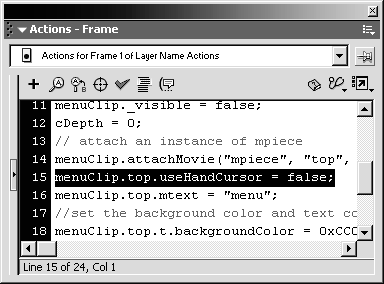
You should still have the Actions panel open from the last exercise. Just add a new line following line 14, and type this ActionScript.
This bit of code sets the useHandCursor property of the top movie clip to false . The useHandCursor property is another property of the built-in MovieClip object. You're going to add button events to the top movie clip during this exercise. By default, adding events to a movie clip will make a hand cursor appear when you move the mouse over the movie clip, but you don't want that to happen.
-
Add another new line, and add the following ActionScript:
menuClip.top.onPress = function () { menuClip.startDrag(); } 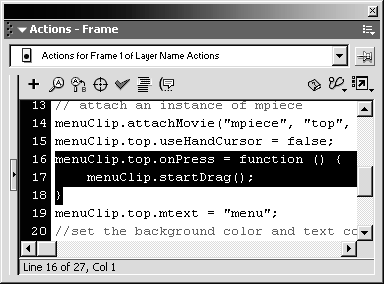
You should add this ActionScript after the code you added in the last step. Insert a new line and start typing. The second line of code in this step does not have to be indented, but indenting it will make the code a bit more readable.
The built-in MovieClip object has several event handlers, one of which is onPress . The onPress event handler is invoked when the object is pressed. In this case, the object is the top movie clip, which is nested in the menuClip movie clip.
When the event handler is invoked, it runs the function assigned to it. In this case, the function assigned to the onPress event handler simply tells Flash to start dragging the menuClip movie clipthis is the startDrag method of the built-in MovieClip object.
TIP
The MovieClip object has several event handlers, including onPress , onRelease , onRollOver , and onLoad all of which should be self-explanatory. A complete list of the MovieClip object's event handlers can be found in Appendix D.
-
Add the following ActionScript:
menuClip.top.onRelease = function () { menuClip.stopDrag(); } menuClip.top.onReleaseOutside = function () { menuClip.stopDrag(); } 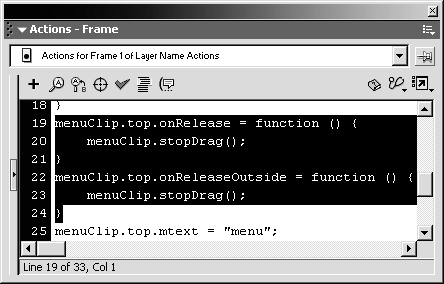
Type this code in the script pane, immediately following the code you added in the last step. This code sets up the onRelease and onReleaseOutside event handlers for the top movie clip. It tells Flash to stop dragging the menuClip movie clip when the onRelease or onReleaseOutside event occurs.
-
Add a new line after line 32, and add the following ActionScript:
menuClip["item"+i].useHandCursor = false;
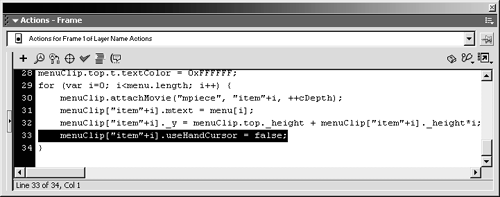
You should add this code inside the for statement that adds the menu items. Once the code is added, the for statement should look like this:
for (var i=0; i<menu.length; i++) { menuClip.attachMovie("mpiece", "item"+i, ++cDepth); menuClip["item"+i].mtext = menu[i]; menuClip["item"+i]._y = menuClip.top._height + menuClip["item"+i]._height*i; menuClip["item"+i].useHandCursor = false; } This last line of ActionScript simply sets the useHandCursor property of each menu item to false .
-
Add another new line, and then add the following:
menuClip["item"+i].onRollOver = function () { this.t.backgroundColor = 0xFF6600; this.t.textColor = 0xFFFFFF; } menuClip["item"+i].onRollOut = function () { this.t.backgroundColor = 0xFFFFFF; this.t.textColor = 0xCC0000; } 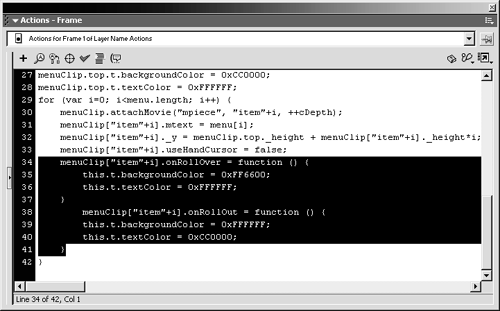
Add this code right after the line you added in the previous step.
This ActionScript adds onRollOver and onRollOut event handlers to each of the Menu Piece movie clips added by the for statement. So when you roll over a menu item, the background color of the t text box will become orange, and the text will become white. When you roll out of the menu item, the background color of the t text box will become white, and the text color will become red.
NOTE
The this in the code refers to the instance of the Menu Piece movie clip that contains the t text box.
The completed for statement should look like this:
for (var i=0; i<menu.length; i++) { menuClip.attachMovie("mpiece", "item" + i, ++cDepth); menuClip["item"+i].mtext = menu[i]; menuClip["item"+i]._y = menuClip.top._height + menuClip["item"+i]._height*i; menuClip["item"+i].useHandCursor = false; menuClip["item"+i].onRollOver = function () { this.t.backgroundColor = 0xFF6600; this.t.textColor = 0xFFFFFF; } menuClip["item"+i].onRollOut = function () { this.t.backgroundColor = 0xFFFFFF; this.t.textColor = 0xCC0000; } } -
Choose Control > Test Movie. Save the file as zoo33.fla in the FlashTFS folder on your hard drive.

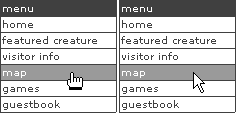
When you test the movie, you should now be able to drag and drop the menu by clicking and dragging the topmost menu item (the top instance, which has the text menu ). The colors of the text and background in each of the subsequent menu items should change colors as your pointer moves over them.
Now you need to add a bit more code, to maximize and minimize the menu. You'll do that next .