| You can use a motion guide to force a tweened symbol to follow a specified path . This technique is great for simulating motion along a curved or irregular line. In the following exercise, you'll learn how to create a motion tween that follows a path, or motion guide, to move the Panda symbol on a curved path. You'll also learn how to use onion skinning to see multiple frames of your animation at the same time. -
Insert a keyframe in frame 6 of the Panda layer. With the frame 6 keyframe selected, choose Insert > Create Motion Tween. 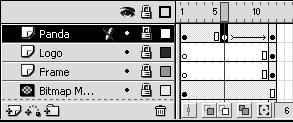 You should be a pro at making motion tweens by now! So this step should be pretty easy. All you have to do is select frame 6 in the Panda layer, and choose Insert > Keyframe or press F6. Then make sure you have the new inserted keyframe selected and choose Insert > Create Motion Tween. TIP You can also right-click (Windows) or Control-click (Macintosh) the keyframe you want to use, and choose Create Motion Tween to create a motion tween. NOTE Make sure you don't accidentally insert a blank keyframe in frame 6. A blank keyframe eliminates the contents of the Panda layer in that frame, which is not what you want. -
Right-click (Windows) or Control-click (Macintosh) the name of the Panda layer, and choose Add Motion Guide from the drop-down menu. NOTE Make sure you choose Add Motion Guide, and not Guide. These are two very different commands. 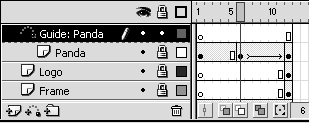 A new layer called Guide: Panda appears above the Panda layer. A motion-guide icon appears to the left of the name, and the Panda layer is indented below it. TIP Another way to add a motion guide is to select the frame you want to guide and choose Insert > Motion Guide. -
Lock every layer except the Panda and Guide: Panda layers , and click the Onion Skin button at the bottom of the timeline. 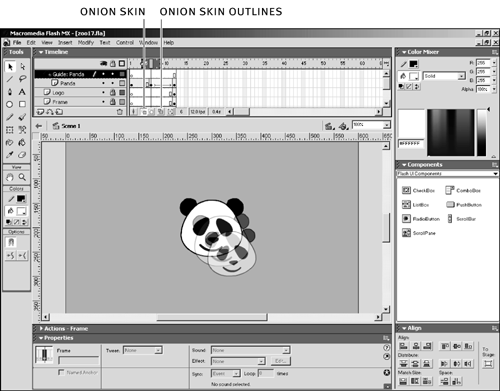 Flash's onion skin feature lets you view multiple frames at the same time. You need to specify which frames you want to view before you can use this feature. The onion skin markers appear at the top of the timeline. These markers show you which frames are included in the onion skin. In addition to the onion skin feature, Flash has an onion skin outline feature. This feature lets you see the outlines of multiple frames at one time. This is very useful if you have complex graphics in the frames you want to view. The color of the outline corresponds to the square at the right of each layer's name, next to the lock and hide controls. NOTE It's important to make sure the Panda and Guide: Panda layers are unlocked before you proceed. You cannot view onion skins for layers that are locked or hidden. -
Select frame 1 of the Guide: Panda layer, and drag the right onion skin marker to frame 12. The contents of frames 1 through 12 of the Panda layer should be visible. Notice that there is one instance of the Panda symbol in the middle of the stage, and six dimmed copies that appear to move toward the bottom-right corner of the stage. When you work with onion skins, the contents of the unlocked and unhidden frames beneath the playhead appear in full color. The contents of the other visible frames, as indicated by the onion skin markers, appear dimmed. If you want to view the outlines of each frame's contents instead of the actual contents, you can click the Onion Skin Outlines button in step 3. 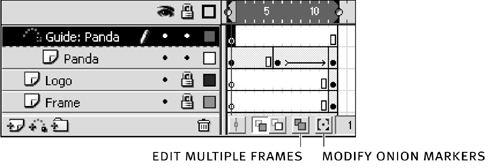 The Edit Multiple Frames and Modify Onion Markers buttons can be used in conjunction with the Onion Skin and Onion Skin Outline buttons to make working with multiple frames even easier. After you have enabled either the Onion Skin or Onion Skin Outlines feature, you can click the Edit Multiple Frames button to modify the contents of all the frames within the onion skin markers. When you click the Modify Onion Markers button, a menu appears that allows you to modify the display of the onion skin markers. The Always Show Markers option lets you display the onion skin markers in the timeline whether or not onion skinning is enabled. You can select the Anchor Onion option to lock the markers in their current positions in the timeline. The Anchor Onion option prevents the markers from moving with the playhead, as is the default. You can select Onion 2, Onion 5, or Onion All to display 2, 5, or all frames on either side of the current frame. 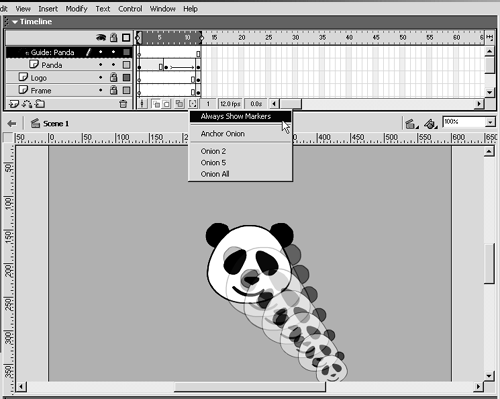 NOTE Remember that only unlocked and unhidden layers will appear onion skinned . This is actually very useful, because you can lock or hide layers you don't want to work with while onion skinning is enabled. -
Select the line tool, and set the Stroke Color to red (#FF0000). You're going to create a line that will be your motion guide. TIP When you create a motion guide, you may find it useful to make the line height 4 or large, so that it's easy to see. -
Draw a line from the center of the Panda symbol instance in the center of the stage to the center of the instance near the bottom right of the stage. 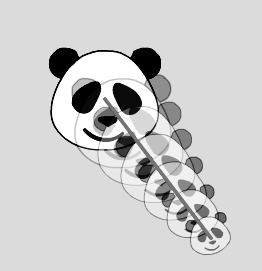 Make sure you still have frame 1 of the Guide: Panda layer selected before you start drawing; otherwise you're going to end up with a motion guide that doesn't guide anything. Just click the center of the Panda symbol instance in the center of the stage, drag to the center of the Panda symbol instance near the bottom-right side of the stage, and then release. You should end up with a straight line that goes from the first instance to the second instance. Don't worry if it's not perfectyou can go back and adjust the endpoints in just a bit. The line you just drew is the motion guide. It's just a straight line right now, so it shouldn't have changed your animation too much, if at all. When you drew the line, you might have seen the onion skinned contents of the Panda layer shift slightly. If they did, it's OK. In fact, it's a good thing, because it means you drew your line with the endpoints touching the centers of both the initial and final instances of the Panda symbol. But don't worry if the line didn't touch the endpoints, because you'll learn how to fix that in the next step. -
Using the arrow tool, drag the line to change it to a curve. 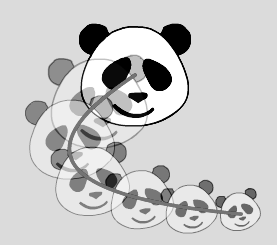 You can use the arrow tool to modify the shape of a straight line. Select the arrow tool, and move the pointer near the middle of the line. When the icon changes to an arrow with a curved line next to it, drag the line you created to the left. Don't click and drag, as that will select the line and move it to the left. Rather, you need to just start dragging. If it doesn't work on the first try, press Ctrl+Z (Windows) or Command+Z (Macintosh) and try again. TIP If you accidentally select the line, just press Ctrl+Shift+A (Windows) or Command+ Shift+A (Macintosh) to deselect it. When you've created the curve, the onion skinned contents of the Panda layer should follow the curve. If for some reason the animation doesn't follow the curve, don't panic. It just means that one or both of the line's endpoints isn't touching the center of the initial or final instance in the animation. Use the arrow tool to drag each endpoint around until it touches the center. As before, don't click the line first, just move the pointer near the endpoint of the line until the icon changes to an arrow with a right angle next to it. Then drag that endpoint to the center of the instance.  If, after you fiddle around with the endpoints, the animation doesn't follow the curve of the line, don't despair! Turn off onion skinning by clicking the Onion Skin button, and move the playhead to frame 6. Use the arrow tool to drag the endpoint of the curved line until it snaps to the center of the Panda symbol instance in that frame. Then drag the playhead to frame 12 and do the same thing. NOTE Make sure the Snap to Objects button in the Options section of the toolbox is pressed. With Snap to Objects selected, the endpoints of the line snap to other objects on the stage. TIP If after positioning the endpoints of the line your animation still doesn't follow the guide, make sure the curved line is in the correct layer. It must be in the Guide: Panda layer, or the motion guide won't work. -
Play the movie. If you like what you see, turn off the onion skin and save the movie as zoo18.fla. You can turn off the onion skin by clicking the Onion Skin button. The motion guide that appears in the Guide: Panda layer will only appear while you're authoring the file. It won't appear when you export the movie. If you'd like to check, choose Control > Test Movie to see what the exported movie will look like. You should notice that the line does not appear in the finished animation. Now that you have motion tweening down, it's time to explore another type of tweening: shape tweening. Before you move on, make sure to save your movie, just in case you need to go back. |