| The data form that you worked with in Hour 21 can be an easy way to enter, view, and delete records. As your database grows, however, you might need a more efficient way of maintaining it. Excel provides an alternative method for finding, viewing, and deleting records. You can set up a criteria range, a range of information separate from the data form criteria. This criteria range allows you to easily inspect data from a large database. The criteria range you use to view the database can contain comparison criteria, such as the type you use in the data form, or computed criteria. A computed criterion finds the result of computing several values in the database, such as EmpPeriod*2 . The criteria range is a special section of your worksheet that contains a row of criteria names, with at least one additional row below those names where you enter values you want to use as your criteria. You define the criteria range by selecting the field names and at least one additional row below the criteria names , and then you select Data, Filter, Advanced Filter. The next To Do exercise sets up a criteria range and uses Data, Filter, Advanced Filter to display all employees who work in the Administration department and receive a salary of more than $40,000. To Do: Set a Criteria Range -
Select cells B4:G4. This step selects the field names in the database that you want to copy to the criteria range. -
Click the Copy button on the Standard toolbar. -
Click cell B13 and then click the Paste button on the Standard toolbar. Excel copies the field names to row 13. Press Esc to remove the copy marquee. -
Click cell E14. This cell will contain the first criterion. In cell E14, type Administration and press Enter. This criteria tells Excel to filter data in the Dept field that is equal to Administration. -
Click cell G14. This cell will contain the second criterion. In cell G14, type >40000 and press Enter. This criteria tells Excel to filter data in the Salary field that is greater than 40000. -
Click any cell in the database and then select Data, Filter, Advanced Filter. The Advanced Filter dialog box appears, as shown in Figure 22.8. Figure 22.8. The Advanced Filter dialog box. 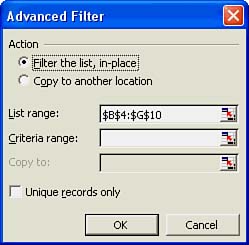 -
In the Action section, choose Copy to Another Location. -
In the List Range box, you should see the range $B$4:$g$10 , which is the range for the database. If it's different, change it to the correct range. -
Click in the Criteria Range box and drag the Advanced Filter dialog box so that it doesn't cover the criteria range on the worksheet. Select cells B13 to G14. This step specifies the criteria range. -
Click in the Copy To box and then click cell B18. This step specifies where you want to copy the filtered data on the worksheet. -
Click OK. Excel copies the field names and records starting in row 18. You should see two records. |