Chapter 9: Designing an Infrastructure for Updating Computers
|
| < Day Day Up > |
|
Every application and service that is running within your network could be used as the launching pad for an attack. It is for this reason that you will want to make sure that you can control the applications and services that can be installed on the machines in the network. Once you are able to prevent your users from installing, intentionally or otherwise, applications that you haven’t approved, you must update and patch the applications and operating system services that are running as new fixes are released from their vendors. You will want to make sure that the only applications that are installed on your network are those that have been tested and approved by the IT department.
In this chapter, we will show you how to secure the client computers in your organization by hardening the operating system and restricting users from accessing specific operating system features. Once you have learned how to secure your client infrastructure, we’ll explain how to update the software and services that are running inside your organization. It is here that you will be introduced to the variety of methods that are available for this purpose, such as Software Update Services (SUS) to distribute updates to the Windows operating system and its core services. The last part of this chapter will discuss hardening the client operating system by restricting different portions from the users as well as using software restriction policies to prevent specific applications from being installed and run.
Securing Client Computers
In Chapter 8, “Designing Security for Servers with Specific Roles,” we showed you how to secure servers based on the roles they play in your network. You will apply similar techniques when you need to secure the clients in your network. You need to make sure that the client computers in your environment are as secure as possible. There are several steps in securing the client computers in your infrastructure.
In the following sections, you will learn how to harden the security configuration of the computers in your organization.
Hardening Security on Client Computers
You will be following many of the same principles when you secure the client computers as you did when you were securing your server infrastructure. The first step is to segregate your clients based on their roles.
First, you will separate the clients based on their functional nature. Are they desktop workstations or are they portable computers such as laptops that will travel outside of the physical security infrastructure in place in your company? You should harden the clients differently, or more so, if they will be “in the wild” as opposed to under the direct control of your IT department at all times. In addition to separating the clients based on roles, you will want to separate them based on the operating system that they are running because different operating systems expose different services and thereby have different risks associated with them. You will use this information within your Active Directory design to build organizational units (OUs) that will accommodate this concept.
In the following section, you will learn the best techniques that you can employ when designing your OUs in this manner. This will be especially important as you use this model for Group Policy and other hardening techniques that you will learn later in this chapter.
Designing an OU Model for Client Computers
You will be creating an OU structure to facilitate the application of Group Policy to the various computers based on their membership in one container versus another. You will want to separate the computers based on how you will utilize Group Policy on them. You can organize the OUs based on computer role. Group Policy objects (GPOs), and OUs, in order to apply policies on the computer designations such as laptops, desktops, kiosks, are only useful if the client computers in question participate in a Windows Server 2003 or a Windows 2000 domain.
When you are designing the Group Policy infrastructure for the client computers in your organization, it is best to consider how you will be applying GPOs. If, for example, you have a specific GPO that needs to be applied to all laptop computers, it is easiest to put all of those computers in a single OU and link the respective GPO to it. If you are trying to build a Group Policy and OU infrastructure where ease of administration is the goal, you should design the OUs so that you don’t need any special filters on the way that Group Policy will propagate down. Figure 9.1 shows an example hierarchy that would make for an easier Group Policy deployment with the assumption that the client operating system will have specific policy settings that will be applied and that should cascade down to laptops as well as desktops.
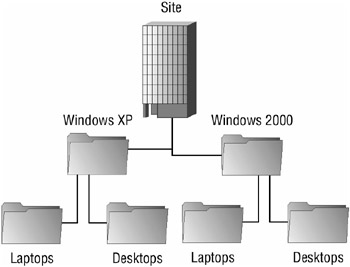
Figure 9.1: Example OU hierarchy for application of Group Policy based on operating system
In a similar fashion, should you want a policy to start at the type and cascade to the operating system, you would configure the OU model as shown in Figure 9.2.
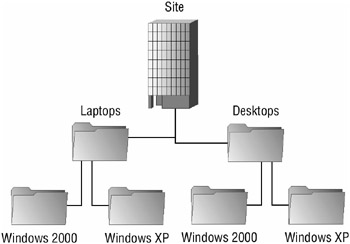
Figure 9.2: Example OU hierarchy for application of Group Policy based on computer type
In both of these cases, it makes sense to have separate OUs for the operating system version and the role of the computer because each computer type or operating system version will likely require the application of different policies. For example, Windows XP Professional has different services and options compared to Windows 2000 Professional, and by separating the different operating systems into different OUs, each operating system can have its own policy defined. The best technique to implement is to create a GPO for each policy and link it to the appropriate organizational unit.
If, however, you will be applying Group Policy based on the departmental role that the computer falls within, you can filter the application of Group Policy based on the operating system or role of the computer.
It is an important concept to understand that you will need to build an OU design that allows for the easy application of policies for different operating systems and roles. Different operating systems are capable of running different services and have different utilities that need to be configured differently. Obviously, this applies to the different uses of client computers as well. Laptops would be better candidates for configuring the encrypting file system (EFS) than the typical desktop. A support professional’s workstation may need to have policies that are different than the policies for other desktops in the department so they can support different clients. To facilitate this, computers should be members of specific security groups created for the application and filtering of Group Policy. Figure 9.3 shows how you may design an OU structure by department assuming that you are using security groups to segregate the operating systems.
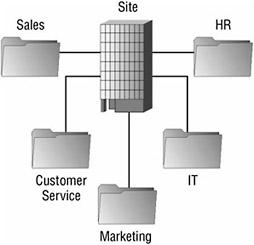
Figure 9.3: OU Model with security groups for computer function.
Group Policy objects can be linked to the OUs that represent the business unit, and you can configure computer group membership to further filter the application of the policies on the different types of computers. Figure 9.4 shows a computer’s Properties dialog box with the Member Of tab selected to display the groups that the computer—in this example, Computer1— belongs to. The group membership can then be used to filter Group Policy. This type of scenario is more difficult to design and implement, but it does offer great flexibility.
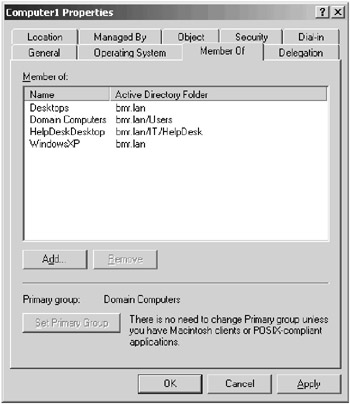
Figure 9.4: Computer Properties dialog box
There are various ways that you can configure your OU structure to facilitate a secure client computer system; the best rule of thumb is that you should design the OU structure around your Group Policy plans. If you know that all laptops must have a specific policy applied to them, it would be a good idea to create a Laptops OU and link the GPO or GPOs to it.
In the “Designing an OU Model” Design Scenario, you will be presented with a basic scenario for which you will try to choose the best OU design based on the requirements.
Design Scenario: Designing an OU Model
You are the engineer in charge of designing the OU model for a large accounting conglomerate. You must design an infrastructure that facilitates the distribution of the line-of-business applications for the various departments throughout the company. You need to make sure that the accounts receivable department has access to the AR application, that accounts payable has access to the AP application, and that the accounting managers have access to both. In addition, all accountants will have access to the Accounting General application.
You also need to make sure that if any AR or AP users are using laptops, the encrypting file system is configured appropriately. Desktop computers do not require EFS, but you also need to be able to update antivirus software on them on a regular schedule.
You need to design an OU model that will facilitate, with the least administrative effort, the application assignment and the security requirements stated.
-
Question: What should you do? Answer: Your proposed solution should look like the following:
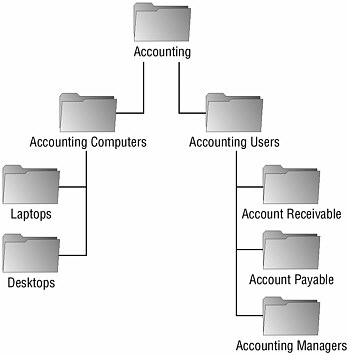
Because all accountants need access to the Accounting General application, you would want to create an OU at the top of the user hierarchy for this department that will hold, either directly or indirectly, all of the accounting users. In the diagram, this is named Accounting Users. You would assign the Accounting General application to this OU in Group Policy. Also in the scenario, you were told that there was an AR application for the accounts receivable users and an AP application for the accounts payable users. This would lead you to create an OU for each group of accountants to assign the software that they will require. Because the AR and AP users are also accounting users, these new OUs should be children OUs of the Accounting Users OU. The accounting managers would also require their own OU because they require that both the AR and the AP applications be assigned to them. As membership changes, a user object could simply be moved from one OU to another in order to have the new applications assigned to them, thus minimizing administration. That covers the user objects and the policies that will apply to them. However, there is also a requirement based on the type of computer that is being used regardless of the user that is using it. As a result, separate OUs should be created for each type of computer, in this case desktop computers and laptop computers.
Please note that the solution given is one possible answer and that many scenarios could be correct in this situation.
Now that you have learned how to evaluate client computer needs as they pertain to the design of the OU hierarchy, you will look at exploiting this design to harden the client operating systems. In order to harden the client computers, you will use security templates, as you learned in Chapter 8, and apply the templates using Group Policy based on the role to which the client computer belongs.
Designing Security Templates for Client Computers
You learned how to use security templates in Chapter 8. You will use them here in the same manner for the hardening of client computers based on their roles. You will want to start with an extremely locked down baseline template and apply a custom template for the particular role of the computer that you wish to harden. In Chapter 8, we used the Windows Server 2003 Security Guide as a good reference for the security recommendations; here we will suggest the Windows XP Security Guide as the resource to refer to regarding best practices on configuration of the templates. It also includes templates for laptop and desktop computers for both an enterprise and a high-security environment.
| Note | You can download the Windows XP Security Guide from Microsoft’s website at www.microsoft.com/downloads/details.aspx?FamilyID=2d3e25bc-f434-4cc6-a5a7-09a8a229f118DisplayLang=en. |
Whether or not you choose to use the templates that are provided with the Windows XP Security Guide, you should create a secure baseline template and customize it for use for a client computer with a specific role. When creating such a template, consider the user rights that need to be restricted in the template, the audit policies, security options, and the system services’ behavior. Next, we will briefly provide some best practices for configuring each of these segments of the overall security template.
Auditing is always a beneficial process and should be utilized on client computers in addition to servers. If you are able to determine which computer in your organization was used to launch an attack, you can evaluate its audited history and determine what happened. You can evaluate the Windows XP Security Guide to see what the Microsoft recommendation is as far as auditing is concerned.
In addition to configuring the audit policy, you should specify other security settings, ideally within the base template that you will apply. The following are some of the more important settings that you should consider applying:
User Rights Assignment There are a couple of important security-related policies that are assigned within the User Rights Assignment portion of the local policy or the template that you are creating:
-
Deny Logon Through Terminal Services Once this setting is enabled, you can add user accounts or security groups that will be prevented from logging on using Terminal Services. This is especially important for clients running Windows XP Professional.
-
Deny Access To This Computer From The Network The users or groups that you add to this policy will be prevented from accessing the client computer via the network. Adding the local administrator account can be useful on laptops that will be attached to other networks, public or otherwise.
Security Options In terms of security, there are also some important computer policy configuration settings within the Security Options portion of the local policy or the template that you are creating:
-
Interactive Logon: Number Of Previous Logons To Cache The settings that you configure here will determine how many credentials are cached on the local machine and are then available if a domain controller cannot be reached. Setting this option to 0 will prevent anyone from logging onto the computer unless the domain controller can be reached. For preventing a highly secure workstation from being accessed without a domain controller performing the authentication may certainly be desirable, but it would not be plausible for a laptop computer that travels outside of the corporate network. Should the laptop computer also need to be secured tightly, you may consider setting this option to 1.
-
Recovery Console: Allow Floppy Copy And Access To All Drives And Folders You can disable this setting to prevent someone from using the Recovery Console to copy secure files or other data, such as the Security Accounts Manager (SAM) database, to an insecure location.
Event Log The various settings within the Event Log portion of the policy allow you to use policies to configure the behavior for all of the event log data. You can specify how long to retain the logs as well as whether the local guests group is able to access the predefined logs (application, security, and system). When configuring a high-security client computer, it may become important to make sure that all security-related information is kept. You can configure the retention method for a specific log, such as the security log, by selecting the Do Not Overwrite Events (Clear Log Manually) option. This prevents log entries from being overwritten automatically. If you configure this option (to not overwrite existing entries), make sure that the log is cleared out periodically or it can become full and prevent new entries from being recorded.
Restricted Groups You can use the Restricted Groups portion of the policy or template to use policies to manage membership within the group. The main feature here is that if the Administrators local group were listed in this policy and a local administrator grants someone membership, that membership would last only until the next policy refresh because it is within the policy itself that the membership is defined. Consider restricting the following groups:
-
Administrators
-
Power Users
-
Remote Desktop Users
System Services To minimize the attack surface, just as we did for servers in Chapter 8, you will want to disable any nonessential services. Consider disabling the following services, unless you have business reasons for allowing them to run:
-
Background Intelligent Transfer Service
-
Computer Browser
-
Fax Service
-
FTP Publishing Service
-
IIS Admin Service
-
Messenger
-
Net Meeting Remote Desktop Sharing
-
Network DDE
-
Network DDE DSDM
-
Remote Registry Service
-
Simple Mail Transfer Protocol
-
Universal Plug and Play Device Host
-
Wireless Zero Configuration
-
Telnet
-
World Wide Web Publishing service
Registry and File System In most cases, the settings specified in the Windows XP Security Guide are more than adequate for securing common client computers. In some highly secure situations, however, you may need to change the settings for the file system and the Registry. Make sure that you test your changes comprehensively to assure that there will be no unexpected side effects.
It is extremely important that you make sure that critical operating system functions and services are appropriately locked down. Even a well-meaning user could inadvertently expose the entire network to security problems by enabling a service or some other part of the operating system that shouldn’t have been available to them.
Similarly, you will also need to prevent the users from your organization from installing software that hasn’t been approved by the IT department. This concept of restricting the software that a user can run can be significantly important because it alone can prevent certain Trojan horse applications from being installed in the network.
Designing Software Restriction Policies
Software restriction policies provide administrators with the ability to specify software that is not allowed to execute. Software restriction policies will harden the operating system by giving the administrator the ability to prohibit viruses, Trojan horse applications, and other programs from executing. The policies can then be applied to a Group Policy object (GPO) and then managed as such.
Next you will learn the individual options that you are presented with when configuring software restriction policies.
Configuring Policy-Wide Software Restriction Settings
Be default, software restriction policies allow all software to run, requiring you to define a policy to prevent individual applications from running. This is certainly not the most secure default behavior that could be configured. You will determine the default behavior in Group Policy by configuring the security level in the software restriction policy.
There are two options when configuring the security level of the software restriction policy:
Unrestricted The access rights for software will be determined based on the access rights of the user who is trying to execute it. Unrestricted is, as mentioned, the default behavior in Group Policy.
Disallowed Software will not run, regardless of the access rights of the user who is trying to execute it.
You configure this setting in the Group Policy Object Editor or the Group Policy Management Editor, which can be downloaded from the Microsoft web site. To configure the setting, complete the following steps:
-
Open the Group Policy Object Editor (gpedit.msc) for the Group Policy object that you are modifying.
-
Select Windows Settings
 Security Settings Software Restriction Policies.
 -
Click the Security Levels folder.
-
Right-click the Disallowed option and select Set As Default, as shown in Figure 9.5.
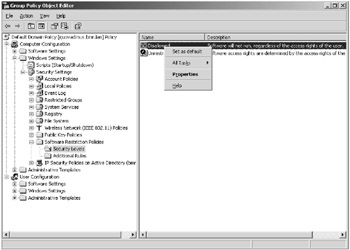
Figure 9.5: Setting the default security level
| Warning | It is more secure to disallow all applications and define exceptions than to allow all applications and define applications that are not allowed to run. |
Before you begin defining individual application policies, you will need to make decisions as to the enforcement of the policies. Figure 9.6 shows the Enforcement Properties dialog box.
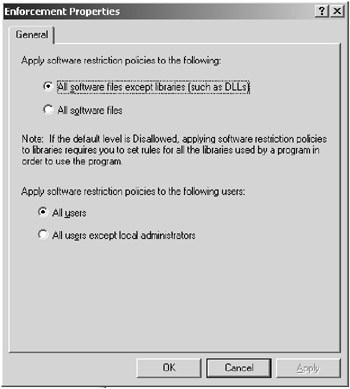
Figure 9.6: The Enforcement Properties dialog box
The first decision is to determine the types of files that will fall under the control of the software restriction policy. There are two options:
-
All Software Files Except Libraries (Such As DLLs)
-
All Software Files
In many situations, it is appropriate to secure all of the files except the libraries because there are numerous library files in use by many applications. If you select the All Software Files option, which is certainly the more secure option, you will be required to explicitly allow each library file, or DLL, that is used by each application. Choosing All Software Files Except Libraries allows you to define a policy for the application without being required to deal with the granularity of granting the library files permission to run within the policy.
The next enforcement option that you need to select is whether or not you want the policy to apply to local administrators or not.
Now you must select what file types will be considered to be executable as far as the policies are considered. There are several file types that are already defined in the policy, such as .bat, .cmd, .com, to name a few. If there are additional file types that become available, you can add them using the Designated File Types Properties dialog box, shown in Figure 9.7.
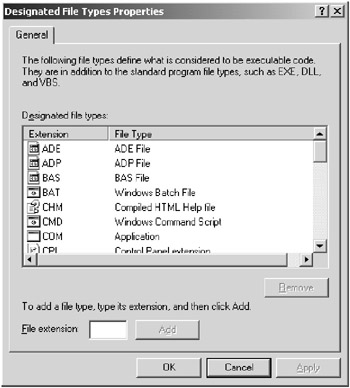
Figure 9.7: The Designated File Types Properties dialog box
The last option before you define policies for individual applications is determining who can select a publisher to be trusted: end users, local computer administrators, or enterprise administrators. Typically, you should not leave this option to the end users, but rather configure it to either local or enterprise administrators. Figure 9.8 shows the Trusted Publishers Properties dialog box.
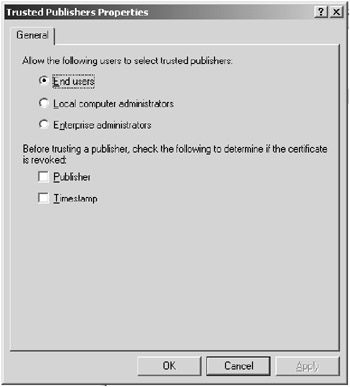
Figure 9.8: The Trusted Publishers Properties dialog box
Once the policy itself is designed, the rules that will govern the individual applications will be configured. If the security level is set to Unrestricted, you will define rules that explicitly prevent software from running. If the security level was changed to Disallowed, you will define rules that explicitly allow individual applications to run.
Defining Software Policy Rules
There are four types of software restriction rules that can be defined within the policy:
Certificate rules Certificate rules will grant or deny access to software by evaluating the software’s signature and determining if it is signed by a trusted publisher. Certificate software restriction rules can not be used unless the security option System Settings: Use Certificate Rules On Windows Executables For Software Restriction Policies is enabled. If the signature is determined to be valid and the publisher has been approved, the software will run as determined by the security level configured in the rule.
Hash rules Hash rules will create a hash of the specified executable file. When an attempt is made to run an executable, it too is hashed and then the hash is compared with the restricted hashes defined in the rules. In the event of a match, the executable will be granted or denied based on the security level defined in the rules. The importance of this type of rule is that the hash is independent of the filename, the path, and so on. If, however, the software gets updated, the hash will no longer match what is stored in the policy and will need to be redefined in order to be allowed to or prevented from running. Figure 9.9 shows the New Hash Rule dialog box after Notepad.exe was selected for hashing.
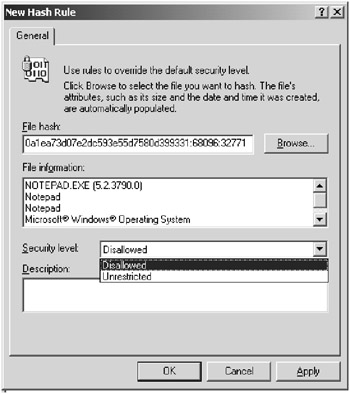
Figure 9.9: The New Hash Rule dialog box
Internet Zone rules Internet Zone rules will grant or prevent a Windows installer package from running based on the Internet zone from which it is downloaded. This rule type applies only to Windows installer packages and not to any other file type.
Path rules Path rules will identify an executable based on its file path. Obviously, this would need to be modified if you move an application from its original executing directory. The paths that you specify can include environment variables such as %userprofile%, %windir%, %programfiles%, and so on. Make sure that you use great care when using path rules; all a user would have to do in order to circumvent the policy is copy the executable to another directory from which it is allowed to execute.
If you need to be certain that unauthorized software cannot run on client computers, the best use of the software restriction policy is to set the security level of the policy to Disallowed. This prevents all software from running, except those executables that have an explicit rule defined for them.
In the “Designing Software Restriction Policies” Design Scenario, you will be presented with two scenarios. Determine what the most appropriate use of software restriction policies is for each scenario.
In the next section, you will learn how you can restrict users’ access to specific operating systems features and services.
Restricting User Access to the Operating System
It is very common to give users the ability to make certain changes to the operating system that they use on a daily basis. The changes may range from installing certain hardware (such as a printer) to installing an application (such as Microsoft PowerPoint). There are several predefined Windows groups that you can use to give a restrained set of abilities to the various types of users that you will need to support. The following list displays the different security groups and their typical permissions:
-
Backup Operators have the ability to override the security restrictions for the exclusive purpose of backing up or restoring files.
-
Network Configuration Operators can manage some of the network configuration settings.
-
Power Users are given rights similar to local administrators. This group is given the ability to run most legacy applications as a result of the extra permissions granted them.
-
Print Operators are able to manage printers. Managing printers includes the ability to create, share, and delete printers as well as manage a printer and its respective queue.
-
Remote Desktop Users can log on to the machine using the RDP client protocol.
Design Scenario: Designing Software Restriction Policies
Scenario 1
You are the security architect for a laboratory that works closely with dangerous chemicals. The hazardous materials are stored in a vault that is secured using a Windows-network-aware application. You need to make sure that under no circumstances is any software run on your network other than applications that have been tested and approved as secure by a government security auditor. There are several physical security mechanisms in place that prevent users from bringing laptop computers and media into the organization. However, sometimes a user is able to sneak a floppy disk or CD into work. No portable computers are allowed in and no computers are allowed to leave the secure environment.
You need to define a policy that will prevent users from running an application that hasn’t been approved.
-
Question: How should you design the software restriction policy in this scenario with the main focus on security? Answer: You should configure a domain-level policy that is set to Disallowed and delete the default path rules. You would then create custom rules to allow the applications that have been tested and verified to run. To make sure that no one can attempt to fool the policy, the exception rules should specify a hash or certificate for verification of the application instead of using path or zone rules, which are less secure.
Scenario 2
You need to design a solution that will prevent users from running virus-infected programs on their computers after the virus has been detected and the program file moved to the quarantine folder by your organization’s antivirus software. The solution that you employ cannot prevent users from installing applications that are approved by your organization.
-
Question: What should you do? Answer: You should create a software restriction policy path rule in the Default Domain Policy Group policy object in your domain that will set the security level on the quarantine folder to Disallowed. To prevent users from copying the file from the quarantine folder to a path that they are allowed to execute from, you would change the Default Domain Policy Group policy object to Disallowed for all software and use a custom hash rule for each approved application and its installer. You would also need to delete the default path rules because they allow unrestricted execution of applications from specific paths.
You should use these predefined groups if your users need to have the rights that are associated with them to perform their work-related tasks. Make sure that you keep the Principle of Least Privilege (PoLP) in mind. For example, if a user needs the ability to manage only a single printer and not all of the printers defined on a machine, they should not be added to the Print Operators group. You should create a new group that has been given only the permission to manage the one specific printer in this example and add the appropriate users to this newly created group. Thus, the users are not given the permissions to do anything that they are not explicitly required to do.
In the “Using Groups to Restrict Access to the Operating System” Design Scenario, you will evaluate the scenario and either choose the appropriate predefined group or create a new group to allow for the required permissions.
Design Scenario: Using Groups to Restrict Access to the Operating System
You need to provide Joel, the office manager at the remote Miami office, with the appropriate permissions to back up the files on the server. The Miami server is a member server in the Tandyman.lan domain and Joel needs to be able to manually back up and restore all of the files on the server.
-
Question: What group would you add Joel’s user account to, if any, in order to allow him to execute his job without hindrance (you need to make sure that Joel is not given any permissions that he doesn’t require)? Answer: Joel should be added to the Backup Operators local group of the Miami server, which is a predefi ned group that grants the ability to back up and restore files on the Miami server only.
You can configure hundreds of specific options in the Administrative Templates (.ADM files) portion of a Group Policy object. Figure 9.10 shows the Group Policy Editor with some of the administrative templates viewable.
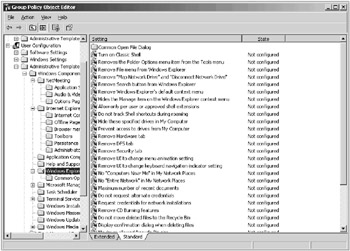
Figure 9.10: Administrative templates
| Tip | You can add or remove templates using the Group Policy Editor snap-in. Just right click the Administrative Templates folder and choose Add/Remove Templates. |
As you can see, there are more options than would warrant being listed here. To see the specific information for any one of the settings, right-click the setting you want to learn about and choose Properties. Then select the Explain tab. Figure 9.11 shows the Explain tab for the Remove File Menu Setting of the Windows Explorer Administrative template.
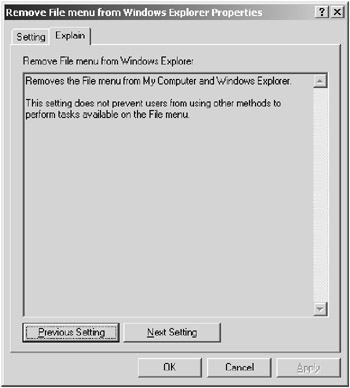
Figure 9.11: The Explain tab for the Remove File Menu From Windows Explorer Properties dialog box
You should examine the many different options here so that when you are given a policy directive, you will know which template you would use to implement it. For example, if a manager were to specify that Windows Messenger should not be allowed to run on Windows XP computers, you should know how to achieve this using the Windows Messenger template and enabling the Do Not Allow Windows Messenger To Be Run setting, as shown in Figure 9.12.
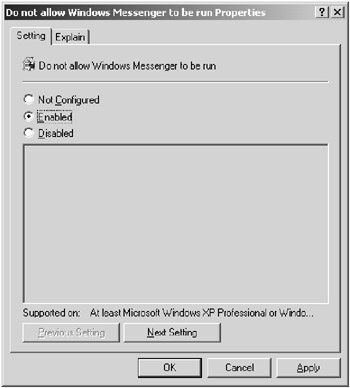
Figure 9.12: The Do Not Allow Windows Messenger To Be Run Properties dialog box
The administrative templates that are installed by default are shown in Table 9.1.
| Template | Example Setting |
|---|---|
| Windows Components | Remove Security Tab From Windows Explorer |
| Start Menu And Taskbar | Lock The Taskbar |
| Desktop | Remove Properties From The My Computer Context Menu |
| Control Panel | Prohibit Access To The Control Panel |
| Shared Folders | Allow Shared Folders To Be Published |
| Network | Prohibit TCP/IP Advanced Configuration |
| System | Turn Off Autoplay |
In the “Selecting the Appropriate Template Setting” Design Scenario, you will be presented with a business rule that must be implemented using the administrative templates in Group Policy.
Design Scenario: Selecting the Appropriate Template Setting
You have gotten word that several viruses have been propagating across the Windows Messenger application. You need to make sure that users in the Customer Support OU are not able to run the Windows Messenger service. You also need to make sure that, for all users of the domain, the Windows Messenger application does not start automatically.
-
Question: How should you implement this business rule? Answer: You should create a Group Policy object that enables the Do Not Automatically Start Windows Messenger Initially setting and link it to the Domain OU. You should create another GPO that enables the Do Not Allow Windows Messenger To Be Run setting and link it to the Customer Support OU.
In the next section, you will be introduced to designing a security update infrastructure. You will learn about secure configurations and security hotfixes and patches as well as how to configure them using the assorted tools that Microsoft has provided.
|
| < Day Day Up > |
|
EAN: 2147483647
Pages: 168