The Tools Panel
The vertical bar titled Tools that appears by default on the left side of the interface is referred to as the Tools panel. If you haven't just installed Flash, or if someone else has changed the defaults in Flash, you may not see the Tools panel on your screen. You can find it in the main Window menu (Window ð Tools) or invoke it with shortcut keys (Ctrl+F2 or z+F2).
Controlling the Tools Panel
The Tools panel cannot be scaled or minimized, but it can be hidden (and unhidden) along with other panels by choosing Window ð Hide Panels or by pressing the F4 key, or it can be opened and closed independently by choosing Window ð Tools (Ctrl+F2 or z+F2).
| Note | If you're using a Windows machine, don't confuse Tools with the menu item for Toolbars, which refers to a set of optional menus we described in the section, "The Flash 8 interface on Macintosh and Windows" earlier in this chapter. |
On Macintosh, the Tools panel is always a free-floating panel that you can move anywhere on the screen. On Windows, you can deploy the Tools panel as either a floating panel, or as a panel that's docked to either edge of the Flash program window. Docking means you drag a floating panel to the edge of the program window, where it then melds or sticks to the border of the window. It remains "stuck" there until you move it to another position or close it.
| Tip | On Windows, to drag the Tools panel to the edge of the program window, yet prevent it from docking, press the Ctrl key while dragging. |
If you would rather not see the tooltips that display when tool icons are pointed to in the Tools panel, you can turn them off in your General Preferences. (In OS X, go to Flash ð Preferences ð General; in Windows, go to Edit ð Preferences ð General, and under Selection options, uncheck Show tooltips.)
Reading the Tools Panel
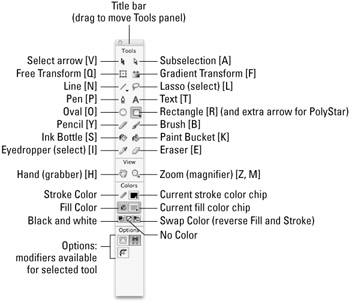
The Tools panel is organized in four main sections (see Figure 4-11 for tool icons and shortcut keys). The top section contains all 17 Flash tools, as follows from left to right and top to bottom: Selection (arrow), Subselection, Free Transform, Gradient Transform, Line, Lasso, Pen, Text, Oval, Rectangle (with PolyStar in submenu), Pencil, Brush, Ink Bottle, Paint Bucket, Eyedropper, and Eraser. The second section contains the Flash View tools: the Hand and Zoom. Beneath the View tools is the Color area, with swatches for assigning Stroke color and Fill color, and buttons for Black and White, No Color, and Swap Color (to reverse stroke and fill colors). The last section of the Tools panel is the Options area, where some of the available tool modifiers appear for any active tool.

Figure 4-11: The Mac Tools panel is shown here with the keyboard shortcuts for each tool. Aside from system display characteristics and docking behavior, the Tools panel is identical on both Mac and Windows.
| New Feature | The Free Transform tool and the Gradient Transform tool (known in Flash MX 2004 as the Fill Transform tool) have been placed closer to the top of the Tools panel to make them easier to find. The Gradient Transform tool has been renamed because gradients can now be applied and modified on strokes as well as fills. |
| Cross-Reference | We explain the application of individual tools and options in the Tools panel in the chapters related to specific production topics that make up the remainder of Part II, "Mastering the Flash Environment." |
Using Tool Options
Depending on the tool selected, the Options area may display some of the options, or properties, that control the functionality of that particular tool, while other controls may appear in the Property inspector or in a panel that launches separately. Of the options located in the Options area, some appear as submenus with multiple options, while others are simple buttons that toggle a property on or off. (For example, if the Lasso tool is selected, the Magic Wand option can be turned on or off by clicking a toggle button in the Options area.) If an option has more than two settings, these are generally available in a submenu.
Many of the options that appear within the Options area of the Tools panel can also be accessed from the Property inspector, from the application menu, or with keyboard shortcuts.
| Caution | The migration of tool options from the Tools panel to the Property inspector is not entirely consistent in this version. For example, you invoke the Rectangle Settings dialog box for controlling the corner radius of a rectangle by clicking the Round Rectangle radius icon in the Options area of the Tools panel (or by double-clicking the icon for the Rectangle tool), but you can only access the controls for the PolyStar tool by clicking an Options button in the Property inspector. Although we can hope that options will be more fully integrated into the Property inspector with future versions of Flash, for now you sometimes have to look back in the Options area of the Tools panel for modifiers that you might expect to appear in the Property inspector. Conversely, many tool options do not show up in the Tools panel, so even if the Options area appears empty, look in the expanded Property inspector to be sure you haven't missed anything. |
All the tools accessed from the Tools panel have keyboard equivalents, or shortcuts, that are single keystrokes. For example, to access the Selection tool — which is the tool with the black arrow icon, located in the upper-left corner of the Tools panel — you can simply press the V key when the Stage or Timeline is in focus. Thus, the V key is the keyboard shortcut for the Selection tool on both Mac and Windows. This is faster than moving the mouse up to the Tools panel to click the Selection tool, and it saves mouse miles on repeated tasks. To help you learn and remember shortcuts, throughout this book when we mention a new tool, the keyboard short-cut for that tool follows in parentheses, like this: Selection tool (V).
Customizing the Tools Panel
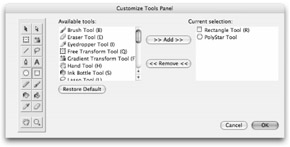
Customize Tools Panel is an option that was added in Flash MX 2004 to support custom tools. There is just one new tool (PolyStar) that was added to the shipping version of Flash MX 2004, but developers have been creating a whole new generation of Flash tools. Because the Tools panel is the most convenient place to store and access drawing tools, Macromedia has provided a user-friendly interface that makes it possible to add, delete, or rearrange the tools (and icons) that appear in the Tools panel. Open the dialog box shown in Figure 4-12 by choosing Edit ð Customize Tools Panel (or Flash ð Customize Tools Panel on a Mac) from the application menu. A preview of the Tools panel on the left side of the dialog box makes it easy to select any of the squares to add or delete the tools that are stored in each section of the panel. The interface is very flexible, making it possible to put all your tools in one square if you want to, or even add the same tool to multiple squares — unless you enjoy changing things just for the sake of changing them, the main reason to use this option is really to add new tools.

Figure 4-12: Use the Customize Tools Panel dialog box to add or rearrange the tools available in the Tools panel.
The PolyStar tool is a good example of how you can store new tools that you want to use in Flash. The PolyStar tool was added to Flash MX 2004, and unlike the original Flash Oval tool and Rectangle tool, it did not get its own square in the Tools panel. The PolyStar tool had to move in and share a square with the Rectangle tool. The PolyStar icon is only visible in the Tools panel when the tool has been selected from the drop-down menu triggered by clicking and holding the Rectangle tool icon. Any tool square that has more than one tool stored in it will display a small black arrow below the currently active tool to indicate that a drop-down menu is available. By default, the tool icons will appear in the drop-down list in the order that they are added to the Current selection list in the Customize Tools Panel dialog box. The first tool added to the list will show up in its assigned square in the Tools panel unless one of the other tools in the same square is selected from the drop-down menu. The most recently selected tool in any square will be visible until Flash is restarted or another tool is selected from the same square.
All assigned tool shortcut keys remain mapped to individual tools and can be used to activate a specific tool regardless of which square the tool is stored in. If all of the tools are removed from a square, that space on the Tools panel is left blank. Thanks to the Restore Default button in the Customize Tools Panel dialog box, you can have fun moving, grouping, or even deleting tools from different tool squares with the knowledge that you can always go back to the original layout. To illustrate the steps for adding a new Flash tool and storing it in the Tools panel, we have included a brief tutorial on a custom Grid tool developed by Joey Lott.
Adding New Tools to Flash, by Joey Lott
Authors' Note: Although it is beyond the scope of this book to describe the steps involved in actually scripting your own custom tools for Flash, we can tell you how to use custom tools that other developers have made. Joey Lott has generously agreed to let us include the code for one of his Flash tools on the CD-ROM. This brief tutorial is adapted from Joey's notes on how to install and use his "Grid" tool. We hope you will be able to follow these same steps to use other custom tools available from Macromedia or from generous developers in the Flash community.
The first step to using a custom tool is to find the files that Flash needs to make the tool work in the authoring environment and the icon that will be visible in the Tools panel. Unless you happen to know some brainy coders, the best place to look for new custom tools is in the Flash Exchange area of Macromedia's site (www.macromedia.com/exhange).
The three files you will want to find and download are as follows:
-
An XML file that describes the functionality of the tool and controls any "settings" that can be used to modify the final result
-
A JavaScript-Flash file (.jsfl) that implements required methods for manipulating the Flash authoring tool based on parameters specified by the XML file
-
A .png file that will appear in the Tools panel as the icon for the custom tool
| On the CD-ROM | We have included Grid.xml, Grid.jsfl, and Grid.png on the CD-ROM in the CustomTool subfolder of the ch04 folder. |
You have to save these files in your Flash 8 Tools folder so that the tool can be applied in the authoring environment.
-
The standard directory path on Windows is:
C:\Documents and Settings\(username)\Local Settings\Application Data\ Macromedia\Flash MX 8\(language)\Configuration\Tools
-
The standard directory path on Mac is:
HD\Users: (username)\Library\Application Support\Macromedia\Flash 8\ (language)\Configuration\Tools
After the three files for the Grid tool are saved to the Tools folder, the Grid tool is added to the list of available tools in the Customize Tools Panel dialog box.
The steps for adding the Grid tool icon to a square on the Tools panel are the same as those used to assign any other tool to a specific location in the panel:
-
Open the Customize Tools Panel dialog box (Edit ð Customize Tools Panel or Flash ð Customize Tools Panel).
-
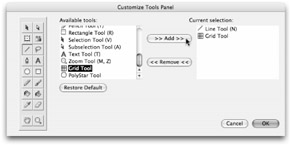
Select a location square on the Tools panel preview on the left side of the dialog box, select the Grid Tool from the list of Available tools, and click the Add button. (As shown in Figure 4-13, we chose to add the Grid Tool to the Line Tool square.)
-
Click OK to apply your changes and close the dialog box.

Figure 4-13: Any tool added to the Tools folder — by saving the relevant .xml, .jsfl, and .png files there — will appear in the Available tools list in the Customize Tools Panel dialog box.
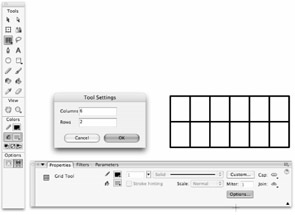
Now that the Grid tool icon has been added to the Tools panel, you will be able to select it from the square that you chose to store it in. As with the PolyStar tool, you will notice that when the Grid tool is active, an Options button appears in the Property inspector. Use this button to launch the Tool Settings dialog box (shown in Figure 4-14) where it is possible to control the number of rows and columns that you want to draw with the Grid tool.

Figure 4-14: After they have been added to the Tools panel, custom tools and options can be used as easily as other standard Flash tools.
After you choose settings for the grid and click OK to close the dialog box, you can draw a grid as easily as you would draw a rectangle with the Rectangle tool: Click the Stage and drag horizontally to create width and vertically to create height — the live preview lets you see how the grid looks before you release the mouse. You can select individual lines in the final vector grid, modify them with other drawing tools, group the lines, or convert them into a reusable symbol. This is a simple tool, but it creates perfect grids every time and saves you time and mouse miles, too!
Let's hope there will be many more useful and creative tools available that will open new possibilities for your Flash designs. You can continue to save other custom tool files to your Tools folder and they will be added to the Available tools list in the Customize Tools Panel dialog box.
| Caution | Obviously, it would be a big mistake to save a custom tool file to your Tools folder if it had the same name as an existing tool. Unless you want to overwrite existing Flash tools, make sure you're using unique names for any custom tools that you add. If you'd rather not change the name of a tool, simply add a unique number to the tool name to avoid overwriting other files with the same name. |
You can remove tool icons from the Tools panel at any time without actually deleting the files stored in the Tools folder, but if you decide you don't need a tool anymore, or if your available tool list gets too cluttered, simply remove the relevant .xml, .jsfl, and .png files from the Tools folder (save them somewhere else if you liked the tool, trash them if you didn't).
EAN: 2147483647
Pages: 395