Managing Windows and Panels
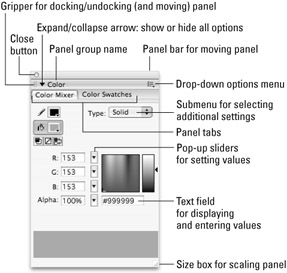
Most interface elements have built-in display controls (see Figure 4-6 for the tabbed panel controls that you will see on both Mac and Windows versions), but you can also manage what appears in your workspace with the main application menu. Rather than go through a laundry list of all the application menu options, we will note the various features that apply to individual windows and panels as we describe their uses.

Figure 4-6: The controls we note here on the tabbed Mac Color panel group are consistent with the control icons you will see on other panels for both Mac and Windows.
| Tip | To make the interface easier to use, Macromedia kindly made the whole title bar of the panels active so that you can expand or collapse a panel by clicking anywhere in the top gray bar, not only on the Expand/Collapse arrow. |
Contextual Menus
As in many other programs, you will find Flash contextual menus pop up in response to a right-click on a selected item in the Timeline, Library panel, or on the Stage. (Control+click for the Mac if you don't have a two-button mouse.) Contextual menus duplicate most functions and commands that are accessible either through the application menu or through the various panels and dialog boxes, which we discuss in this chapter. Because contextual menus show you only those options relevant to the element you have selected, they provide a handy authoring shortcut that can also help you get familiar with Flash.
Grouping and Stacking Panels
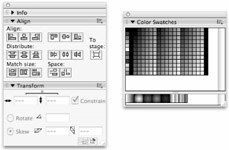
Panel groups are a familiar UI convention for Windows users, but this is a brand-new option in Flash for Mac users. Figure 4-7 shows the tabbed panel group that includes the Align panel, Info panel, and Transform panel.

Figure 4-7: Tabbed panel groups are more space efficient than stacked or individual floating panels.
As we mentioned earlier, some prebuilt panel groups exist in Flash 8, but the Group… with command in the contextual menu (or in the panel Options menu) is the key to modifying or making your own panel groups. Here are the steps for managing panel groups:
-
Select any open panel (or a specific tab within a panel group).
-
Click the Options menu or right-click to invoke the contextual menu.
-
Use the Group with… command to select either another panel in the list to create a new tabbed group configuration or New panel group to make the currently selected panel independent.
-
As long as a set of panels is grouped together, selecting any of the panels from the Window menu will invoke the whole panel group.
-
To remove a panel from a group, select it's tab and then use the Options menu or the contextual menu to choose Close (panel name) or Group (panel name) with ð New panel group.
Grouping panels for tabbed access is more space efficient than just docking or stacking panels, but you will probably still want to stack some panels or panel groups to keep your workspace orderly. To stack or dock panels, follow these steps:
-
Grab the panel (or panel group) by clicking on the dotted gripper icon in the top-left corner of the panel.
Caution Do not release the mouse until the panel is ready to dock!
-
Drag the panel until it overlaps another open panel or panel group.
-
When Flash recognizes the panel overlap, a blue docking highlight will appear at the top or bottom of the panel that you want to dock to — dragging your panel toward the top of another panel will stack it above and dragging your panel toward the bottom of another panel will stack it below.
-
Release the mouse and the panel will dock so it can be moved and opened or closed with other panels in the same stack.
Unstacking or undocking panels is easy: Just click the gripper to pull any panel away from the other panels in a stack and make it free-floating. Figure 4-8 shows a panel stack and a free-floating panel.

Figure 4-8: Ungrouped panels can be stacked (left) or floated individually (right).
Focus: Making Panels or Windows Active
Prior to Flash 4, only one area of the application required users to pay attention to focus — when they were selecting colors for either the stroke or fill — because it was easy to confuse the two. As the interface has grown to include more panels and windows that can be active at different times within the Flash environment, focus has become an important aspect of the program. What is focus? Focus is a term used to describe which part of the application is active, or has priority, at a given time. For example, all panels, such as the Actions panel, do not automatically "have focus" — this means that you have to click within the panel to begin working there. Similarly, to return to the Document window or Stage to edit an element, you must click there to return focus to that aspect of the application. The Property inspector can actually remind you what area or element is active because it displays the attributes of the currently active item. Otherwise, if a panel or dialog box doesn't seem to respond, just remember to focus on what you're doing.
Creating Custom Workspace Layouts
Whether you have chosen a layout from the Window menu (Window ð Workspace Layout) or have just opened Flash with the default display, one of the first things you'll want to learn is how to customize the Flash environment to suit your workflow. Whether you're working on an 800 x 600 laptop screen, a 1024 x 768 dual-monitor setup, or a 1,920 x 1,200 LCD, panels give you the flexibility to create a layout that fits your screen real estate and production needs.
To save your current panel layout as a custom set that can be accessed from the Workspace Layout menu the next time you open Flash, follow these simple steps:
-
Open and arrange (by grouping or stacking) any panels that you want to include in your custom layout.
-
Go to Window ð Workspace Layout ð Save Current.
-
You will be prompted by a dialog box to name your workspace layout. Enter a name that will help you remember why you made that panel set, such as animation or scripting.
-
Your custom layout will now appear in the list of available Workspace Layouts (Window ð Workspace Layout).
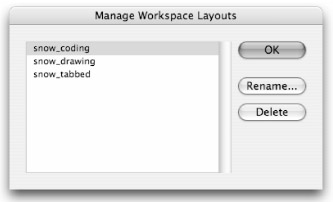
Deleting or renaming Workspace Layouts is easy in Flash 8. Select Window ð Workspace Layout ð Manage to invoke the new dialog box for editing the list of saved layouts. As shown in Figure 4-9, you have the option of renaming or deleting any of the files that appear in the Workspace Layouts menu.

Figure 4-9: The new Flash 8 dialog box for managing saved Workspace Layouts makes it easy to delete or rename your custom layouts.
Do you really love your custom layout? You can save Workspace Layouts just as you would project files in order to share them with other people or take them with you when you upgrade to a newer version of Flash (or move to another machine). When you want to add them to your current version of Flash, just place the files in the Workspace Layouts folder and they'll appear in the menu, ready for you to use. The only limitation is that Workspace Layout files cannot be shared between the Mac and Windows versions of Flash.
Workspace Layouts are stored in a folder on your hard drive. Once you find the Workspace Layout files, you can either add or delete any of these files and the Workspace Layout menu in Flash will update to show only the files that you currently have saved there.
-
The standard directory path on Windows is:
C:\Documents and Settings\(username)\Local Settings\Application Data\ Macromedia\Flash 8\(language)\Configuration\Workspace
-
The standard directory path on Mac is:
HD\Users: (username)\Library: Application Support\Macromedia\Flash 8\ (language)\Configuration\Workspace
| On the CD-ROM | Everyone will have a different way of organizing her workspace, but to get you started, we have included some of the panel layouts that we use regularly for you to try out. In the ch04 folder on the CD-ROM, you'll find a WorkspaceLayouts folder with a Mac set from Snow and a Windows set from Rob. Save these files to your Workspace folder and see if you like them. Keep in mind that you can use a panel set as a starting point for your own custom layout — move, close, or add panels as you like, and then use the Save Workspace Layout command and give the layout a new name. It will be added to your Workspace folder and will be available in the Workspace Layout menu. |
Keyboard Shortcuts
Keyboard shortcuts allow you to work more quickly because you avoid the hassle of clicking through a menu to activate a feature with your mouse. This is a workflow trick that many people use even when working in text-editing applications. Instead of browsing to the Edit menu to find the Copy command, you can just press the key combination Ctrl+C (or z+C on Mac). We have included the default keyboard shortcuts for most tools and features as they are introduced by listing them in parentheses after the tool or menu item name. When key options are different on Mac and Windows, we list both. Thus the convention for showing the keyboard shortcut for Copy in both Windows and Mac would be Ctrl+C or z+C.
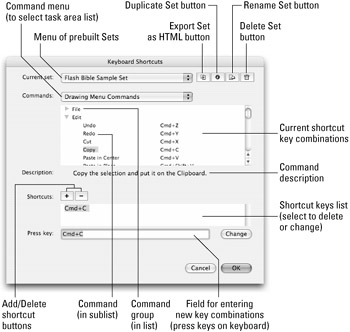
A default set of keyboard shortcuts is available without having to change any settings and these shortcuts are listed after most commands in the various application menus. However, if you would like to use different shortcut keys for certain tasks or add a new shortcut key for a custom Panel group or tool, you can make changes to the default settings in the Keyboard Shortcuts dialog box shown in Figure 4-10.

Figure 4-10: The Keyboard Shortcuts dialog box as displayed on Mac OS X. The appearance is slightly different on Windows, but the options available are the same.
| Tip | By default, Flash uses the Macromedia Standard set of built-in keyboard shortcuts, which is designed to be consistent on most applications in the Studio 8 family. You can also select a built-in keyboard shortcut set from one of several popular graphics applications, including Adobe Illustrator and Adobe Photoshop. Instead of manually changing a duplicate of the Macromedia Standard set to match your favorite program, simply switch the Current Set using the menu list. |
As shown in Figure 4-10, the Keyboard Shortcuts dialog box enables you to customize your Flash keyboard shortcuts to maintain consistency with other applications or to suit a personalized workflow. Not only can you choose keyboard shortcuts developed from other applications, but you can also save your modifications and custom settings. A full explanation of this dialog box follows.
| Note | Flash includes a special set of keyboard shortcuts for the Actions panel. This is a boon for coders who may wish to use different shortcuts when editing in the Actions panel than when working in the Document window. |
| Tip | For the experienced coder, the Actions panel also supports the known keyboard shortcut "accelerators" such as Ctrl+Arrow key to jump to the next space (end/beginning of words/ expressions). You can also click selected blocks and Ctrl+drag (or Option+drag on Mac) to copy them. There are many of these shortcuts, and if you are authoring hundreds of lines of code, they will save you valuable time. |
You will find the Keyboard Shortcuts dialog box in the application menu (Edit ð Keyboard Shortcuts, or in OS X go to Flash ð Keyboard Shortcuts). To create a new keyboard shortcut, you must first duplicate an existing set, from which you can then add or subtract existing shortcuts to form your custom set. Here's the process:
-
Select a shortcut set from the Current set submenu. This is now the active set.
-
Duplicate the active set by clicking the Duplicate Set button. The Duplicate dialog box appears. Enter a new name for this set in the Duplicate name field and click OK.
A similar procedure is employed to rename a shortcut set. Simply click the Rename Set button and enter the new name in the ensuing dialog box. (Note that you can rename all the built-in sets that ship with the program, with the exception of the Macromedia Standard set.)
-
Select a commands list (Mobile menu, Drawing menu, Tools panel, Test Movie menu, Script edit, Timeline, Workspace Accessibility, or Actions panel) from the Commands pop-up menu either to add to a command list or to modify it.
-
Next, in the commands list, choose either a grouping or a command from one of the previously chosen commands lists. Note that some lists have sublists. Click the plus sign (or small arrow on the Mac) to expand a particular category.
-
Now choose a command that you want to add (or subtract) — a description of the selected command appears in the Description area.
-
To delete the existing shortcut, click the minus (-) shortcut button.
-
To add a shortcut for this command, click the plus (+) shortcut button; then enter the shortcut key combination in the Press Key entry box. Simply press keys on the keyboard, rather than type the key names. Click Change and then OK to close the dialog box.
-
Or, to change an existing command, select the command and click the Change button.
-
To delete a shortcut set, click the Delete Set button, and then select the set to be deleted from the Delete Set dialog box and click the Delete button. (Because you cannot delete the built-in sets that ship with the program, they do not appear in the Delete Set dialog box.)
New Feature The Export Set as HTML button in the Keyboard Shortcuts dialog box (shown in Figure 4-10) is a fantastic way to create a formatted table of shortcut keys that you can post near your desk or share with other people. This option enables you to name the file and choose a location to save it. Drag the saved HTML file into a browser window to see a nicely formatted reference table that you can read onscreen or print out.
Note Like Panel set files, Keyboard Shortcut sets are stored on your hard drive. You'll find them in the Keyboard Shortcuts folder in the First Run folder that is in the same location as the Configuration folder that we listed in the previous section for Workspace Layouts. You can navigate to this location on your hard drive and copy, back up, restore, delete, or otherwise manipulate any of these files from this folder. Keyboard shortcuts are transferable between machines, although we have had no success transferring them across platforms.
EAN: 2147483647
Pages: 395