The Main Timeline as the Site Layout
Before you can start creating a Flash project, you need to know what you're communicating — what is the basic concept of the experience? Is this an all-Flash Web site? Is this a Flash animation that introduces some other type of content (HTML, Shockwave Director movies, and so on)? For the purposes of this chapter, you create a Flash movie for a basic all-Flash presentation. In a sense, this project will be the Flash equivalent of a Microsoft PowerPoint presentation. Let's look at the completed project (shown in Figure 20-1) that you will create in this chapter.
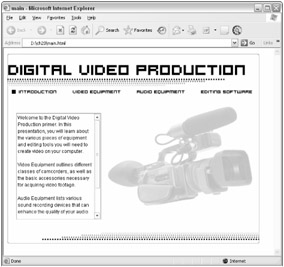
Figure 20-1: The completed presentation
| On the CD-ROM | In a Web browser, open the main.html document, located in the ch20 folder of this book's CD-ROM. This movie contains two completed sections of the presentation. |
When you load the main.html file into a Web browser with the Flash Player 8 installed, you see the presentation's title, "Digital Video Production," along with four navigation buttons that take you to each section of the presentation. The opening section, Introduction, has scrolling text featuring the new TextArea UI component. When you click the Video Equipment button in the navigation bar, a Movie Clip featuring five video items is displayed along with another instance of the TextArea component. The Next and Previous buttons enable you to browse the video items. Each video item uses a custom component that blurs and fades the item onto the Stage.
You will also notice that when you click each navigation button, the browser history updates. You can click the Back button of the Web browser to go directly to the previous section of the presentation. In this chapter, we show you how to create named anchors in the Flash document.
If you have a screen reader installed and are using the Windows operating system, you will hear the screen reader describe each item in the Introduction section. A screen reader is an application that assists visually impaired computer users by speaking text aloud. The Flash Player 8 ActiveX control will only work with screen readers that adhere to the MSAA (Microsoft Active Accessibility) specification built into Windows operating systems. As of this writing, only the Window-Eyes screen reader by GW Micro and JAWS from Freedom Scientific adhere to MSAA. In this chapter, you learn how to add accessibility information to elements in your Flash document.
Creating a Plan
Once you know what goals you want to achieve with your Flash content, you should map the ideas on paper (or with your preferred project planning or flowchart software). We create a basic presentation for digital video production that has four areas: introduction, video equipment, audio equipment, and editing software. Our organizational chart for this site has four discrete areas, as shown in Figure 20-2.
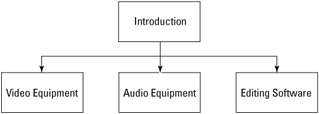
Figure 20-2: Our organizational chart will help us plan our Flash movie architecture.
In this chapter, you create the first two sections: introduction and video equipment. If you prefer, you can continue to develop the presentation with graphics we provide on the CD-ROM.
Determining Flash Movie Properties
After you've made your organizational chart, you'll want to determine the frame rate, size, and color of the Flash document. We've skipped much of the "real-life" planning involved with Flash Web sites, which we discussed in Chapter 3, "Planning Flash Projects." For this example, we have made a starter Flash document for you to use that contains all of the elements necessary to complete the chapter. This document contains some of the basic graphic elements already positioned on the Stage.
| On the CD-ROM | Make a copy of the main_starter.fla document, located in the ch20 folder of this book's CD-ROM. Before you open this file, you should install the Miniml font files from the ch08 folder. |
Open the starter document in Flash 8. This document uses a frame size of 640 x 480 (to maintain the aspect ratio of a computer monitor), a standard frame rate of 12 fps (frames per second), and a white background color. These are set in the Document Properties dialog box, shown in Figure 20-3, which is accessed by choosing Modify ð Document (Ctrl+J or z+J).
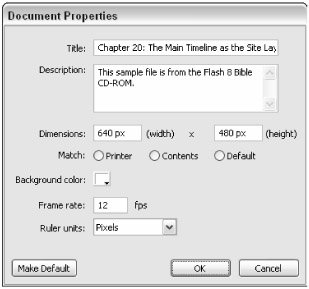
Figure 20-3: The Flash document properties
Mapping Presentation Areas to Keyframes
Once the Flash document properties have been determined, you can create a Main Timeline structure for the presentation. Because there are four areas in the project (introduction, video equipment, audio equipment, and editing software), you'll have keyframes on the timeline that indicate those sections.
-
Create a new layer, and name it labels. Place this layer at the top of the layer stack in the Timeline window.
-
With the Selection tool, select frame 10 of the labels layer, and press F7. This creates a keyframe on frame 10.
Tip It's usually a good idea to leave some empty frame space in front of your "real" Flash content. You can later use these empty frames to add a preloader, as discussed in Chapter 28, "Sharing and Loading Assets."
-
With the keyframe selected, open the Property inspector. In the <Frame Label> field, type intro. After you have typed the text, press the Tab (or Enter) key to make the name "stick."
-
Repeat Steps 2 and 3 with frames 20, 30, and 40, with the frame labels video, audio, and software, respectively.
-
Select frame 50 of the labels layer, and press F5. This will enable you to read the very last label, software. Your Timeline window should resemble Figure 20-4.
-
Select frame 50 on all other layers in the Timeline window, and press F5 to extend the content on these layers across the entire timeline, as shown in Figure 20-5.
-
Save your Flash document as main_100.fla.
-
Make a new layer, and rename it actions. Place this layer below the labels layer. Add a keyframe on frame 10 of the actions layer, and open the Actions panel (F9). Type the following code into the Script pane:
stop();
-
Close the Actions panel, and open the Property inspector. Make sure frame 10 of the actions layer is selected. In the <Frame Label> field, type //stop. The // characters assign a frame comment instead of a frame label. Although this step isn't necessary for the functionality of the movie, frame comments can provide quick and easy access to the designer's or programmer's notes. Your Timeline window should now look like Figure 20-6.
-
Save the Flash document again.

Figure 20-4: You use frame labels to differentiate each section of the site.

Figure 20-5: The content in the heading, background, and frame layers will be present throughout the entire movie.
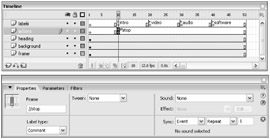
Figure 20-6: Unlike labels, you cannot use frame comments in ActionScript. Comments can provide quick visual references for ActionScript code.
At this point, the Flash document has a skeleton architecture (a blueprint) for your interactive functionality. Now you'll add some content to each section of the movie.
| On the CD-ROM | You can find the main_100.fla document in the ch20 folder of this book's CD-ROM. |
Arguably, you might be wondering why you are using keyframes to delineate each section, instead of new scenes. There are a few reasons to use one scene (in other words, one Main Timeline):
-
You can see the entire layout of the site very easily on one timeline.
-
You can blend interstitials (transitions between each area of the site) over two sections more easily. It's much easier to have one Movie Clip instance span the area between two section keyframes on the Main Timeline.
-
Scenes are not scriptable objects like Movie Clip instances are. You have greater flexibility with Movie Clips than you do with scenes.
Ultimately, the decision is yours. Make sure that you determine your Flash architecture well before you start production within the Flash 8 authoring environment. It's not a simple task to re-architect the layout once production has begun.
Creating Content for Each Area
In this section, you create navigation artwork for each area of the presentation. You also build some content for the video section.
-
In the Flash document you created in the last section, create a new layer named menu. Place this layer beneath the actions layer. Insert a keyframe on frame 10 of the menu layer.
-
On frame 10 of the menu layer, use the Text tool to add a Static text block with the text Introduction. For this example, we use the Miniml font hooge 05_53 at 12 points with bold formatting. Use the Property inspector to set these options. Place the text near the left edge of the Stage below the heading, as shown in Figure 20-7.
On the CD-ROM If you don't have this font installed, copy the Miniml font files from the ch08 folder of the book's CD-ROM.
-
Repeat Step 2 for the text Video Equipment, Audio Equipment, and Editing Software. Space these text blocks across the Stage beneath the heading, as shown in Figure 20-8. Again, all of these text blocks should be on frame 10 of the menu layer. Later, you will convert each of these text blocks to a Button symbol.
Now, you create a graphic that lets the user know which section is currently active. To do this, you add a black square that will appear next to the appropriate text block. When the presentation starts, the black square will be next to the Introduction text. When the user navigates to the Video Equipment section, the black square will appear next to the Video Equipment section. Open the Library panel, and expand the graphics folder. There, you will find a Graphic symbol named marker. You will use this symbol in a moment.
-
Create a new layer on your Main Timeline (that is, Scene 1), and name it marker. Place this layer underneath the menu layer.
-
On frame 10 of the marker layer, insert a keyframe. Drag the marker symbol from theLibrary panel to the Stage. Position the instance of the marker to the left of the Introduction text, as shown in Figure 20-9.
-
Insert another keyframe (F6) on frame 20 of the marker layer — make sure you do not insert empty keyframes. Move the instance of the marker at frame 20 to the left of the Video Equipment text, as shown in Figure 20-10.
-
Repeat Step 6 from frames 30 and 40 of the marker layer, moving the marker instance to the left of the Audio Equipment and Editing Software text, respectively. You now have the marker changing its position for all sections of the timeline.
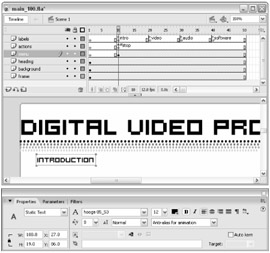
Figure 20-7: Use the Text tool to add the Introduction text to the Stage.
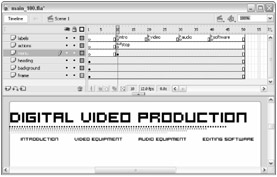
Figure 20-8: Add text that describes each section of the presentation.
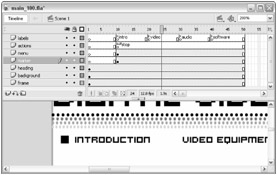
Figure 20-9: This marker designates the active section.
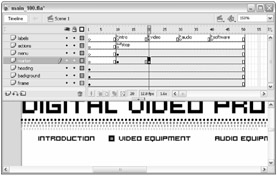
Figure 20-10: When the user goes to the Video Equipment section, the marker will appear next to the Video Equipment text.
Now you'll add a slide show of the video equipment that can be used for digital video production. This slide show will appear in the Video Equipment section of the presentation. For this, you create a Movie Clip symbol that has each product graphic on a separate keyframe.
-
Create a new symbol using Insert ð New Symbol (Ctrl+F8 or z+F8). Make sure the Type option is set to Movie clip, and give it a name of videoEquip.
-
Flash 8 automatically switches to Edit mode on the videoEquip timeline. Rename Layer 1 to items.
-
Add keyframes to frames 2, 3, 4, 5, and 6 of the items layer. There are six items in the videoItems folder of the Library panel, and each item is put on its own keyframe.
-
Move the Playhead to frame 1 of the videoEquip timeline, and drag the dvTape Movie Clip symbol from the videoItems folder of the Library panel to the Stage. Once an instance of the symbol is on the Stage, name the instance mcTape in the <InstanceName> field of the Property inspector.
-
Continue moving the Playhead to the next frame, dragging another item to the Stage for each frame. Place cameraLow on frame 2, cameraMid on frame 3, cameraHigh on frame 4, dvDeck on frame 5, and dvCable on frame 6. Make sure you name each instance in the Property inspector, using the following names: mcCamLow, mcCamMid, mcCamHigh, mcDeck, and mcCable. When you're finished, press the < and > keys to review your frames. Check Figure 20-11 to compare your work. You may want to center each graphic on the Stage using the Align panel (Ctrl+K or z+K). As you progress with this exercise, you can adjust the exact placement of each item. Before you proceed to the next step, check that each instance is named in the Property inspector.
-
Now you need to insert an actions layer for this Movie Clip symbol. Create a new layer, and rename it actions. Select frame 1 of the actions layer, and open the Actions panel. Add a stop action to make sure the items don't automatically loop when the movie loads:
stop();
-
Return to the Main Timeline (Scene 1) by clicking the Scene 1 tab in the upper-left corner of the document window.
-
Create a new layer, and rename it content. Place this layer underneath the marker layer. Insert a new keyframe on frame 20 of the content layer.
-
Open the Library panel, and drag the videoEquip symbol from the Library to the Stage. Place it just left of the center of the Stage, as shown in Figure 20-12. In the Property inspector, name this instance mcEquip.
-
Select frame 30 of the content layer, and press F7. This inserts a blank keyframe. Now, the mcEquip instance will show only in the Video Equipment area of the timeline.
-
Save your Flash document as main_200.fla.
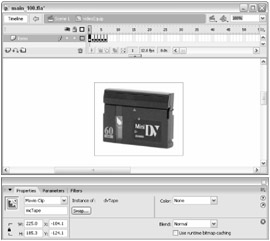
Figure 20-11: You should have six filled keyframes on the item layers of the videoEquip timeline.
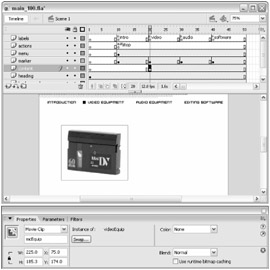
Figure 20-12: The mcEquip instance will only be present in the video section of the timeline.
Now you have some content in the Flash document. In the next section, you add navigation controls to the presentation.
| On the CD-ROM | You can find the main_200.fla document in the ch20 folder of this book's CD-ROM. |
EAN: 2147483647
Pages: 395