Adding Navigation Elements to the Main Timeline
In the last section, you created a timeline for a digital video production presentation. You inserted content placeholders for the intro, video, audio, and software sections of the timeline, and you made a Movie Clip with video item graphics to place in the video section. However, the user has no way of actually getting to any section except the intro frame. In this section, you convert the text blocks in the menu to Button instances, whose actions will control the position of the Playhead on the Main Timeline.
Creating Text Buttons for a Menu
In this part of the exercise, you make menu buttons that will enable the user to navigate to the different areas of the Flash movie.
-
On the Main Timeline of your main_200.fla document, select frame 10 of the menu layer.
-
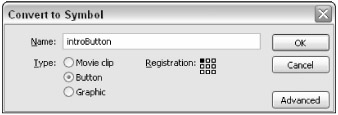
With the Selection tool, select the Introduction text block. Press F8 to convert this text into a symbol. In the Convert to Symbol dialog box, name the symbol introButton. Assign it a Button type. Click the top-left corner of the Registration box, as shown in Figure 20-13.
-
Select the Button instance on the Stage, and in the Property inspector, type btIntro in the <Instance Name> field. You will not target the button in any ActionScript for this project, but naming your instances is a good habit to get into.
-
Now you need to add a Hit state to the introButton timeline. By default, Flash 8 uses the last frame of a Button symbol timeline for the Hit state, unless content is added to the Hit state keyframe. Double-click the btIntro instance on the Stage to switch to Edit mode.
-
On the timeline of the introButton symbol, select the Hit frame of Layer 1. Press F7 to insert an empty keyframe.
-
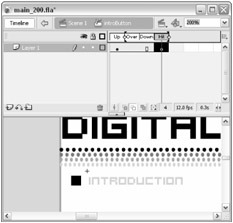
Click the Onion Skin Outlines button in the Timeline window toolbar. This enables you to view the previous frames of the introButton timeline, as shown in Figure 20-14.
-
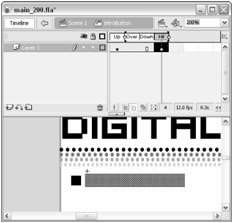
Select the Rectangle tool, and draw a filled rectangle that covers the same area of the Introduction text block. You can use any fill color because the user never sees the Hit state. Make sure you turn off the stroke, or delete the stroke after the shape is drawn. Your button's timeline should resemble the one shown in Figure 20-15.
-
Select the shape you drew in Step 7, and press F8 to convert it to a Graphic symbol named hitArea. As with the introButton symbol, make sure the Registration icon is active in the top-left corner. You will reuse this shape for the other buttons in this section.
-
Next you add an Over state to the introButton, so that the user has a visual indication that it's an active button. Select the Over frame of Layer 1, and press F6. This copies the contents of the previous keyframe into the new one. Select the Introduction text block with the Selection tool, and change the fill color to a shade of blue such as #0099CC in the Tools panel or the Property inspector. You can also turn off Onion Skin Outlines at this point.
-
Return to the Main Timeline (that is, Scene 1) of your document, and save your Flash document as main_300.fla. Choose Control ð Test Movie to test the states of the introButton.
You can also use Control ð Enable Simple Buttons to preview the graphical states of a Button instance directly on the Stage.
-
Now you put an action on the btIntro instance. Select the btIntro instance on the Stage, and open the Actions panel (F9). In the Script pane, type the following ActionScript code:
on (release) { this.gotoAndStop("intro"); }With these actions, the btIntro instance will move the Main Timeline Playhead to the intro frame label when the user clicks the button.
-
If you test your movie at this point, your btIntro instance won't do anything — the Playhead already stops on the intro frame label when the movie starts. Add a button for each section on the site. Repeat Steps 2 to 9 for each section name in your movie. Note that you should reuse the hitArea Graphic symbol from Step 8 for the remaining buttons — use the Free Transform tool to size each new instance of hitArea to match the size of the text block in the Button symbol. You should end up with four Button instances on the Stage: btIntro, btVideo, btAudio, and btSoftware.
Tip When you're finished making all the buttons, make a folder in the Library panel named buttons, and move the Button symbols and the hitArea graphic into the new folder.
-
Repeat Step 11 for each new Button instance. For each Button instance, change the frame label parameter in the gotoAndStop() action to match the name of the button's area (for example, this.gotoAndStop("video"); on the btVideo instance).
Tip To quickly add the on() handler, type Esc+O+N in succession — not simultaneously. To add the gotoAndStop() action, type Esc+G+S.
-
Save your Flash document as main_300.fla, and test it (Ctrl+Enter or z+Enter).

Figure 20-13: The introButton symbol settings

Figure 20-14: Onion skinning enables you to align the contents of several keyframes accurately.

Figure 20-15: The Hit state defines the "active" area of the Button instance in the movie. When the user's mouse pointer enters this area, the Over frame of the button is displayed.
| On the CD-ROM | You can find the main_300.fla document in the ch20 folder of this book's CD-ROM. |
When you test your Flash movie, you should be able to click each button to go to each area of the movie — you should see the square marker move to each category name when you click the name. If a button isn't functioning, double-check the code on the instance. Make sure that each Button instance has a Button behavior in the Property inspector. In the next section, you add buttons to the videoEquip Movie Clip symbol, so that the user can browse the pictures of the video items.
Browsing the Video Items
In this section, you go inside the videoEquip symbol and add some navigation buttons for the video items.
-
From the Main Timeline of your main_300.fla document, double-click the mcEquip instance on frame 20 of the content layer. Flash 8 switches to Edit mode.
-
Make a new layer on the videoEquip timeline, and rename the layer buttons. Place this layer below the actions layer.
-
Open the Buttons Library (Window ð Common Libraries ð Buttons). In the Buttons Library panel, double-click the Circle Buttons folder. Drag the circle button — next instance symbol to the Stage. Place the Button instance below and to the right of the mcTape instance. Name the new Button instance btNext in the Property inspector.
-
With the btNext instance selected, open the Actions panel. In the Script pane, try using keyboard shortcuts to type the following code. Press Esc+O+N, in succession — not simultaneously. That is, press the Esc key, release the key, press the O key, release, and then press the N key, and release. This sequence adds an on(){} handler to the Script pane. Type the keyword release between the () of the on handler, and between the {}, type Esc+N+F. This sequence adds a nextFrame() action. Finally, press the Auto Format button in the toolbar of the Actions panel. When you are finished, the Script pane should show the following code:
on (release){ nextFrame(); } -
With the circle button — next instance selected, press Ctrl+D (z+D) to duplicate the instance on the Stage. Name the duplicate instance btPrev in the Property inspector. Move the duplicate instance to the left of the original arrow button. With the Free Transform tool selected, enable the Rotate modifier in the Tools panel. Rotate the duplicated button 180 degrees. Press the Shift key while rotating, to lock in 45-degree steps.
-
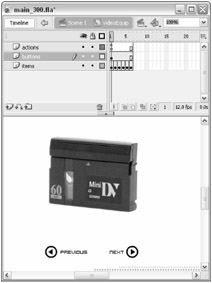
Select both arrow buttons, and align them horizontally to each other by using the Align panel. Insert some descriptive text next to the instances, as shown in Figure 20-16.
-
Select the btPrev instance, and open the Actions panel. Change the nextFrame action to a prevFrame action. The Script pane should show the following code:
on (release){ prevFrame(); } -
Save your Flash document as main_400.fla, and test it. Click the Video Equipment button, and try the new navigation arrows for your video items catalog.

Figure 20-16: Add text to the buttons to describe their functionality.
You can enhance your presentation by adding information in the videoEquip Movie Clip symbol. In the next section, you add a scrolling text window that displays descriptions of the video items.
| On the CD-ROM | You can find the main_400.fla document in the ch20 folder of this book's CD-ROM. |
The topic of Flash usability has received a lot of press, particularly because many Flash interfaces are considered experimental or nonintuitive to the average Web user. Since December 2000, Macromedia has maintained a special section in its Web site: Macromedia Flash Usability. You can read usability tips and view examples of interface design at www.macromedia.com/software/flash/productinfo/usability.
Closely related to usability is accessibility: How easily can someone with a disability access the content within your Flash movie? We show you Flash movie accessibility options in the final section of this chapter.
EAN: 2147483647
Pages: 395