Movie Clips: The Key to Self-Contained Playback
A powerful addition to the Flash format was the Movie Clip symbol, introduced in Flash Player 3. Movie Clips enabled Flash developers to create complex behaviors by nesting self-contained sequences of animation or interactivity inside each other. These sequences could then be placed as discrete, self-playing modules on the Main Timeline (that is, Scene 1). Initially, the key to the power of Movie Clips was their capability to communicate with and control each other via the tellTarget action.
In Flash 4, the role of Movie Clips was expanded — they could be used with ActionScript. That capability put Movie Clips at the foundation of advanced interactivity in Flash. In Flash 5, when ActionScript matured into a full-blown scripting language that mirrored JavaScript, Movie Clips became the central object of programming. In Flash MX, Movie Clips could utilize more compiler directives, which enabled them to become full-blown user-interface components. In Flash MX 2004, Movie Clips and components continued to evolve and play a vital role in the organization of a Flash movie's content and interactivity. In Flash 8, Movie Clips gain new filter effects, blend modes, and bitmap-caching optimizations. In this chapter, you'll look at several key features of the Movie Clip symbol.
How Movie Clips Interact within a Flash Movie
Previous chapters dealt with Flash movies as a single sequence of frames arranged along a single timeline. Whether the playback along that timeline was linear (traditional animation) or nonlinear (where the Playhead jumps arbitrarily to any frame), our example movies have normally comprised only the frames of a single timeline. Ostensibly, a single timeline may seem to provide everything you'd need to create any Flash behavior, but as you get more inventive or ambitious, you'll soon find yourself conceiving ideas for animated and interactive segments that are thwarted by the limits of a single timeline.
Suppose you want to create a looping animation of a dog with its tail wagging. You decide that the tail should wag every 5 seconds and the dog should bark every 15 seconds. On a single timeline, you'd need a loop of 180 frames to accommodate the timing of the bark (assuming a frame rate of 12 frames per second), and repeating keyframes for the wagging tail artwork every 60 frames. Although animating a dog in that manner would be a bit cumbersome, it wouldn't be impossible — until your dog had to move around the screen as an integrated whole. Making the bark and the wagging tail loop while the whole dog moved around complex paths for extended periods of time would quickly become impractical, especially if the dog was only one part of a larger environment.
Now imagine that you could make the dog by creating two whole separate movies, one for the tail and one for the barking mouth and sound. Could you then place those movies as self-contained, animated objects on the Main Timeline, just like a graphic or a button? Well, you can — that's what Movie Clips are all about. Movie Clips are independent sequences of frames (time-lines) that can be defined outside the context of the Main Timeline and then placed onto it as objects on a single frame. You create Movie Clips the same way you create a Graphic symbol in Edit mode. Unlike a Graphic symbol, a Movie Clip (as the name somewhat implies) acts in most cases just like a fully functional movie or .swf file, meaning, for instance, that frame actions in Movie Clip timelines are functional. After you have created a Movie Clip as a symbol, you drop instances of it into any keyframe of the Main Timeline or any other Movie Clip time-line. The following are some general Movie Clip principles:
-
During playback as a Flash .swf file, a Movie Clip instance placed on a timeline begins to play as soon as the frame on which it occurs is reached, whether or not the Main Timeline (or the clip's parent timeline) is playing.
-
A Movie Clip plays back autonomously, meaning that as long as it is present on the Stage it is not governed by the playing or stopping of the Main Timeline.
-
Movie Clips can play when the Main Timeline is stopped, or stay halted when the Main Timeline plays.
-
Like a Graphic or a Button symbol, Movie Clips can be manipulated on the Stage — you can size them, skew them, rotate them, place effects such as alpha blending on them, or tween them, all while the frames within them continue to play.
New Feature Movie Clip instances can now use filter effects and blend modes. You create these effects in real time and set them in the Property inspector or with ActionScript code.
-
All timelines play at the frame rate specified by the Document Properties dialog box (Modify ð Document) or the Property inspector (when the Document window is focused, and all items on the Stage are deselected). However, it is possible to modify playback behavior of a timeline with ActionScript routines.
In our dog wagging and barking example, the tail and head of the dog could be looping Movie Clips, and then those Movie Clips could be nested inside another Movie Clip symbol (representing the entire dog). This "whole" dog clip could then be tweened around the Stage on the Main Timeline to make the dog move. You could use the same principle to move a Movie Clip of a butterfly with flapping wings along a motion path.
One Movie, Several Timelines
Because a Flash movie can have more than one timeline existing in the same space and time, there must be a way to organize Movie Clips within the Main Timeline (Scene 1) of your Flash document. Just as artwork can be placed inside any symbol, symbol instances can be nested within other symbols. If you change the contents of the nested symbol, the parent symbol (the symbol containing the other symbol) will be updated as well. Although this may not seem special, it's of extreme importance to Movie Clips and Flash interactivity. Because the playback of each Movie Clip timeline is independent from any other timeline, you need to know how to tell Flash which Movie Clip you want to control.
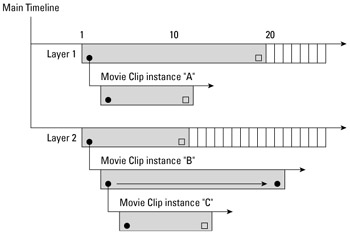
The Flash movie diagram in Figure 19-1 illustrates multiple timelines. This Flash movie has two layers on the Main Timeline: Layer 1 and Layer 2. Layer 1 has a Movie Clip (instance "A") that exists for 19 frames on the Main Timeline. Layer 2 has a Movie Clip (instance "B") that exists for 10 frames on the Main Timeline, but it also contains a nested Movie Clip (instance "C").

Figure 19-1: This figure shows one method of diagramming Flash timelines.
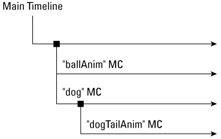
In Figure 19-1, if the Main Timeline has a stop action on the first frame, all three Movie Clips will continue to play unless there are stop actions on their first frames or they are told to stop by actions targeted to them. If the Main Timeline plays to frame 20, instance "A" will no longer be on the Stage, regardless of how many frames it may have on its timeline. Figure 19-2 shows a more practical diagram of a timeline hierarchy.

Figure 19-2: Flash movies can be flow-charted in this fashion. This diagram is similar to the Movie Explorer's method of displaying Flash movie information.
In Figure 19-2, you can see three Movie Clips. Two of them, ballAnim and dog, occupy space on the Main Timeline. The other one, dogTailAnim, is nested within the dog Movie Clip. Each Movie Clip instance on any given timeline must have a unique name — you can't have two or more Movie Clip instances on the same timeline using the same instance name. The instance name is specified in the Property inspector, shown in Figure 19-3. To see the settings for a particular instance, you must have the instance selected on the Stage before referencing the Property inspector.

Figure 19-3: Among other things, the Property inspector enables you to name each Movie Clip instance that appears on the Stage.
| Tip | The suffix Anim is the naming convention we use to designate a symbol name (in the Library) containing an animation. As you can see in Figure 19-3, we use the prefix mc to name our MovieClip instances, to differentiate them from other data types used in ActionScript. If you use ActionScript 1.0, you may want to use the _mc suffix with instance names; this suffix allows the Actions panel to show code hints specifically for Movie Clip instances. If you use ActionScript 2.0, you can derive your own naming convention as long as you type all MovieClip instance variables. You'll learn more about these concepts later in the chapter. |
Now that you understand how multiple timelines can exist within a Flash movie, let's see how you can make Movie Clips communicate with one another.
EAN: 2147483647
Pages: 395
- Challenging the Unpredictable: Changeable Order Management Systems
- The Second Wave ERP Market: An Australian Viewpoint
- Distributed Data Warehouse for Geo-spatial Services
- Healthcare Information: From Administrative to Practice Databases
- Relevance and Micro-Relevance for the Professional as Determinants of IT-Diffusion and IT-Use in Healthcare