Creating Invisible Buttons and Using getURL
In this section, you learn how to create an "invisible button" and practice the use of getURL actions. An invisible button is essentially a Button symbol that has only a Hit state defined, with empty Up, Over, and Down states. Once you have created an invisible button, you can use it to convert any type of Flash element into a button. By dragging an instance of the invisible button on top of another piece of artwork or symbol instance on the Stage, you can add interactivity to that element.
| On the CD-ROM | Make a copy of the themakers_ad_starter.fla file, located in the ch18 folder of the book's CD-ROM. This file contains a sample layout of graphics and text for a mock Flash ad, sized for display on a Pocket PC screen. This document uses a Flash Player 6 version setting in the Publish Settings, which is why some actions in the Actions toolbox's booklets are high-lighted in yellow. |
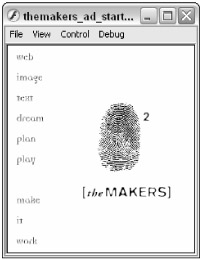
With the starter Flash document (.fla) open in Flash 8, quickly familiarize yourself with the existing content. There are four layers on the Main Timeline (Scene 1). The comments layer indicates what the Flash document is, the border layer contains a black outlined box with no fill, the graphics layer contains a Graphic symbol of branding artwork, and the animText layer contains a Movie Clip instance featuring a tweened animation. Go ahead and test this movie (Control ð Test Movie) to see how these elements currently play. When the animation finishes, you should see the artwork displayed in Figure 18-10.

Figure 18-10: The artwork of the Flash movie designed for a Pocket PC screen
In this exercise, you're going to add two invisible buttons to this movie. One is an oval-shaped button that fits over the thumbprint graphic, and another is a rectangular-shaped button that fits over the company's name. The thumbprint button, when clicked, opens the e-mail client to send an e-mail to the company. When the user clicks the name button, a new browser window opens displaying the company's Web page.
-
In the starter Flash document, create a new layer named actions. Place this layer just underneath the comments layer.
-
Save the starter document as makers_ad.fla.
-
Select the first frame of this layer and open the Actions panel (F9). In the plus (+) menu, choose Global Functions ð Timeline Control ð stop. This will add a stop(); action to the keyframe. Currently, there is more than one frame on the Main Timeline, and if you were to develop this Flash movie further, you wouldn't want the Playhead going past the first frame without some input from the user.
-
With this first frame of the actions layer still selected, open the Property inspector and in the <Frame Label> field, type //stop. This will add a frame comment of //stop to the layer in the Timeline window. This comment provides a quick visual cue about the behavior of this keyframe.
-
Now you're going to make your first invisible button. Choose Insert ð New Symbol (Ctrl+F8 or z+F8) and make a new Button symbol named invisibleButton_rect. This button will be the rectangular button that is placed over the company's name. Flash will take you right inside the symbol's workspace as soon as you press the OK button in the Create New Symbol dialog box.
-
Rename Layer 1 to hit area graphic. On this layer of the Button symbol's Timeline, create a keyframe for the Hit state. Move the Playhead in the Timeline window to this new keyframe.
-
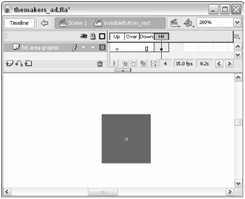
Select the Rectangle tool, and draw a uniform square on the symbol's Stage. The square can be any color, although we prefer red for invisible buttons. If you drew the shape with a stroke, delete the stroke. Select the square, and in the Property inspector, give the square a width and height of 50 pixels. Then, using the Align panel, center the square on the Stage. Your Button symbol and Timeline should now resemble Figure 18-11.
-
Now, go back to Scene 1 (the Main Timeline), and create a new layer. Rename this layer btLink, and place it above the graphics layer.
-
Open the Library panel (Ctrl+L or z+L), and drag an instance of the invisibleButton_rect symbol to the Stage. Place this instance over the company's name. In the Property inspector, name this instance btLink.
-
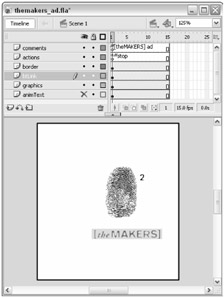
Using the Free Transform tool, size the instance to fit the size of the text, without over-lapping other elements on the Stage. You'll notice that your Button instance has a transparent aqua blue tint that overlays the underlying elements (as shown in Figure 18-12. This is Flash's way of enabling you to select and manipulate an invisible button. You will not see this color effect for the button when the document is published or tested as a Flash movie file (.swf).
-
With the Selection tool, select the Button instance on the Stage, and open the Actions panel (F9, or Option+F9 on Mac). Your Action panel title bar should read Actions -Button. Using the booklets in the Actions toolbox, add an on handler from the Global Functions ð Movie Clip Control booklet. Inside the on handler, specify a release event. Your Script pane should show the following code:
on (release){ }Tip Try coding these actions without using the Script Assist mode. At any point, you can click the Script Assist button in the Actions panel to help you write your code.
-
In the Script pane, click the mouse pointer just before the closing curly brace (}) on line 2. Now add a getURL action from the Global Functions ð Browser/Network booklet. Specify a URL for the first parameter of the action, and a blank browser window target for the second parameter, as shown in the following code:
on (release){ getURL("http://www.theMakers.com","_blank"); }For this example, we used the URL http://www.theMakers.com. When you're linking to domain names, make sure you specify the transfer protocol (such as http://, ftp://, and so on). If you are linking to relative URLs, specify the name of the HTML document (or other resource) that you want to access. This on() handler with the getURL() action will direct a button click on this instance to [theMAKERS] Web site, in a new browser window.
-
Save your Flash document, and test it using Publish Preview ð HTML (Ctrl+F12 or z+F12). In the browser window, roll over the company's name in the Flash movie. You'll notice that this area is an active button. When you click the button, a new browser window will open, displaying the company's Web page.
-
Now, let's go back to the Flash document and add another invisible button. You'll use a different procedure this time. On the Scene 1 timeline, create a new layer and name it btEmail. Place this layer above the btLink layer.
-
On the first frame of the btEmail layer, select the Oval tool, and draw a perfect circle anywhere on the Stage. Again, you can use any fill color you wish. If the circle has a stroke, delete the stroke. With this circle selected, open the Property inspector and give the circle a width and height of 50 pixels.
-
With the circle selected, choose Insert ð Convert to Symbol (F8). In the Convert to Symbol dialog box, make a Button symbol named invisibleButton_oval and click OK.
-
Now, edit the new symbol, either by double-clicking the instance on the Stage, or by double-clicking its listing in the Library panel. On this symbol's timeline, rename Layer 1 to hit area graphic. Now, select the keyframe for the Up state, and drag it to the Hit state. Note that you may need to click, then click and drag the keyframe for this method to work properly. When you are finished, your circle shape should be on only the Hit area of the button's timeline.
-
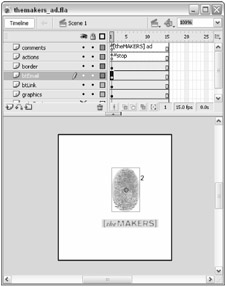
Go back to the Scene 1 timeline, and you'll notice that your circle button is now an invisible button, just as our rectangular one is. Move the circular invisible button over the thumbprint graphic, and use the Free Transform tool to shape the circle as an oval that closely matches the shape of the thumbprint, as shown in Figure 18-13. Also, name the instance btEmail in the Property inspector.
-
With the oval invisible button selected, open the Actions panel. Repeat Steps 11 and 12 of this exercise. This time, however, we'll use a mailto: URL, as in "mailto:info@theMakers.com". Type this value as the first parameter of a getURL action for this Button instance. For this getURL action, however, you do not need to specify a window parameter.
Tip You can specify subject lines and body text in mailto: URLs as well, just as you can with HTML documents. For example, the following code will open a new e-mail message window addressed to info@theMakers.com, with a subject line of "Web Feedback" and body text of "Here are my comments." The following code should be typed as one line of code:
getURL("mailto:info@theMakers.com?subject=Web%20Feedback&body=H ere%20are%20my%20comments%3A"); -
Save your Flash document once again, and preview it in a browser. When you click the active area over the thumbprint graphic, the default e-mail client on your system should open, displaying a new message window with the To: field predefined to the URL you typed in Step 19.

Figure 18-11: The square will act as the active area of the Button symbol.

Figure 18-12: The aqua blue tint of the Button instance indicates the presence of a button that has only a Hit state.

Figure 18-13: The thumbprint graphic now has an invisible button on top of it.
| New Feature | You can also change the title and description metadata published with the .swf file by choosing Modify ð Document. Even though these features are new to Flash 8, the metadata can be included with older .swf formats, including Flash Player 6! If your Flash movie is on a publicly accessible Web page and crawled by a search engine, the metadata can be read by the engine and indexed. |
Now you know how to make invisible buttons and add getURL actions to them. In your own work, you may come to realize the true benefit of invisible buttons: You can quickly drag several instances of either invisible button shape (oval or rectangle) to the Stage to create active areas. This offers two benefits: First, you don't have to make Button symbols from regular graphics that don't need four button states, and second, you can make "hidden" areas in interactive puzzles or games.
| Tip | As you become more agile with ActionScript, you can start to use Movie Clip instances as button handlers. You learn more about this usage of Movie Clips in Chapter 25, "Controlling Movie Clips." |
| Web Resource | We'd like to know what you think about this chapter. Visit www.flashsupport.com/feedback to send us your comments. |
EAN: 2147483647
Pages: 395