Making Actions Happen with Event Handlers
The ten common actions we discussed in the previous sections provide many of the behaviors that you need to make an interesting interactive Flash movie. But those actions can't make your movies interactive on their own. They need to be told when to happen. To tell a Flash movie when an action should occur, you need event handlers. Event handlers specify the condition(s) under which an action can be made to happen. For instance, you might want to mouse-click a button to initiate a play() action, or you might want a movie to stop when a certain keyframe in the timeline is reached. Creating interactivity in your movies is simply a matter of deciding what event you want to detect (mouse click, keystroke, and so on), adding the appropriate event handler to detect it, and specifying the action(s) that should be performed when it happens.
Before we describe each event handler in detail, we'll show you an example of exactly how an event handler merges with an action to form a functioning interactive button.
Combining an Action with an Event Handler to Make a Functioning Button
Imagine that you have a short, endlessly looping movie in which a wire-frame cube rotates. Now imagine that you want to add a button to your movie that, when clicked, stops the cube from rotating by stopping the playback of the looping movie. Here's what you need to do:
| On the CD-ROM | For this exercise, you can use the rotatingCube.fla file located in the ch18 folder on this book's CD-ROM. The finished file is named rotatingCube_complete.fla. |
-
Open the starter Flash document, rotatingCube.fla. Save this document as rotatingCube_complete.fla on your local hard drive.
-
Make a new layer called button.
-
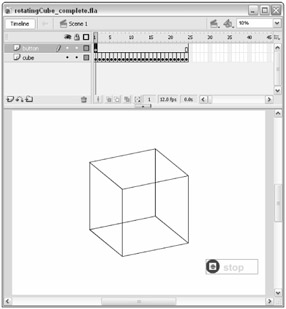
Place a button on the button layer. You can use Flash 8's sample Stop button found in the class buttons ð Circle Buttons folder of the Buttons library (Window ð Common Libraries ð Buttons). See Figure 18-7 to see this button's placement on the Stage.
Tip Selecting buttons and editing button properties sometimes can be tricky if buttons are enabled in the Flash authoring environment. For easier button manipulation, disable buttons by unchecking Enable Simple Buttons under the Control menu.
-
With the Stop Button instance selected, open the Actions panel (F9). Click the Script Assist button, and open the Global Functions ð Movie Clip Control booklet in the Actions toolbox.
-
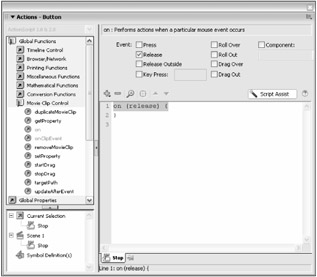
Double-click the on event handler in the Movie Clip Control booklet, or drag it to the Script pane. A list of mouse events for on appears in the Script Assist area of the Script pane (shown in Figure 18-8). Notice that the release event is automatically checked for you. The release event is one of several mouse-click events (another frequently used event is press; we describe both later in this chapter in the section titled "The Flash event handlers"). Notice that the event is specified between the parentheses of the on handler in the Script pane. You've now told Flash that you want something to happen when the mouse clicks the button. All that's left is to tell it what should happen. In other words, you need to nest another action within the on (release){} code.
-
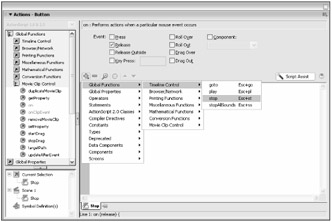
Now you'll try another method for adding an action to the Script pane. While in Script Assist mode, make sure line 1 in the Script pane is highlighted. Then click the plus (+) button in the toolbar of the Actions panel. From the menu, choose Global Functions ð Timeline Control ð stop, as shown in Figure 18-9.
A stop action will be placed between the curly braces ({}) of the on handler. The Script Assist mode automatically formats the code cleanly. The Script pane should now read as follows:
on (release){ stop(); }The stop action, represented by the code stop();, is contained by the curly braces { and } that mark the beginning and end of the list of actions that are executed when the release event occurs (there could be any number of actions in this list). Each action line (handlers excluded) must end with the semicolon (;) character.
-
You now have a button in your Flash movie that stops the movie's playback when it is clicked. Save your Flash document (.fla), and test the movie by choosing Control ð Test Movie. When you click the button, the rotating cube animation should stop.

Figure 18-7: The Stop button on the Stage

Figure 18-8: Adding a release event to the on handler

Figure 18-9: Adding a stop action to the on handler.
To make any interactivity in your movies, you simply have to apply the basic principles you used to make the stop button: Decide which action (or actions) you want to happen, and indicate when you want that action to happen with an event handler. Let's look now at more event handlers you can use to make those actions happen.
The Flash Event Handlers
Three primary event handlers exist in Flash: those that detect mouse activity on Button instances (button manipulation), those that recognize when a key is pressed on the keyboard (key presses), and those that respond to the progression of the timeline (keyframes).
Working with Mouse Events and Buttons
Event handlers that occur based on the user's interaction with a button rely entirely on the location and movement of the mouse pointer. If the mouse pointer comes in contact with a Button symbol's Hit area, it changes from an arrow icon to a finger pointer icon. At that time the mouse is described as "over" the button. If the mouse pointer is not over a button, it is said to be out or outside of the button. General movement of the mouse without the mouse button depressed is referred to as rolling. General movement of the mouse with the mouse button pressed is referred to as dragging.
| Cross-Reference | If you don't know how to make a Button symbol and its various states, read Chapter 6, "Symbols, Instances, and the Library." |
| Caution | Event handlers and actions for buttons must be placed only on Button instances, not on the four frames in the timeline of the original Button symbol. One of the features in Flash 8 is that it will not enable you to place any actions in a Button symbol timeline. |
It's worth mentioning that you can assign one or more mouse events to a Button instance's on handler. For example, the following code will be invoked when the user releases the mouse button over or outside of the Hit area of the Flash button:
on (release, releaseOutside){ stop(); } As this code demonstrates, multiple events are separated by a comma (,). You can specify as many events as you need within the parentheses of the on handler.
Here are the mouse-based events for Flash buttons:
Press
A single mouse click can actually be divided into two separate components: the downstroke (the press) and the upstroke (the release). A press event occurs when the mouse pointer is over the Hit area of a button and the downstroke of a mouse click is detected. Press is best used for control panel — style buttons, especially toggle switches.
| Caution | Typically, developers should program reversible decisions for primary navigation so that users can abort their clicks by rolling the cursor away from the Hit area before releasing the mouse. For example, a user might click a button for more information and decide she would rather not get that information. We do not recommend using the press event for important user moves such as these because it does not give users an opportunity to abort their moves. |
Release
A release event occurs when the mouse pointer is over the Hit area of a button and both the downstroke and the upstroke of a mouse click are detected. The release event is the standard button click event.
| Tip | If you use the Track as Menu Item behavior for a Button instance in the Property inspector, a button will respond to a release event over its Hit state even if the mouse was pressed outside of the button's Hit area. |
ReleaseOutside
A releaseOutside event occurs in response to the following series of mouse movements:
-
The mouse pointer moves over a button's Hit area.
-
The mouse button is pressed.
-
The mouse pointer is moved off the button's Hit area.
-
The mouse button is released.
The releaseOutside event can be used to react to an aborted button click.
RollOver
A rollOver event occurs when the mouse pointer moves onto the Hit area of a button without the mouse button depressed.
| Note | To perform standard rollover button effects, such as graphic art changes or sound events, you can insert graphics and sound on to the Over state of the Button symbol timeline. It's common practice, however, to create Movie Clip instances that use mouse event handlers for specialized rollover effects. You learn more about this advanced usage of Movie Clips in Chapter 25, "Controlling Movie Clips." You can also find a bonus file demonstrating Movie Clip-based rollovers at www.flashsupport.com/bonus/button_transition/button_anim.html. |
RollOut
A rollOut event occurs when the mouse pointer moves off of the Hit area of a button without the mouse button depressed. This event is commonly used for switching an advanced button's graphic state back to its original state when the user rolls off the button.
DragOver
A dragOver event occurs in response to the following series of mouse movements:
-
The mouse button is pressed when the mouse pointer is outside the Hit area of a Flash button.
-
The mouse pointer moves over the Hit area while the mouse button is still depressed.
The dragOver event is rather obscure, but you could use it for special cases of interactivity such as revealing a hidden item in a game. For example, when the mouse button is held down and mouse movement occurs over a specific area, ActionScript can detect the coordinates of the mouse movement and reveal a Movie Clip instance that is otherwise invisible on the Stage.
DragOut
A dragOut event occurs in response to the following series of mouse movements:
-
The mouse button is pressed when the mouse pointer is over the Hit area of a Flash button.
-
The mouse pointer moves outside the Hit area of the Flash button, and the mouse button is still depressed.
As with dragOver, you'll likely encounter very few situations where the dragOut event is necessary. Most of the more complicated mouse events are only useful for Flash games and experimental user interfaces.
Capturing Keyboard Input
You can also use event handlers to detect events that occur on the user's keyboard. You can enable your Flash movies to "capture" a key press (also known as a keystroke) initiated by the user. One way in which ActionScript can detect a keystroke is by using the keyPress event. This event lets you execute an action (or series of actions) when the user presses a key on the keyboard. The implementation method for a keyPress event handler may be confusing, but it's the least code-intensive (and most designer-friendly) route: To add a keyPress event handler, you must first place a button onstage at the frame where you want the keyboard to be active. You then assign the keyPress event to the Button instance's on handler. Keep in mind, though, that the button's Hit area has no effect on the keyPress event detection. As such, even though the keyPress event is defined on a button, any key press that occurs in the Flash movie can be captured by the button, regardless of the user's mouse position.
| Tip | If you are using the button only as a container for your keystroke event handler and you do not want the button to appear on Stage, you should make sure that (in Edit mode for the symbol) all the frames of the Button symbol timeline are blank. |
For example, if you have a Button instance on the Stage of your Flash document, you can select the Button instance, open the Actions panel, and add the following code to capture an Enter keystroke:
on (keyPress "<Enter>"){ trace("The Enter key was pressed."); } | Note | A trace action sends a message to the Output panel in the Test Movie environment. You'll learn more about trace actions in Part VII, "Approaching ActionScript." |
As you can see in this example, you specify the key's name between a set of double quotes, after the keyPress term. Some keys, such as Enter and Escape, require less than (<) and greater than (>) characters as well. You can use the keyPress event in conjunction with other mouse events. The following example detects when the user clicks the mouse button over the Hit state of the Flash button or presses the spacebar anywhere within the Flash movie:
on (release, keyPress "<Space>"){ stop(); } The keyPress event, which was introduced with Flash Player 4, and the newer Key object, introduced with Flash Player 6, open up many possibilities for Flash. Movies can have keyboard-based navigation, buttons can have keyboard shortcuts for convenience and accessibility, and games can have keyboard-controlled objects (such as ships and animated characters). But watch out for some potential "gotchas" to keyboard usage, specifically with on handlers and keyPress events. If you're planning ambitious keyboard-based projects, you may want to check the following list of potential issues first:
-
Multiple key combinations are not supported. This scenario rules out diagonals as two-key combinations in the classic four-key game control setup. It also means shortcuts such as Ctrl+S are not available. You can, however, use the Shift key in combination with another key to specify an uppercase letter or symbol. (See the case-sensitive note later in this list.)
-
If presented in a browser, the Flash movie must have "focus" before keystrokes can be recognized. To "focus" the movie, the user must click anywhere in the space it occupies within the browser window. Keyboard-based movies should include instructions that prompt the user to perform this initial mouse click.
Tip You can use the JavaScript focus() method in HTML documents to automatically draw attention to a Flash movie contained within the page. You can use the onLoad event to initiate a JavaScript function that includes the focus() method to enable this behavior as soon as the page loads into the browser.
-
Because the Escape (Esc), Enter, less than (<), and greater than (>) keys are used as authoring shortcuts in the Test Movie environment, you may want to avoid using them as control keys in your movies. If you need to use those keys in your movies, make sure that you test the movies in a browser, or use the Control ð Disable Keyboard Shortcuts option in the Test Movie environment.
-
keyPress events are case-sensitive. For example, an uppercase letter "S" and a lower-case letter "s" can trigger two different actions. No case-insensitive keystroke event (that is, one that would enable both cases of a letter to trigger the same action) exists for Button instances and the on handler. Achieving case-insensitivity would require two separate on handlers (and their contained actions), one for each case of the letter, on the same Button instance. For example, the following code would stop the current time-line when either the s key or Shift+s key (or the s key with Caps Lock enabled) is pressed:
on (keyPress "s"){ stop(); } on (keyPress "S"){ stop(); }
Capturing Time Events with Keyframes
The keyframe event handler depends on the playback of the movie itself, not on the user. Just about any action (except the on() and onClipEvent() handlers) can be attached to any keyframe on the timeline. An action attached to a keyframe is executed when the Playhead enters the keyframe, whether it enters naturally during the linear playback of the movie or as the result of a goto action. So, for instance, you may place a stop action on a keyframe to pause the movie at the end of an animation sequence.
In some multimedia applications, keyframe event handlers can differentiate between the Playhead entering a keyframe and exiting a keyframe. Flash has only one kind of keyframe event handler (essentially, on enter). Hence, as a developer, you do not need to add keyframe event handlers explicitly — they are a presumed element of any action placed on a keyframe. As we mentioned in an earlier note, ActionScript 1.0 and 2.0 can employ a more advanced event model. You learn about different event models in Chapter 25, "Controlling Movie Clips."
| Tip | Complex movies can have dozens, or hundreds (or even thousands!), of actions attached to keyframes. To prevent conflicts between uses of keyframes for animation and uses of keyframes as action containers, it is highly advisable to create an entire layer solely for action keyframes. Name the layer actions and keep it on top of all your layers for easy access. Remember not to place any symbol instances, text, or artwork on your actions layer. You can also create a labels layer to hold — you guessed it — frame labels. |
The process for adding an action to a keyframe is as follows:
-
Create a keyframe on a timeline. This keyframe can exist in the Main Timeline (that is, Scene 1) or a Movie Clip symbol timeline.
-
Select the keyframe in the Timeline window, and open the Actions panel. The Actions panel title should read Actions - Frame.
-
Type your desired actions in the Script pane.
In the next section, you'll get a little more hands-on experience adding actions to both buttons and keyframes.
EAN: 2147483647
Pages: 395