Publish Settings for Audio
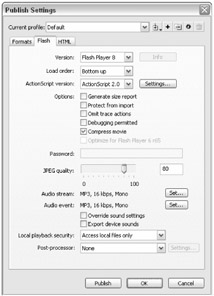
To take a global approach to the control of audio output quality, choose File ð Publish Settings (Ctrl+Shift+F12 or Shift+Option+F12) to access the Publish Settings dialog box. Then choose the Flash tab of the Publish Settings dialog box, shown in Figure 15-15. This tab has three areas where the audio quality of an entire Flash movie can be controlled globally.

Figure 15-15: The Flash tab of the Publish Settings dialog box has several options to control audio quality.
| Tip | You can also access the Flash tab of Publish Settings using the Property inspector. Click the document's Stage or Work Area, and in the Property inspector, click the Settings button to the right of the Publish label. |
The Flash tab of the Publish Settings dialog box has three options for controlling audio quality:
-
Audio Stream: Controls the export quality of Stream sounds. To customize, click Set. This gives you a number of options, which we describe in the section that follows. Flash MX supports MP3, which is the optimal streaming format, as well as a new Speech codec.
-
Audio Event: Controls the export quality of Event sounds. To customize, click Set. This gives you the same number of options as the Set button for Audio Stream. We describe these options in the section that follows.
-
Override Sound Settings: If this box is checked, Flash uses the Publish Settings rather than the individual audio settings that are fine-tuned in the Library panel for the current document. For more information, see the section "Fine-Tuning Sound Settings in the Library," later in this chapter.
The Set Options
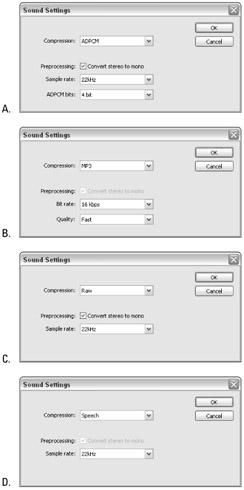
Audio stream and Audio event have individual compression settings, which can be specified by their respective Set button options. If you click either Set button on the Flash tab, the same Sound Settings dialog box appears — it is identical for both Audio Stream and Audio Event, which means that the same options are offered for both types of sound. The Sound Settings dialog box, shown in various permutations in Figure 15-16, displays numerous settings related to the control of audio quality and audio file size. The type of compression you select governs the specific group of settings that appear.

Figure 15-16: The various options in the Sound
| Note | The impact of individual sound settings may be overridden by another setting. For example, a Bit Rate setting of 160 Kbps may not result in good sound if the Quality is set to Fast. Optimal results require attention to all of the settings. It's like a set of interlinked teeter-totters: A little experimentation will reveal the cumulative or acquired impact of each setting on the others. However, the need to experiment here is hobbled by the lack of a preview mechanism. By contrast, tuning a sound in the Library is much more serviceable because there's a sound preview button adjacent to the settings controls. For more about this workflow, refer to the following section of this chapter, "Fine-Tuning Sound Settings in the Library." |
The specific options that are available in the Sound Settings dialog boxes are always related to the compression, or audio-encoding scheme, selected in the Compression drop-down menu. That's because different compression technologies support different functionalities:
-
Disable: This option turns off all sounds that have been assigned in the Property inspector to keyframes in any timeline. If this option is selected, only sound that has been linked and attached for use in ActionScript will play in the movie (see Chapter 27, "Interacting with Movie Clips," for more information on this use). All other sound sources assigned in the movie will be omitted from the final movie file (.swf). No additional options accompany this setting.
-
ADPCM: With ADPCM selected in the Compression menu, the following options are available:
-
Convert Stereo to Mono: Mixes the right and left channel of audio into one (mono) channel. In sound-engineer parlance, this is known as "bouncing down."
-
Sample Rate: Choose from sampling rates of 5, 11, 22, or 44 kHz. Increasing the sample rate of an audio file to something higher than the native sample rate of the imported file simply increases file size, not quality. For example, if you import 22 kHz sounds into the Flash movie, selecting 44 kHz will not improve the sound quality. For more information on sample rates, see Appendix C, "Digital Audio Basics," on the CD-ROM.
-
ADPCM Bits: Set the number of bits that ADPCM uses for encoding. You can choose a rate between 2 and 5 bits. The higher the ADPCM bits, the better the audio quality. Flash's default setting is 4 bits.
-
-
MP3: If you select MP3 in the Compression menu, you can set the following options:
-
Convert Stereo to Mono: Mixes the right and left channel of audio into one (mono) channel. This is disabled at rates below 20 Kbps because the lower bit rates don't allow stereo sound.
-
Bit Rate: MP3 measures compression in Kbps. The higher the bit rate, the better the audio quality. Because the MP3 audio compression scheme is very efficient, a high bit rate still results in a relatively small file size. Refer to Table 15-2 for a breakdown of specific bit rates and the resulting sound quality.
-
Quality: Choose Fast, Medium, or Best quality. These settings determine how well Flash 8 will analyze the sound file during compression. Fast will optimize the audio file in the shortest amount of time, but usually with less quality. Medium will analyze the sound waveform better than the Fast setting, but takes longer to compress. Best is the highest quality setting, but it takes the longest time to compress the sound file. Note that the file size of the final compressed sound will not be affected by any Quality setting — it simply instructs Flash how well it should analyze the sound during compression. The longer Flash takes to analyze a sound, the more likely the final compressed sound will capture the high highs and the low lows. If you have a fast computer processor, then we recommend you use the Best setting during your final Flash movie publish. During development and testing, you may want to use Fast to avoid long waits.
-
-
Raw: When Raw (also known as Raw PCM audio) is selected in the Compression menu, there are two options:
-
Convert Stereo to Mono: Mixes the right and left channels of audio into one (mono) channel.
-
Sample Rate: This option specifies the sampling rate for the Audio Stream or Audio Events sounds. For more information on sample rate, please refer to Appendix C, "Digital Audio Basics," on this book's CD-ROM.
-
-
Speech: When the Speech codec is selected in the Compression menu, there is only one option available: Sample Rate. Any sound compressed with the Speech codec will be converted to mono (one-channel) sound. Even though the Speech codec licensed from Nellymoser was designed for 8 kHz, Flash 8 "upsamples" this codec to those frequencies supported by the Flash Player. See Table 15-3 for an overview of these sampling rates and how they affect sound quality.
| Bit rate | Sound quality | Good for |
|---|---|---|
| 8 Kbps | Very bad | Best for simulated moonwalk transmissions. Don't use this unless you want horribly unrecognizable sound. |
| 16 Kbps | Barely acceptable | Extended audio files where quality isn't important, or simple button sounds |
| 20, 24, 32 Kbps | Acceptable | Speech or voice |
| 48, 56 Kbps | Acceptable | Large music files; complex button sounds |
| 64 Kbps | Good | Large music files where good audio quality is required |
| 112–128 Kbps | Excellent | Near-CD quality |
| 160 Kbps | Best | Near-CD quality |
| Sample rate | Sound quality | Good for |
|---|---|---|
| 5 kHz | Acceptable | Sound playback over extremely limited data connections, such as 19.2 Kbps wireless Internet modems used by mobile devices |
| 11 kHz | Good | Standard telephone-quality voice audio |
| 22 kHz | Excellent | Not recommended for general Internet use. While this setting produces higher fidelity to the original sound, it consumes too much bandwidth. For comparable sound, we recommend using a midrange MP3 bit rate. |
| 44 kHz | Best | See description for 22 kHz |
| Tip | As a general rule, if you use the Publish Settings to control audio export globally, we recommend choosing MP3 at 20 or 24 Kbps. This will result in moderate to good sound quality (suitable for most Flash projects), and the ratio of file size to quality will give reasonable performance. 20 to 24 Kbps is an acceptable data rate for speech and short sound effects, while 96 to 128 Kbps is a better data rate for longer sounds and music. |
Supporting Audio and MP3 Playback
-
Although this is becoming less of an issue with the desktop versions of the Flash Players, it may still be important to consider that MP3 or audio playback may not be supported by all Flash Players, especially device-based players. You can use Flash Player 6 and higher features in the ActionScript language to check the capabilities of the Flash Player installed on a user's system. Using the System.capabilities object, you can check to see whether an MP3 decoder is installed. The specific property is
System.capabilities.hasMP3
| Tip | In FlashLite 1.1 or higher, you can use the _capMP3 global property at run time to determine if MP3 playback is supported on a particular device. |
More importantly, though, you can script your movies to check whether the Flash Player hasaccess to general audio output. Some devices with the Flash Player may not have any audio output. This property is
System.capabilities.hasAudio
| Caution | These new additions to the ActionScript language are only available in Flash Player 6 or higher. Earlier versions of the Flash Player will not recognize these objects or properties. |
EAN: 2147483647
Pages: 395