Applying Filters in Flash
Filters offer shortcuts for adding visual polish to your Flash designs. Rather than manually editing shapes to create drop-shadows or adjusting gradient fills to create bevels, you can simply apply a live filter and use the built-in settings to adjust the final effect. Unlike Timeline Effects, filters are rendered on the fly and do not result in any additional symbols being generated and added to the Library. In addition, Filters do not interfere with the "editability" of your content — you can always modify the original text or symbol instance without "breaking" the filter effect. Filters can be layered in any order and you can make modifications to the individual filter settings at any time. You can also add or control filters at run time with ActionScript, but for now we'll focus on applying filters in the authoring environment — which doesn't require any code! Filters are rendered as you add or adjust them so you can always see just what you'll get when the final movie is published.
Adding and Adjusting Filters
As shown in Figure 12-1, the Filters panel is grouped with the Property inspector in the default Flash Workspace layout. To apply a filter, follow these easy steps:
-
Select an item on the Stage that is compatible with filters — a MovieClip instance, Button symbol instance, or text field.
-
Open the Filters panel (or activate the Filters tab in the Property inspector), then click the plus symbol in the top-right corner to access the drop-down list of available filters.
-
After a filter is selected from the drop-down menu, it will appear in a live list on the left side of the Filters panel and you will see the filter effect (with default settings) applied to your selected item.
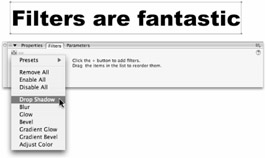
Figure 12-1: The new Flash 8 Filters panel makes it easy to add live effects.
As shown in Figure 12-2, the settings for each filter are loaded into the main part of the panel when an applied filter is selected in the live list. The settings vary for each filter, but once you become familiar with the options, you'll find it easy to adjust individual filters. To remove a filter at any time, simply select the name of the filter in the live list and click the minus (-) symbol at the top of the panel.

Figure 12-2: Individual settings for applied filters can be adjusted at any time by selecting a filter in the Filters panel live list.
| Tip | Applied filters can be temporarily toggled off (and back on) to preview different filter combinations by clicking the check mark (or cross icon) that appears to the left of the filter name in the live list. |
The default filter settings (shown in Figure 12-3) are a good starting point, and in some cases they might even give you the result you want, though in most cases, you'll need to modify the settings to achieve a satisfactory final effect.
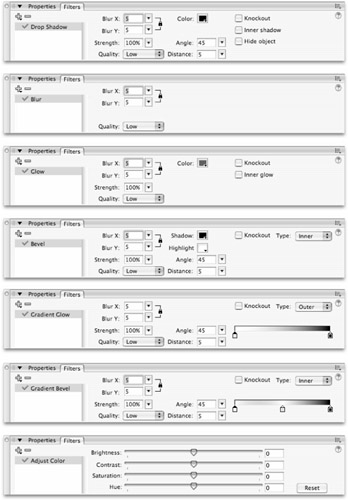
Figure 12-3: Some Flash 8 filter effects have unique controls, but most are created with different combinations of a series of basic settings.
It would be an overwhelming task to document every combination of settings on every filter, but an overview of the main settings will provide you with some guidance for experimentation:
-
Blur X, Blur Y: Sets the distance that the edge of a shape will be extended horizontally (X) and vertically (Y) to create a graduated or softened edge for shadow, blur, bevel, and glow effects. This has the same effect as the distance setting in the Soften Fill Edges dialog box for shapes. The default blur distance is 5 and the range is from 0 to 100. By default, the lock icon is turned on to constrain the X and Y settings to the same value, creating a symmetrical, graduated effect. If you prefer to make the X and Y settings independent of each other, toggle the constrain option off by clicking the lock icon.
-
Strength: Sets the opacity of the rendered effect. The default setting is 100. The range is from 0 to 1,000. However, for all practical purposes, the effective range for most filters is from 0 (invisible) to 100 (solid center area with normal fall-off in graduated area). Increasing the strength of a filter beyond 100 percent adds opacity to the stepped (or softened) areas of the shape. The opacity is increased incrementally from the most solid area to the least solid area of the stepped edge.
Caution At the maximum Strength setting of 1,000 percent, all the steps within the Blur distance of a filter are rendered at 100-percent opacity, which usually counteracts the visual impact of the filter. The result is an expanded solid shape with a slightly jagged edge, rather than a nicelooking shadow, blur, or bevel.
-
Quality: Sets the fidelity or smoothness of the rendered effect. This setting has a major impact on the performance of the published movie. By default, Quality is set to Low. As the quality is increased to Medium or High, gradients are rendered more smoothly and the steps in blurs are softened, but the performance of the final movie is reduced. Your Flash movies will perform better if you can achieve the visual effect you need by making adjustments to the Color and/or Blur settings rather than increasing the Quality setting.
Tip To make a glow or drop-shadow look less harsh, adjust the Color to be a closer match to the background color rather than reduce Strength or increase Quality. Color settings have the least impact on the performance of the final movie.
-
Color: Click color chips to access currently loaded swatches and set colors used to render Drop shadow or Glow effects. The default solid color for Drop shadow is Black (#000000); the default solid color for Glow is Red (#FF0000). The solid color that is set with the Color chip will automatically fade from solid to transparent to create a soft glow or shadow effect. The Bevel filter requires both a Shadow and a Highlight color — by default, these are set to black (#000000) and white (#FFFFFF), respectively. The Gradient Bevel and Gradient Glow filters make it possible to add multiple colors to rendered gradient effects. Click the color anchors on the gradient strip to access currently loaded swatches and set control points in the gradient.
Note The opacity of the center color anchor for Gradient Bevels and the left (outer) color anchor for Gradient Glows are fixed in position and set to 0 percent Alpha. The color of these pointers can be changed, but the Alpha level and anchor position can only be changed on the other anchors (or new anchors added to the gradient strip).
-
Angle: Sets the direction of offset to be applied with the Distance setting. If Distance is set to 0, changing the Angle (or degree of offset) will have no visible effect. The default is a 45-degree angle and the range is 0 to 360 degrees. You can change this setting by manually entering a number (decimals are allowed), or by dragging a small circle icon around a fixed 360-degree arc invoked by clicking the arrow (drop-down menu) icon next to the Angle value field. The higher the Distance setting, the more obvious the offset direction or Angle will be.
-
Distance: Sets the pixel value for the distance between the center point of the original item and the center point of the rendered filter (gradient). The default setting is 5 and the range is from -32 to 32 pixels. If the distance setting is 0, the rendered gradient and the original item will be center-aligned.
| Caution | If the Distance setting is 0 and the Blur setting is less than 5, it can be hard to see a filter effect if it is rendered outside (or behind) the original item. |
In addition to the adjustable settings, there are some check box options that expand the visual possibilities for filters:
-
Knockout: Converts the original shape into a transparent area, while leaving the rendered effect visible in any area that was not cut out by the original shape.
-
Filter types: For Blur and Drop shadow filters, this is a check box to switch the rendered gradient from outside to inside the boundary of the original shape. For the multicolor gradient filters (Bevel, Gradient Glow, and Gradient Bevel), the options are listed in a drop-down menu that enables the filter to be set to render inside (Inner), outside (Outer), or inside and outside (Full) the boundaries of the original item.
Caution The Bevel filter works best when left at the default Inside setting. Outside and Full bevels require some adjustment to create a realistic, dimensional result rather than a messy, doubled-up drop-shadow effect.
Tip Inner Gradient Glow effects are easier to create using a custom gradient fill instead of applying the Gradient Glow filter with the Inner setting. A gradient fill will also be less demanding at run time than a Gradient Glow filter.
-
Hide object: This option is the secret to creating sophisticated Drop shadows (as we describe later in this chapter). When Hide object is enabled, the original object disappears, but the drop-shadow is preserved.
Note Although Hide object and Knockout both convert the original shape into a transparent area, they do not have exactly the same result. The Hide object option preserves the entire gradient area rendered by a filter effect, while the Knockout option creates a "cutout" effect when combined with filters that are not set to render inside the boundaries of the original shape. Although Hide object can be selected when the Knockout option is also selected, there is no visible difference to the rendered graphic. If you decide to use the Knockout option, it is best to uncheck the Hide object option to avoid rendering redundant filters at run time.
The filter settings we have described thus far relate to the various gradient-based filters. As you can see from Figure 12-3, the Adjust Color filter settings are unique. The sliders available with the Adjust Color filter settings for adjusting various color qualities will be familiar to anyone who has worked in image editing programs like Photoshop or Fireworks. Flash updates the selected item on the Stage as you make color adjustments, so it is easy to experiment with the filter settings. However, it is important to know when to apply the Adjust Color filter and when to use the color controls available from the Properties panel.
Creating Dimensional Shadows
One limitation of the new Drop shadow filter is that it does not have a built-in skew setting. The workaround for creating a drop-shadow with more depth illustrates how you can use the Hide object option and the Transform panel to enhance shadows created with the Drop shadow filter. Here are the steps:
-
Place a Text field, Movie Clip, or Button instance on the Stage.
-
Create a new layer below the original content layer: Click the Insert Layer icon in the Timeline (or choose Insert ⇨ Timeline ⇨ Layer from the application menu). Drag the new layer to reorder it below the original layer in the layer stack.
-
Copy the item from Step 1 to the new layer: Select the keyframe where the item exists and hold the Option key while dragging the keyframe content to the new layer, or select the item and use the copy command (Ctrl+C or z+C on Mac), then activate the new layer and use the Paste in Place command (Shift+Ctrl+V or Shift+z+V on Mac).
-
Lock the original content layer.
-
Select the duplicate item on the lower layer and use the Transform panel to apply a Horizontal stretch and skew. As shown in Figure 12-4, we set the horizontal scale to 130 percent and the horizontal skew to -45 degrees.
-
Open the Filters panel or activate the Filters tab in the Property inspector.
-
Click the plus symbol and select Drop shadow from the filters list. In the Drop shadow settings, select the Hide object check box. Otherwise, the default settings are a good place to start.
-
As shown in Figure 12-5, the default settings can be modified to create a softer shadow. In our example, the shadow Color was changed to medium gray (#666666), the Strength was set to 50 percent, and the Quality was set to Medium.
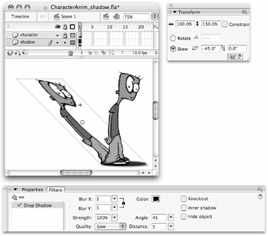
Figure 12-4: Use the Transform panel to modify the duplicate symbol instance so it will create a more realistic offset shadow.
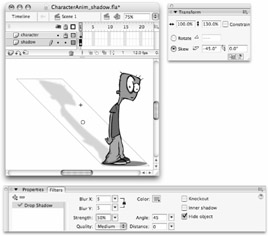
Figure 12-5: A Drop shadow filter applied to the skewed symbol instance with the Hide object option enabled, and a few adjustments to the default settings, result in a realistic, dimensional shadow.
Combining Filters and Saving Custom Presets
You can add multiple filters to one item and they will be rendered in the order they appear in the live list, from top to bottom. Changing the order of filters by dragging a filter name up or down in the live list will change the final result of the combined effect, but the settings for each filter will be preserved and editable.
If you have created a special combination of filters or found a custom filter setting that you would like to reuse, the Presets option makes it easy to save and access your own list of filter effects.
To save a filter setting or filter combo to the presets menu, follow these steps:
-
Select the item that has the filters and settings applied that you would like to save.
Note All filters in the live list for the selected item will be saved with the preset — including any filters that are toggled off. When the custom filter is applied from the Presets menu to another item, the settings will be identical.
-
In the Filters panel, click the plus icon (+) to invoke the filter menu (as shown in Figure 12-6), and from the Presets submenu, select Save As.
-
Enter a name for your custom filter settings or filter combo (as shown in Figure 12-7) and click OK.
-
The named preset will be added to the bottom of the Presets submenu, along with any other saved Presets (in alphabetical order, as shown in Figure 12-8), and can be applied to other items.
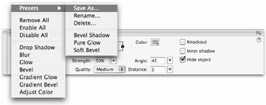
Figure 12-6: The Presets submenu in the Filters panel enables you to manage and apply any custom filter settings or filter combinations that you want to save for reuse.

Figure 12-7: You can name and save custom settings for a specific filter or a combination of filters for reuse.
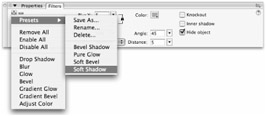
Figure 12-8: Saved filter presets appear alphabetically in the Presets menu — the Presets are saved on an application level for reuse in any active document.
| Caution | When a Preset is applied to an item, any other filters that have been applied to that item will be cleared and replaced with the filters (and settings) that were saved with the Preset. |
After a Preset is applied to an item, the settings can be modified on that item without corrupting the saved Preset. Unfortunately, the Presets list doesn't have a centralized edit option, but you can select the Rename or Delete option from the Preset submenu to load your list of currently saved presets into dialog boxes that enable you to rename an item or remove an item from the list. If you'd like to share your filter presets with someone else, all you have to do is provide them with the XML file that is saved for each preset in the Flash Configuration folder. The standard file paths for saved filter presets are as follows:
-
Windows:
C:\Documents and Settings\username\Local Settings\Application Data\Macromedia\Flash 8\language\Configuration\Filters\filtername.xml
-
Macintosh:
Macintosh HD/Users/username/Library/Application Support/Macromedia/Flash 8/language/Configuration/Filters/filtername.xml
Once the XML files are copied into the same location on someone else's computer, the presets will appear in her Presets menu when she starts Flash 8. Filter swapping is an easy way to share creative resources and to keep effects consistent for projects that rely on filters for a specific look.
Although you may occasionally find it helpful to combine filters, it is best to try and achieve the result you want by first adjusting the settings of a single filter and/or modifying the symbol instance using the Color Effect settings in the Properties panel or the Transform tools. As with any intensive effect rendered at run time, multiple filters will have a negative impact on the performance of the published Flash movie.
Animating Filters with Motion Tweens
Macromedia has done a great deal of engineering to make it as easy as possible to combine filters with motion tweens for animated effects. The result is a very intuitive system that works behind the scenes to support tweens while preserving editable filter settings.
| Note | Filters are not necessarily incompatible with shape tweens, but because filters can only be applied to symbols or text fields and shape tweens can only be applied to primitive shapes, filters and shape tweens never get a chance to work together. The only workaround for this rule is to create a shape tween inside of a Movie Clip and then apply a filter to the Movie Clip. In this case, the final visual result is a combination of a shape tween and a filter, but they remain on separate timelines. |
You can apply a filter to an item and then tween it, or you can select an item that has been tweened and add a filter to enhance the motion — in most cases, you'll get exactly the animated effect you were hoping for. The only time you'll need to know what is going on behind the scenes is when you don't get the result you want on the first try.
Here are some notes that should help you troubleshoot if things go wrong when you try to combine filters and Motion tweens:
-
Filters "stick" to symbol instances, so if you insert a keyframe (with the same content as the initial keyframe), and set up a Motion tween, the settings and the stacking order in the live list will automatically match in the first keyframe and the last keyframe of the tween.
-
If you add a filter to a symbol in one keyframe of a tween, Flash automatically adds a matching filter with all the settings adjusted to create "no effect" to the symbol in the other keyframe. This is also called a "dummy filter" because it will have no visible effect on the symbol, but it is required to support the tween.
-
If you remove a filter from a symbol in one keyframe of a tween, Flash automatically clears the matching filter from the other keyframe.
-
If you apply different filters (or different combinations of filters) on two different keyframes and then apply a tween, Flash will analyze the symbol with the most filters and apply dummy filters to the symbol in the other keyframe to support the tween. The visual difference between the two symbols will be interpolated in the span of the tween.
-
You can modify filter settings to create a visual change from the first keyframe to the last keyframe in a Motion tween. The differences will be tweened evenly across the span unless you use easing to adjust the interpolation.
-
The knockout and type of gradient (such as inner, outer, or full) filter settings will not interpolate properly as part of a tween if they are set differently on the beginning and end keyframes. If the filter options in the first keyframe and the end keyframe of a tween are inconsistent and cannot be interpolated properly, Flash will apply the options set in the first keyframe to the frames in the span of the tween.
Using Custom Easing to Control Filter Interpolation
By default, the interpolation of any differences in filter settings from the first keyframe to the last keyframe will match the interpolation of the motion tween — that is, the filters will change at the same rate as any other characteristics of the item that have been modified to create animation in the tween. General Easing settings (adjusted in the Property inspector) will be applied equally to all changes in the characteristics of an item. As we described in the previous chapter, if you need more precise control over the interpolation of different aspects of a tween, you can use Custom Easing to set unique curves for Position, Rotation, Scale, Color, and/or Filters. To access Custom Easing controls, select the first keyframe in the motion tween, then click the Edit button to the right of the Easing controls in the Property inspector. As shown in Figure 12-9, the easing Property menu at the top of the dialog box enables you to load a unique interpolation curve for each of the various properties that can be animated in a tween. You can set a unique curve to apply to all properties, or set unique curves for selected properties, leaving the default curve for others.
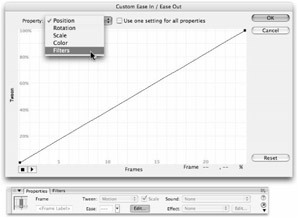
Figure 12-9: The interpolation of filters in a tween can be controlled separately from the interpolation of other characteristics by adjusting a custom easing curve.
EAN: 2147483647
Pages: 395