Integrating Multiple Animation Sequences
So far in this chapter, we've looked at creating different types of animation on the Main Timeline. As you can tell, even with the simple examples that we've used, adding multiple tweens to the Main Timeline can soon result in a jumble of colored spans and keyframes that might be hard to navigate when you need to make edits. Authoring all animation sequences on the Main Timeline also puts you at risk of unintentionally displacing multiple sequences as you make edits.
The best solution for keeping your project (.fla) files manageable as you continue to add animation is to move animation sequences off the Main Timeline and organize them instead on individual symbol timelines. This makes it much easier to move or reuse animation and will also ensure that any edits you make to individual animation sequences will not disrupt sequences on other symbol timelines. Graphic symbols and Movie Clip symbols can both be used to hold multiple layers of animation, but they have different uses.
As we discussed in Chapter 6, all symbols have their own timelines, so you could just as easily store an animation in a Graphic symbol as in a Movie Clip. However, there are some important differences to keep in mind:
-
A Graphic symbol timeline must still be tied to frames on the Main Timeline, while a Movie Clip timeline will play back independently, regardless of how many frames it is assigned on the Main Timeline.
-
The benefit of using a Graphic symbol to store an animated sequence is that it can be previewed frame by frame directly in the authoring environment, even if it is nested. You can preview animation on a Movie Clip timeline in Edit mode, but you will not be able to see how the animation on the Movie Clip timeline syncs with animation on other symbol timelines or with the Main Timeline until you publish the movie or use the Test movie command.
-
Another significant limitation of Graphic symbols is that they cannot be targeted with ActionScript. Movie Clip symbols can be targeted with ActionScript to control the play- back of each symbol instance independently, as opposed to having all animation tied to frame sequences on the same (main) timeline.
The extent to which you separate and nest animated elements will depend on the complexity of the project and also on how you intend to reuse animation. In general, any elements that will always be linked together on playback can be stored in the same symbol. If you want to have the option of altering playback speed or placement of certain elements independently, then these should be stored in discrete symbols. For example, if you have an animated logo that may be used in a project separately from an animated title, then these two elements should be in individual symbols. On the other hand, if the logo always appears in the same way with the title, then these two elements can be stored in a single symbol (on separate layers, if necessary).
| Note | Timeline Effects generally render an animated sequence as a multiframe Graphic symbol on the Main Timeline. Although this is not always the recommended symbol type for Flash animation, it does make it possible to view the animation just by scrubbing the Timeline. This was intended to make Timeline Effects more user-friendly for people learning Flash. We cover the uses for and limitations of Timeline Effects in more detail in Chapter 12, "Applying Filters and Effects." |
| Tip | It is always possible to use the Property inspector to change the behavior (or symbol type) of a symbol instance on the Stage. If you are working with multiple Movie Clips and you need to sync some parts of the animation, it can be helpful to temporarily assign a Movie Clip instance Graphic symbol behavior so that you can see the animation on its timeline in the main authoring environment. Don't forget to switch the instance back to Movie Clip behavior before you publish your movie. |
Moving Tweens onto Symbol Timelines
Certainly, it is more efficient to plan your project structure before you begin adding animation so that you can nest animation in symbols as you create it, but Flash is flexible enough to enable you to optimize the organization of your animation sequences even after you have strewn them around on the Main Timeline.
| Caution | The only exception to this flexible authoring rule is caused by Timeline Effects. You must create a holder symbol for the Timeline Effect and render the Effect on the symbol timeline rather than on the Main Timeline, to avoid "breaking" the Timeline Effect settings option when you try to re-architect your project file. |
To illustrate how tweens are moved from the Main Timeline to symbol timelines, we will modify a file called tweensTimeline.fla, which includes multiple layers with Shape tweens and Motion tweens keyframed on the Main Timeline.
| On the CD-ROM | We have included two files in the Integrate subfolder of the ch11 folder on the CD-ROM for you to refer to: the original tweensTimeline.fla with tweens on the Main Timeline and the modified tweensNested.fla, with tweens moved onto symbol timelines. |
To reorganize a file (.fla) that has animation built on the Main Timeline, follow these steps:
-
Analyze the Main Timeline carefully to see how the various animated sequences need to relate to each other in the final .swf file. Decide which frame spans and layers you need to keep tied together and which should be independent.
-
Pay close attention to how the transitions between different animated sequences are handled on the Main Timeline. If two different phases of a tween share a common keyframe (for example, if you have scaled an element in one tween and then rotated the same element in another tween that continues from the final keyframe of the first tween), you must keep these tweens together or else insert an additional keyframe before you separate them in order to keep both tweens intact.
Tip To be certain that linked sequential tweens can be separated without getting messed up, it can be helpful to remove the tween from the end keyframe of the first tweened sequence after inserting another keyframe (F6) to maintain the beginning of the tween that follows. This ensures that there is no interpolation between the end keyframe of the first tween and the start keyframe of the second tween.
-
Double-click the span or Shift-select the beginning and end keyframes of the sequence that you want to move off the Main Timeline.
-
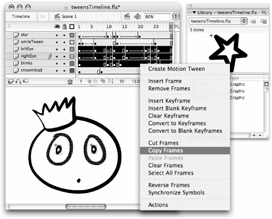
With all frames in the sequence selected, choose Copy Frames from the contextual menu (see Figure 11-25), or Edit ð Timeline ð Copy Frames from the application menu (Alt+Ctrl+C or Option+z+C).
-
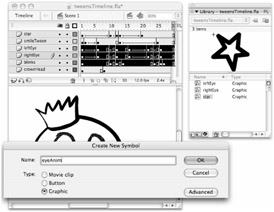
Create a new symbol by choosing Insert ð New Symbol from the application menu (Ctrl+F8 or z+F8). Assign the symbol Movie Clip or Graphic behavior and give it a name that will be useful for identifying the animation, as shown in Figure 11-26.
-
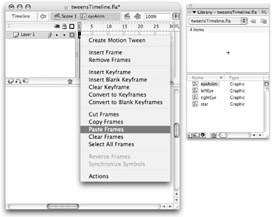
After you click OK to close the Create New Symbol dialog box, the symbol is automatically opened in Edit mode — you will see the symbol timeline rather than the Main Timeline in the Timeline window. Select the first frame of the symbol timeline and choose Paste Frames from the contextual menu, as shown in Figure 11-27. Or choose Edit ð Timeline ð Paste Frames from the application menu (Alt+Ctrl+V or Option+z+V).
-
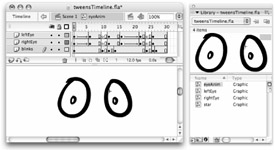
Flash automatically inserts enough layers and frames to accommodate the content you paste into the symbol timeline (see Figure 11-28). Your animation sequence is now stored inside the symbol and you can easily access it from the Library for reuse or editing.

Figure 11-25: You can select frame spans on multiple layers to move at one time. Be sure to use Copy Frames rather than simply Copy to move all the frames to the Clipboard.

Figure 11-26: In the Create New Symbol dialog box, select a symbol behavior and enter a meaningful name for your new symbol.

Figure 11-27: Select the first frame in your new symbol timeline and use Paste Frames to insert the frames and layers from the Clipboard.

Figure 11-28: When you use Paste Frames to place the content from the Clipboard into your symbol, layers and keyframes are preserved.
Create as many new symbols as you need to hold all of the individual animation sequences that you want to work with in your project. When you are finished, you should have a set of named symbols in your Library that are easy to identify and contain animated elements that will now be efficient to edit or reuse.
EAN: 2147483647
Pages: 395
- The Effects of an Enterprise Resource Planning System (ERP) Implementation on Job Characteristics – A Study using the Hackman and Oldham Job Characteristics Model
- Data Mining for Business Process Reengineering
- Intrinsic and Contextual Data Quality: The Effect of Media and Personal Involvement
- A Hybrid Clustering Technique to Improve Patient Data Quality
- Relevance and Micro-Relevance for the Professional as Determinants of IT-Diffusion and IT-Use in Healthcare
- Key #1: Delight Your Customers with Speed and Quality
- Key #2: Improve Your Processes
- When Companies Start Using Lean Six Sigma
- Making Improvements That Last: An Illustrated Guide to DMAIC and the Lean Six Sigma Toolkit
- The Experience of Making Improvements: What Its Like to Work on Lean Six Sigma Projects