Enterprise Policy Administration
This section explains how to perform each of the administrative tasks related to managing an enterprise, focusing special attention on enterprise policies. We start by describing how to create and configure enterprise policies and enterprise access rules. Before we go over the process for deleting policies, we explain how to back up and restore enterprise settings. After a brief discussion of how to administer enterprise-level roles and permissions, you'll learn how to connect to remote ISA Server enterprises or arrays by connecting to configuration storage servers (CSSs).
| Note | Remember that you must be a member of the ISA Server Enterprise Administrator group to create and configure enterprise policies. If you are an ISA Server Array Administrator, you can only view enterprise policies. |
Creating Enterprise Policies
You'll use enterprise policies when you want to manage all the arrays in your environment from a central location. You can configure access rules through an enterprise policy. To create an enterprise policy, follow these steps:
-
In the ISA Server Management console tree, expand the Enterprise node, and then select Enterprise Policies.
-
In the task pane, under Enterprise Policies Tasks, click Create New Enterprise Policy.
-
On the Welcome To The New Enterprise Policy Wizard page, type a name for the enterprise policy, and click Next.
-
On the Completing The New Enterprise Policy Wizard page, click Finish.
-
In the details pane, click Apply to save your changes, and then click OK.
Creating Enterprise Access Rules
After you have created an enterprise policy, you will want to create one or more enterprise access rules. The default enterprise policy named Default Policy cannot be modified, as shown in Figure 14-1.
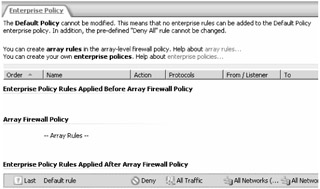
Figure 14-1: The Default Policy and the Default Rule created out of the box cannot be changed.
To create an enterprise access rule for an enterprise policy other than the default policy, complete the following steps:
-
In the ISA Server Management console tree, expand the Enterprise node, expand Enterprise Policies, and select the policy you want to modify.
-
In the task pane, under Enterprise Policy Tasks, click Create Enterprise Access Rule.
-
On the Welcome To The New Access Rule Wizard page, type a name for the rule, and click Next to continue.
-
On the Rule Action page, select either Allow or Deny to specify whether the action of this rule is to allow or deny access, and click Next.
-
On the Protocols page, from the This Rule Applies To drop-down list, select one of the following:
-
All Outbound Traffic If you select this option, click Next to continue.
-
Selected Protocols If you select this option, click Add. On the Add Protocols page, select the protocols you wish to add to the access rule, click Add again, and then click Close. Click Next to continue.
-
All Outbound Traffic Except Selected If you select this option, you will complete the same steps as above, but the protocols added will be treated as exceptions when the access rule is processed. Add the necessary protocols, and click Next to continue.
Tip On the Protocols page, you can also select Ports to limit traffic from clients originating within a range of source ports. By default, traffic from any allowed source port is accepted, as shown in Figure 14-2.
-
-
On the Access Rule Sources page, click Add. In the Add Network Entities dialog box, select the networks to include in the rule (for example, Local Host), click Add, and then click Close. Click Next to continue.
-
On the Access Rule Destinations page, click Add. In the Add Network Entities dialog box, click the networks to include in the rule (for example, External), click Add, and then click Close. Click Next to continue.
-
On the User Sets page, the default setting is for the rule to apply requests from the All Users user set. If you would like to modify the default, you can select All Users, click Remove, and then click Add to include new user sets. Click Add, in the Add Users dialog box select the user set to include in the rule, click Add again, and then click Close. Click Next to continue.
-
On the Completing The New Access Rule Wizard page, review the summary of information, and then click Finish.
-
In the details pane, click Apply to save your changes, and then click OK.
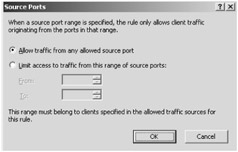
Figure 14-2: The Ports option gives you granular control over the types of traffic that can originate from source ports. This is a per-rule setting.
Enterprise Administration and Permissions
ISA Server uses role-based administration, which can utilize Active Directory or Windows users and groups. ISA Server Enterprise Edition provides enterprise-level roles and array-level roles. These roles are for enterprise administration:
-
ISA Server Enterprise Administrator Allows unlimited access to the enterprise and array configurations, and includes the capabilities of the ISA Server Enterprise Auditor.
-
ISA Server Enterprise Auditor Allows viewing the enterprise and array configurations only.
The Enterprise Administrator role is the only role with permissions to modify enterprise configurations and policies. The Enterprise Auditor role is used primarily for viewing policies.
| Note | See the ISA Server Help file under the section "Enterprise-Level Administrative Roles" for an outline of the permissions each role can perform. |
To configure enterprise roles and permissions, follow these steps:
-
In the ISA Server Management console tree, right-click the Enterprise node and then select Properties.
-
Click the Assign Roles tab, click Add, type the name of the user or group, and then from the drop-down list, select the role to assign to the specified user or group. Click OK twice to complete the procedure.
-
In the details pane, click Apply to save your changes, and then click OK.
| Note | Users granted permission on the Enterprise node have direct access to the CSS and can monitor all arrays in the enterprise. |
To configure enterprise policy permissions, follow the same steps just given, but right-click the applicable enterprise policy to modify the roles.
| Note | The Default Policy does not have an Assign Roles tab because it cannot be modified. |
Backing Up and Restoring an Enterprise Configuration
Before you make major changes to your enterprise environment, you should back up the enterprise configuration. This backup process saves all enterprise policies, enterprise access rules, array configurations for each array member, certificates, and relationships between arrays and enterprise policies into an .xml file that you can store in a directory of your choosing.
To back up an enterprise configuration, complete the following steps:
-
In the ISA Server Management console tree, right-click Microsoft Internet Security And Acceleration Server 2004, and then select Export (Back Up).
-
On the Welcome To The Export Wizard page, click Next to continue.
-
On the Export Preferences page, there are two check boxes to choose from, as shown in Figure 14-3. To make a complete backup of your enterprise, you should select both check boxes, and click Next to continue.
-
Export Confidential Information Includes user passwords, RADIUS shared secrets, and preshared IPSec keys. The information is encrypted and you have to define a minimum eight-character password before the wizard continues.
-
Export User Permission Settings Includes the role-based permissions you have assigned within the enterprise.
-
-
On the Export File Location page, click Browse, select the path where you want the .xml file stored, type a name for the file, click Open, and then click Next.
-
On the Completing The Export Wizard page, review the summary, and then click Finish.
-
After the export process has completed, click OK.
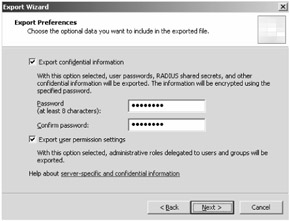
Figure 14-3: Select both check boxes to ensure that the complete ISA Server configuration is being exported.
| Note | You can also use Windows Backup to back up your ISA Server configuration. To do so, back up the ADAM Data folder. |
When you are preparing to restore your enterprise configuration, you should confirm that you have access to the password used during the export or backup. You should also be aware that if you are importing the configuration to the same ISA Server computer where the export was run, identical objects will be overwritten. To restore an enterprise configuration, follow these steps:
-
On the Welcome To The Import Wizard page, click Next to continue.
-
On the Select The Import File page, click Browse, select the path and .xml file to import, click Open, and then click Next.
-
In the ISA Server Management console tree, right-click Microsoft Internet Security And Acceleration Server 2004, and then select Import (Restore).
-
On the Import Action page, select Import to add the information contained in the .xml file to the existing configuration or select Overwrite (Restore) to overwrite all existing configuration information with the information contained in the .xml file. Click Next to continue.
-
On the Import Preferences page, there are two check boxes to choose from:
-
Import Server-Specific Information Includes cache drives, Secure Sockets Layer (SSL) certificates, and virtual private network (VPN) static address pools. To decrypt, access to the password used during the export is required in the next step.
-
Import User Permission Settings Includes the role-based permissions you have assigned within the enterprise.
-
-
To get a complete restore of your enterprise, you should select both check boxes. Click Next to continue.
-
On the Enter Password page, type the password, and then click Next.
-
On the Completing The Import Wizard page, review the summary, and then click Finish.
-
A warning dialog box appears asking you to confirm your decision to overwrite the existing configuration. Click OK as shown in Figure 14-4.
-
After the import process has completed, click OK.

Figure 14-4: Confirm that you want to overwrite the existing configuration before clicking OK.
| Note | If you created a backup by using Windows Backup, you should use Windows Backup to restore your ISA Server configuration. |
Deleting Enterprise Policies
When you no longer require an enterprise policy, it's best to delete the policy by following these steps:
-
In the ISA Server Management console tree, expand the Enterprise node, and then select the Enterprise Policies node.
-
In the details pane, select the enterprise policy you want to delete.
-
In the task pane, click the Tasks tab. Under Enterprise Policy Tasks, click Delete Selected Enterprise Policy.
Note The Delete option is not available when you have selected the Default Policy.
-
On the Confirm Delete page, click Yes.
-
In the details pane, click Apply to save your changes, and click OK.
Connecting to Remote Enterprise and Arrays
The ISA Server Management console gives you the ability to manage any enterprise and array in a network environment by connecting to either local or remote CSSs.
To connect to remote enterprises and arrays, follow these steps:
-
In the ISA Server Management console tree, right-click Internet Security and Acceleration Server 2004 and then select Connect To Configuration Storage Server.
-
On the Welcome To The Connection Wizard page, click Next.
-
On the Configuration Storage Server Location page, specify whether you want to connect to a local CSS or a remote CSS. Click Next.
Note If you choose a remote CSS, as shown in Figure 14-5, you must specify the fully qualified domain name (FQDN) for the server. You should also ensure that the IP address of the remote CSS is in the Remote Management Computers computer set before continuing.
-
Only if you chose a remote CSS will you see the Configuration Storage Servers Credentials page, shown in Figure 14-6. Specify whether you will use the credentials of the local user or another user for access to the CSS. If you specify another user that is a domain account, you must specify the domain name as well. Click Next.
-
On the Array Connection Credentials page, specify whether to use the same credentials used to connect to the CSS or different credentials, and then click Next. If you select the same credentials, skip to Step 7.
-
On the Array Connection Credential Details page, specify whether you will use the credentials of the local user or another user for access to the CSS. If you specify another user that is a domain account, you must specify the domain name as well. Additionally, there is a Check User Credentials check box. Click Next.
-
On the Completing The Connection Wizard page, review the summary, and click Finish.
-
If prompted, click OK after the connection has been made to the CSS.
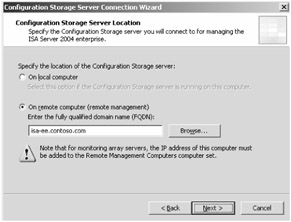
Figure 14-5: The IP address of the remote CSS must be in the Remote Management Computers computer set.
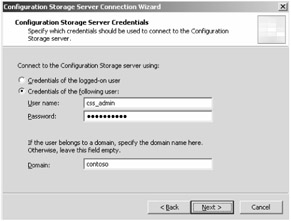
Figure 14-6: Ensure you have accounts with appropriate credentials or you will have difficulty connecting to a remote CSS.
Settings Contained in the Default Enterprise Policy
The concept of setting the default policy in ISA Server 2000 has been revamped in ISA Server 2004. Out of the box, an enterprise policy named Default Policy is created. The policy contains one rule, named Default Rule, which blocks all traffic from all networks. The Default Policy cannot be modified or removed, nor can access rules be created for it. More information on how ISA Server processes access rules for an enterprise policy and an array policy is discussed in the section entitled, "Rules of Effective Array Policy," later in this chapter.
EAN: 2147483647
Pages: 173