Scrolling and Selecting Data Fields
| < Day Day Up > |
| Unless a project is very small, you probably can't see more than a small portion of all the data onscreen at any one time. There are several ways to scroll through the data fields in a project. Scrolling through the data fields differs from moving through the data fields. Scrolling changes the screen display to show new data fields without changing the field selected for data entry or editing. Moving changes the selected data field. Scrollbars are provided on all views except the forms. Forms typically fill the screen, and there isn't a need to scroll. With forms you use buttons to view the next screen's data. The most widely used scrolling and moving methods are described in the following sections. More specific methods are presented in the chapters that introduce the different views. Using the ScrollbarsYou use the vertical scrollbar on the right side of a view to scroll through the rows of tasks or resources displayed in the view. If you drag the scroll box, you see a small information box next to the top of the scrollbar that identifies the task or resource that will be at the top of the screen when you release the mouse button. You can drag the scroll box all the way to bottom of the scrollbar to see the last row in the view. When a view displays data in a table (as rows and columns), you can use a horizontal scrollbar along the bottom of the view to scroll through the columns of data. When a view displays data in a timescale, you can use the horizontal scrollbar beneath the timescale to scroll to different dates. If you drag the scroll box, you see a small box next to the scrollbar that shows the date that will appear at the left of the timescale when you release the mouse button. You can drag the scroll box all the way to the left to go to the beginning date for the project, and you can drag it all the way to the right to go to the ending date for the project. Scrolling the Timescale with the KeyboardYou can change the date that is displayed on the timescale by using the Alt key and the cursor movement keys on the keyboard. These key combinations and their functions are described in Table 2.1. Table 2.1. Keyboard Shortcuts for Navigating the Timescale
Locating a Taskbar on the Timescale
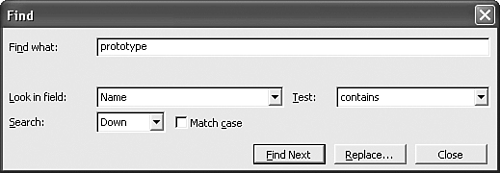
Finding Tasks or Resources by NameIf you're looking for a task by name, choose Edit, Find (or press Ctrl+F) to display the Find dialog box. The Find dialog box is by default set up to search for names (task names or resource names , depending on the view you are using) that contain the keyword you supply. In the Find What box, enter a keyword or string of characters that is part of the task name (see Figure 2.19). This search is not case sensitive; you don't need to be concerned about uppercase letters . Figure 2.19. You can use the Find dialog box to search for tasks or resources by name. You can click the Find Next button to initiate the search down the task list for the next task name that contains the values you entered. By default, the search always starts with the currently selected task (not with Task 1) and searches down the list of tasks. You can change the Search option to Up to search up the task list. If a task is found that matches your search criteria but is not the task you were looking for, you can click the Find Next button again to locate the next match. If you close the Find dialog box and then want to search for the next occurrence of keyword or characters, you can press Shift+F4 to continue the search in the same direction.
Selecting Data Fields in TablesYou must select a data field if you want to enter data; edit the existing data in the field; or copy, move, or delete the data in the field. You can select data fields in any view or dialog box by clicking the mouse on a field. In tables, you can also use the arrow keys to move the selection. You can use the keyboard to move through the project data and select new data fields. The keys in Table 2.2 function in the same way in all views that contain tables. Table 2.2. Keyboard Methods for Moving to Different Fields/Rows
When you're in a table view, you can extend the selection to include multiple data fields by dragging the mouse pointer through all fields you want to select. You can also hold down the Shift key as you use the arrow keys to extend the selection. Pressing the Extend key (F8) allows you to extend the selection without holding down the Shift key. When you press F8, EXT appears in the status bar. You can use the arrow keys to extend the selected data fields. Then you can carry out the action you want to apply to all the selected data fields. If you want to add fields that are not adjacent to the current selection, you can use the Ctrl key as you select the additional fields with the mouse. You can also use the Add key (or press Shift+F8) to extend the selection. Pressing the Add key keeps the current selection from going away while you move to the next fields. For example, after selecting the first group of fields, press the Add key. Then move to the next field you want to add. The status bar displays ADD in place of EXT. Then press the Extend key again and extend the selection, use the Shift key with arrow keys to extend the selection, or drag with the mouse to extend the selection. Scrolling and Selecting Fields in FormsForm views display details about one task or resource at a time. You can move through the project's tasks or resources with the Previous and Next buttons that appear in most forms. You can use the Tab and Shift+Tab keys in forms and dialog boxes to move to and select successive fields. The text next to each field in a form has an underlined character (that is, a hotkey). Hold the Alt key and press the underlined letter to move the selection directly to that field. You cannot extend the selection in forms. |
| < Day Day Up > |
EAN: 2147483647
Pages: 283