Life Without Wizards
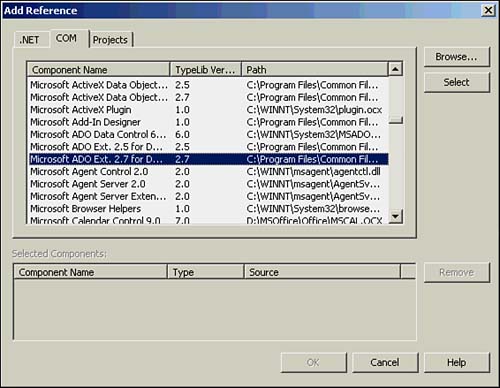
| In this section, we'll examine the code necessary to work with databases, but without using the Visual Basic .NET wizards. We'll also use some old-style ADO along with the new-style ADO.NET. Even though we could do everything with pure ADO.NET, I thought it would be interesting to show you how you can use ADO if needed (there is, after all, a lot of ADO legacy code out there). Setting Up the FormThe program we're about to write is the SQL test program you saw in Chapter 24. Start a new project and name it SQLTester. You'll need to add the controls shown in Figure 25.22 to the form. Figure 25.22. Controls for the SQLTester project. There are two list boxes near the top of the form named lstTables and lstFields . The buttons are named btnWhere , btnSubmit , btnClear , and btnExit . The multiline text box near the center is named txtQuery . The DataGrid control is named dtgGrid . You also need to add an OpenFileDialog control named OpenFileDialog1 (its default name) from the Windows Forms tab of the Toolbox. Finally, drag copies of the OleDBConnection and OleDbDataAdapter from the Data tab of the Toolbox onto the form. The default names for each object are fine. When you drag the OleDbDataAdapter to the form, Visual Basic .NET automatically starts the Data Adapter Wizard. However, because we want to manage things ourselves now, click the Cancel button to dismiss the dialog box. Because we'll be using ADO along with ADO.NET in this project, we need to inform Visual Basic .NET of that fact. To add the required references, use the Project, Add Reference menu sequence and click on the COM tab of the Add Reference dialog. Scroll down and click Microsoft ADO Ext. 2.7 for DDL And Security dynamic link library. Your screen should look similar to Figure 25.23. Now click the Select button to add the file to our project. Figure 25.23. Controls for the SQLTester project. Before you dismiss the Add Reference dialog box, click on the .NET tab. Highlight the adodb component in the list (it should be near the top of the list) and click the Select button. Now you can click OK to dismiss the Add Reference dialog box. Visual Basic .NET now knows that we can use the ADO routines in our project. Adding the CodeListing 25.2 shows part of the code for the test program. The program begins by importing the necessary namespaces that are required to use ADO.NET. (I'll explain the purpose of the MAX_RECORDS constant later in the chapter.) The first function in the project is GetFileName() . This function simply asks the user to select the Access database. Because we're working with the sample database that's distributed with Crystal Reports, I've hard coded that directory as the default startup directory (see the InitialDirectory property). Obviously, you should change this directory to reflect your own installation path for Visual Studio .NET. The remainder of the function's code should look familiar to you by now. Listing 25.2 The GenFileName() and Form Load Event CodeImports System Imports System.Data Imports System.Data.OleDb Public Class frmMain Inherits System.Windows.Forms.Form Private Const MAX_RECORDS As Integer = 10000 Private strConnect As String ' Windows Form Designer generated code Private Function GetFileName() As String ' Purpose: This function attempts to open an Access database ' ' Argument list: ' none ' ' Return value ' string the name of the file selected or an empty ' string if cancelled. ' Dim NewFileName As String Dim NewFile As OpenFileDialog = New OpenFileDialog() Dim MyChoice As DialogResult With NewFile .Filter = "Access Files (*.mdb)*.mdbAll Files (*.*)*.*" .FilterIndex = 1 ' Assume text files .DefaultExt = "mdb" ' Ditto .InitialDirectory = "D:\VSNET\Crystal Reports\Samples\Database\" .CheckFileExists = False .ReadOnlyChecked = True .Title = "Open Access Data File" End With MyChoice = NewFile.ShowDialog ' What did they do? If MyChoice = DialogResult.Cancel Then ' Bail out? NewFileName = "" Else NewFileName = NewFile.FileName End If If NewFileName.Length > 0 Then Return NewFileName End If End Function Private Sub frmMain_Load(ByVal sender As System.Object, ByVal e As_ System.EventArgs) Handles MyBase.Load ' Purpose: This opens and reads in the table names from the database. Dim FileName As String Dim AdoConn As New ADODB.Connection() Dim MyCat As New ADOX.Catalog() Dim tbl As ADOX.Table FileName = GetFileName() ' Get the database file name If FileName.Length = 0 Then Exit Sub End If Me.Text = "SQL Tester: " & FileName ' Show the file name ' This builds the connect string. It is used later as needed, too. strConnect = "Provider=Microsoft.Jet.OLEDB.4.0;Password="""";User _ ID=Admin;Data Source=" strConnect &= FileName AdoConn.Open(strConnect) MyCat.ActiveConnection = AdoConn For Each tbl In MyCat.Tables ' Show the field names lstTables.Items.Add(tbl.Name.ToString) Next AdoConn.Close() End Sub The Form Load event code sets things up by a call to GetFileName() . After the database filename is entered by the user, the code copies the filename and pathname to the form's title bar. The Connection StringNow the code starts to get interesting. The first thing we need to do is build a connection string that provides the necessary details to Visual Basic .NET to form a connection to the selected database. Because we're connecting to an Access database, we can hard-code the first part of the connection string as strConnect = "Provider=Microsoft.Jet.OLEDB.4.0;Password="""";User _ ID=Admin;Data Source=" strConnect &= FileName This tells Visual Basic .NET that we'll be using the Provider for Access databases, we aren't using a password, the User ID is Admin , and the Data Source is the filename just selected by the user. This connection string comprises the bare-bones essentials needed to form a connection to the database. It's probably obvious that this connection string will vary according to the type of database being used. Programmer's Tip
Using ADOSome readers might question my use of the older ADO model in the program. After all, ADO is based upon Microsoft Component Object Model (COM) which, for the most part, is limited to Windows platforms; ADO.NET is not. Still, there are a number of reasons why I chose to include a little ADO code in the program. First, there are things that ADO can do for us that the present incarnation of ADO.NET cannot. For example, ADO.NET does not yet support a data definition language (DDL) for creating your own databases (this is forthcoming, however). Second, sticking your head in the sand doesn't make ADO go away. There is a ton of Visual Basic code out there that uses ADO, and you might learn something useful by studying it. Third, because we're simply using the ADO model to retrieve the table and field information, we aren't taking a significant performance hit. Finally, I wanted you to at least see how easy it is to use an ADO connection if you ever need to. 'nuff said. After the connect string is formed , we use it to make an ADO connection to the database. The Catalog object enables us to retrieve a list of the tables that are associated with the database. We march through the Tables collection of the catalog, adding the table names to the lstTables list box. We use the ADO connection in a similar fashion in the SelectedIndexChanged event for the lstTables list box. This code is presented in Listing 25.3. The same connection string, strConnect , is used again to reopen the ADO connection to read the field names for the table that the user selected. Listing 25.3 The SelectedIndexChanged Event for the lstTables List Box Private Sub lstTables_SelectedIndexChanged(ByVal sender As System.Object, _ ByVal e As System.EventArgs) Handles lstTables.SelectedIndexChanged ' Purpose: Construct a list of database fields for the table that was ' selected. Dim AdoConn As New ADODB.Connection() Dim i As Integer, buff As String Dim MyCat As New ADOX.Catalog() Dim tbl As ADOX.Table, col As ADOX.Column txtQuery.Clear() ' If this changes, clear the query AdoConn.Open(strConnect) ' Open a connection MyCat.ActiveConnection = AdoConn lstFields.Items.Clear() ' Clear old field names For Each tbl In MyCat.Tables ' Go through the tables... ' for the selected table... If tbl.Name.ToString = lstTables.SelectedItem Then lstFields.Items.Add("*") For Each col In tbl.Columns ' ...show the fields lstFields.Items.Add(col.Name) Next Exit For End If Next AdoConn.Close() End Sub The only real difference in the ADO code in Listing 25.3 is that we're also iterating through the Columns collection of the database and adding the columns to the lstFields list box. We add the wildcard field section (that is, the asterisk) at the top of the list box before adding the field names. As you'll recall from our SQL discussion in Chapter 24, the asterisk means that we want to retrieve all column values from the table for the SELECT statement. As you can see from Listing 25.3, firing the SelectedIndexChanged event occurs when the user clicks on one of the database tables listed in the lstTables list box. The tables selection then causes the fields for that table to be displayed in the lstFields list box. We're now ready to examine the rest of the program code. The remaining code is presented in Listing 25.4. Selecting Field Names for the QueryThe first subroutine in Listing 25.4 ( lstFields_SelectedIndexChanged ) processes the field choices made by the user. This event is fired any time the user clicks a choice in the lstFields list box. The code first checks to see whether the user elected to retrieve all fields by selecting the asterisk. If so, the query text "SELECT * " is moved into the txtQuery text box and we exit the subroutine. A little more processing is necessary if the user clicks on a specific field name in the lstFields list box. First, we check the length of the txtQuery text box. If the length is 0, we're starting a new query and we must add the SELECT statement to the text box. If the txtQuery length is not 0, it means we're adding another field name to the query. Therefore, we do not need to copy the SELECT statement. The code now must check to see whether the field name selected by the user has one or more words. This check is performed by the BracketMultiWords() function. We call BracketMultiWords() , passing in the field name that was just selected. If the field name contains two or more words (for example, "Contact First Name" as shown in Figure 25.21), we need to place brackets around the field name. The resulting name is then returned by the function with brackets added, if necessary. Once that's done, we append the (adjusted) field name to the existing state of the query as held in txtQuery and then add a comma at the end of the string. The comma is appended in preparation for adding more field names (more about the comma later on). Adding a WHERE PredicateAfter the field names are added to the query, the user has two choices. First, he can click on the Submit button to submit the query for processing. Second, he can click on the Where button to add a WHERE predicate to the query. The code to add a WHERE predicate is quite simple. First, we copy the content of the txtQuery text box into a temporary variable named temp . We do this so we can use the LastIndexOf() string method to see if a FROM keyword is already present in the query string. If there is no FROM present in the string, we use the Remove() string method to remove the trailing comma that was appended while the field names were being added to the query. The code then adds the FROM keyword followed by the table name being used in the query. (Once again, we call BracketMultiWords() in case the selected table name has two or more words in it.) The resulting string is then copied back into the txtQuery text box. Next, we append the WHERE keyword and set the focus to the text box. Finally, we add a trailing blank space to txtQuery . Hmmm. Why not just add the space when the WHERE keyword is appended? If you use that approach, the Focus() method highlights the entire string in the text box. If the user would inadvertently type a keystroke at this point, the entire content of the text box that we have built would be immediately erased. Not good. By setting the focus and then adding the blank space, the content of the text box is not highlighted, but the cursor is politely waiting for the user to type in the WHERE predicate. Listing 25.4 The Remaining Program Code Private Sub lstFields_SelectedIndexChanged(ByVal sender As Object, ByVal e _ As System.EventArgs) Handles lstFields.SelectedIndexChanged ' Purpose: This selects the field names for the query. If lstFields.SelectedItem = "*" Then ' Did they chose a wildcard? txtQuery.Text = "SELECT * " Exit Sub ' We're done...go home End If If txtQuery.TextLength = 0 Then txtQuery.Text = "SELECT " End If txtQuery.Text &= BracketMultiWords(lstFields.SelectedItem) & "," End Sub Private Sub btnWhere_Click(ByVal sender As System.Object, ByVal e As _ System.EventArgs) Handles btnWhere.Click ' Purpose: Add a WHERE predicate to the query. In preparation, we need ' to remove the last comma from the field list. Dim FromFound As Integer Dim temp As String temp = txtQuery.Text FromFound = temp.LastIndexOf(" FROM ") ' See if there is a FROM yet If FromFound = -1 Then ' If not... temp = temp.Remove(temp.Length - 1, 1) ' ...remove trailing comma ' and add the FROM and table name temp &= " FROM " & BracketMultiWords(lstTables.SelectedItem) txtQuery.Text = temp End If txtQuery.Text &= " WHERE" ' Now add the WHERE txtQuery.Focus() ' Set the focus so they can add the rest txtQuery.AppendText(" ") ' The order prevents highlighting the query End Sub Private Sub FixupTheQuery() ' Purpose: This checks for an incomplete SQL query and supplies the ' missing parts as needed Dim FromFound As Integer Dim buff, temp As String Try temp = txtQuery.Text ' The current query state FromFound = temp.LastIndexOf(" FROM ") ' Does it have a FROM yet? If FromFound = -1 Then ' Nope, none there... temp = temp.Remove(temp.Length - 1, 1) ' Remove trailing comma buff = BracketMultiWords(lstTables.SelectedItem) temp &= " FROM " & buff ' Add in the missing FROM txtQuery.Text = temp ' Copy it back End If Catch MessageBox.Show("Make sure you have selected the table name") End Try End Sub Private Sub btnSubmit_Click(ByVal sender As System.Object, ByVal e As _ System.EventArgs) Handles btnSubmit.Click ' Purpose: This sets up the connection and objects and then submits ' the query. Dim i, j, RecordsRead, WhichField As Integer Dim ReConnect As New OleDbConnection(strConnect) 'Reuse connect string... ReConnect.Open() ' ...and reopen the connection FixupTheQuery() ' Complete the query as needed Dim MyAdapter As New OleDbDataAdapter(txtQuery.Text, ReConnect) Dim MyDataSet As New DataSet() Try ' How many records were returned? RecordsRead = MyAdapter.Fill(MyDataSet, 0, MAX_RECORDS, _ lstTables.SelectedItem) dtgGrid.CaptionText = "Records: " & CStr(RecordsRead) ' Tell how many ReConnect.Close() ' Close it down ' Tie everything to the data grid dtgGrid.SetDataBinding(MyDataSet, lstTables.SelectedItem) MyAdapter = Nothing ' Free things up MyDataSet = Nothing ReConnect = Nothing Catch MessageBox.Show("Check the SQL query syntax for errors.") End Try End Sub Private Sub btnExit_Click(ByVal sender As System.Object, ByVal e As _ System.EventArgs) Handles btnExit.Click Me.Dispose() End Sub Private Sub btnClear_Click(ByVal sender As System.Object, ByVal e As _ System.EventArgs) Handles btnClear.Click ' Purpose: Just clear out old query, the selected table, and the field ' names in case they want to select another table. txtQuery.Text = "" lstFields.Items.Clear() lstTables.ClearSelected() End Sub Private Function BracketMultiWords(ByVal Word As String) As String ' Purpose: This function checks to see if a table or field name ' contains multiple words. If so, it needs to have brackets ' around it. ' ' Argument list: ' Word a string with the name to check ' ' Return value: ' string the string with the brackets added, if needed Dim SpaceIndicator As Integer Dim buff As String SpaceIndicator = InStr(Word, " ") ' See if field name is multi-word If SpaceIndicator Then buff = "[" & Word & "]" ' Bracket if it is Else buff = Word End If Return buff ' Send back the value End Function End Class Submitting the QueryAfter a WHERE clause has been added, the user is ready to submit the query for processing. When the user clicks on the Submit button, the first thing we do is reestablish our connection to the database using the strConnect string. The call using the Open() method reconnects us to the database. However, we need to do a little checking on our query before we attempt to process it. The call to FixupTheQuery() duplicates some of the checking we did with respect to the WHERE predicate. The primary check is to see whether the FROM keyword is present and add it into the query if it's missing. We surround the code in a Try - Catch block just in case the user hasn't selected a table yet. (We don't need to do this in the list boxes because the only way those events can fire is if the table has already been selected. Think about it.) Next, we create an OleDbDataAdapter object named MyAdapter , initializing it with the ReConnect connection object and the SQL query that's now held in txtQuery . We also define a DataSet object named MyDataSet that will hold the results of the query. A Try - Catch block is used in case something goes amiss. In most cases, an error at this point is caused by an improperly formed SQL statement. The Fill() method call RecordsRead = MyAdapter.Fill(MyDataSet, 0, MAX_RECORDS, _ lstTables.SelectedItem) is overloaded, and we're using the version that takes four parameters. The first parameter, MyDataSet , tells the Fill() method where to store the results of the query. The second argument specifies the starting record, and the third argument determines the maximum records we want to return. We arbitrarily set this to 10,000 records in the belief that any more than that was probably an error in the SQL statement. Programmer's Tip
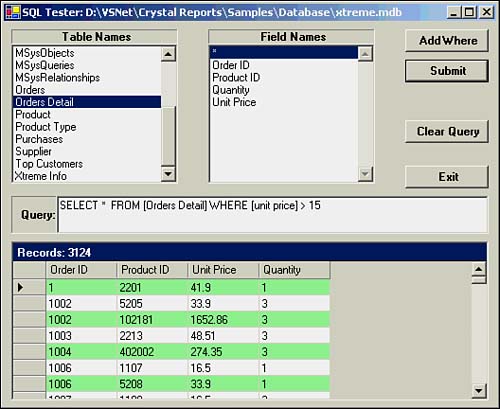
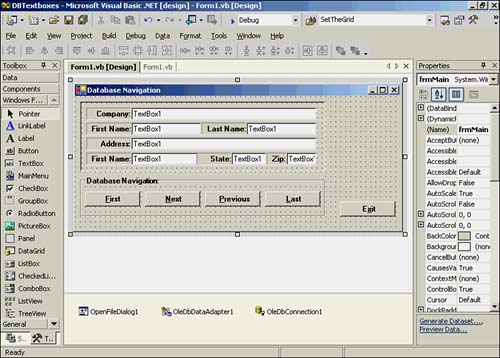
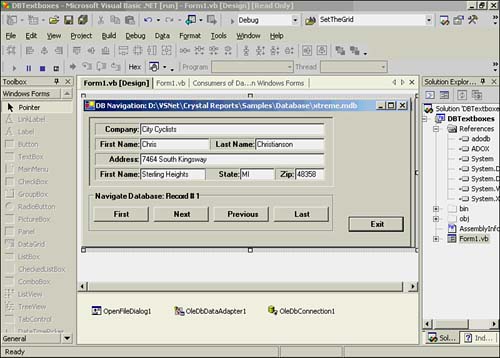
The last argument of the Fill() method is the name of the database table being used in the query. The return value from the Fill() method call is the number of records returned by processing the SQL query. We copy this value to the caption text of the data grid so that the user can see how many records were returned by the query. At this juncture, MyDataSet is filled with the results from the SQL query. Therefore, we have what we need, so we immediately close the connection to the database using the Close() method of the connection object. Finally, we bind the results stored in MyDataSet to the DataGrid control using the SetDataBinding() method call and free up the resources associated with the objects. The results of the query are then displayed in the grid control. A sample run is shown in Figure 25.24. Figure 25.24. A sample run of the SQLTester program. Even though my machine is fairly slow by today's standards (it has a 750MHz clock), response time for the 3,000+ records is about a second using a WHERE predicate. Also notice that the field name in a WHERE predicate is not case-sensitive. Finally, if you try a SELECT statement in which you need to expand the width of the column, move the cursor to the vertical line that separates the column headers. The cursor will change to a double-arrow cursor. At this point, you could drag the bar to the right to expand the column width, as pointed out in Chapter 24. However, if you double-click when the double-arrow cursor is showing, the column automatically expands to a width that shows the widest entry in the column. Cool stuff. Navigating a DatabaseYou often need to work with a database in which you're very familiar with its contents. You know all the table names and the field names, and there's really no reason for the user to need knowledge of either. In situations like this, all you might need is a way to navigate through the database and, perhaps, edit or update the content of an individual record. In this section, we'll write a simple program that's designed to navigate through a known database. Start by creating a new project named DBTextboxes. Place the controls shown in Figure 25.25 on the form. Figure 25.25. The form layout for the DBTextboxes program. By now, you should be able to look at the code and know what the names of the various controls need to be. Therefore, we won't denude any more of the nation's forests by stating the obvious. The complete code for the program appears in Listing 25.5. A good portion of the code was copied from the previous project, so we'll concentrate on the new elements of the program. Listing 25.5 Source Code for the DBTextboxes Project Imports System Imports System.Data Imports System.Data.OleDb Public Class frmMain Inherits System.Windows.Forms.Form Private Const MAX_RECORDS As Integer = 10000 Private RecordsRead As Long Private strConnect As String Private MyTable As String Private MyDataSet As New DataSet() ' Windows Form Designer generated code Private Function GetFileName() As String ' Purpose: This function attempts to open an Access database ' ' Argument list: ' none ' ' Return value ' string the name of the file selected or an empty ' string if cancelled. ' Dim NewFileName As String Dim NewFile As OpenFileDialog = New OpenFileDialog() Dim MyChoice As DialogResult With NewFile .Filter = "Access Files (*.mdb)*.mdbAll Files (*.*)*.*" .FilterIndex = 1 ' Assume text files .DefaultExt = "mdb" ' Ditto .InitialDirectory = "D:\VSNET\Crystal Reports\Samples\Database\" .CheckFileExists = False .ReadOnlyChecked = True .Title = "Open Access Data File" End With MyChoice = NewFile.ShowDialog ' What did they do? If MyChoice = DialogResult.Cancel Then ' Bail out? NewFileName = "" Else NewFileName = NewFile.FileName End If If NewFileName.Length > 0 Then Return NewFileName End If End Function Private Sub frmMain_Load(ByVal sender As System.Object, ByVal e As _ System.EventArgs) Handles MyBase.Load ' Purpose: This opens and reads in the table names from the database. Dim FileName, SQL As String FileName = GetFileName() ' Get the database file name If FileName.Length = 0 Then Exit Sub End If Me.Text = "SQL Tester: " & FileName ' Show the file name ' This builds the connect string. It is used later as needed, too. strConnect = "Provider=Microsoft.Jet.OLEDB.4.0;Password="""";User _ ID=Admin;Data Source=" strConnect &= FileName MyTable = "Customer" Dim Connect As New OleDbConnection(strConnect) ' Reuse connect string... Connect.Open() ' ...and reopen the connection SQL = "SELECT * FROM Customer" Dim MyAdapter As New OleDbDataAdapter(SQL, Connect) Try ' How many records were returned? RecordsRead = MyAdapter.Fill(MyDataSet, 0, MAX_RECORDS, MyTable) Connect.Close() SetControlBindings() MyAdapter = Nothing ' Free things up Connect = Nothing Catch MessageBox.Show("Something wrong during connecting.") End Try WhichRecord() End Sub Private Sub btnExit_Click(ByVal sender As System.Object, ByVal e As _ System.EventArgs) Handles btnExit.Click Me.Dispose() End Sub Private Sub SetControlBindings() txtCompany.DataBindings.Add("Text", MyDataSet, "Customer.Customer Name") txtFirstName.DataBindings.Add("Text",MyDataSet, "Customer.Contact First _ Name") txtLastName.DataBindings.Add("Text", MyDataSet, "Customer.Contact Last _ Name") txtAddress.DataBindings.Add("Text", MyDataSet, "Customer.Address1") txtCity.DataBindings.Add("Text", MyDataSet, "Customer.City") txtState.DataBindings.Add("Text", MyDataSet, "Customer.Region") txtZip.DataBindings.Add("Text", MyDataSet, "Customer.Postal Code") End Sub Private Sub btnFirst_Click(ByVal sender As System.Object, ByVal e As _ System.EventArgs) Handles btnFirst.Click Me.BindingContext(MyDataSet, MyTable).Position = 0 WhichRecord() End Sub Private Sub btnNext_Click(ByVal sender As System.Object, ByVal e As _ System.EventArgs) Handles btnNext.Click Me.BindingContext(MyDataSet, MyTable).Position += 1 WhichRecord() End Sub Private Sub btnPrevious_Click(ByVal sender As System.Object, ByVal e As _ System.EventArgs) Handles btnPrevious.Click Me.BindingContext(MyDataSet, MyTable).Position -= 1 WhichRecord() End Sub Private Sub btnLast_Click(ByVal sender As System.Object, ByVal e As _ System.EventArgs) Handles btnLast.Click Me.BindingContext(MyDataSet, MyTable).Position = RecordsRead _- 1 WhichRecord() End Sub Private Sub WhichRecord() ' Purpose: This finds out which record we are looking at and updates ' the groupbox text property with the record number. Dim where As Long where = Me.BindingContext(MyDataSet, MyTable).Position + 1 gbxDBNavigation.Text = "Navigate Database: Record # " & CStr(where) End Sub End Class Because we know the name of the database table we want to use as well as the field names we are interested in, we can push all the real work into the Form Load event. We hard-code the query into variable SQL and use that string in the OleDbDataAdapter() initialization call: SQL = "SELECT * FROM Customer" Dim MyAdapter As New OleDbDataAdapter(SQL, Connect) The Fill() method of the data adapter transfers the data to the MyDataSet object. We also fill in RecordsRead with the number of records that were returned from the database. We make use of this value later in the program. The subroutine SetControlBindings() does most of the new work in the program. Each text box is tied to a field in the MyDataSet object according to the parameters in the call. For example, the statement txtCompany.DataBindings.Add("Text", MyDataSet, "Customer.Customer Name") ties the txtCompany text box to the Customer Name field of the Customer table. The first parameter ( "Text" ) of the Add() method tells which property of the control is being bound. In all cases, we want to bind to the Text property of the text boxes. The other calls are similar, changing only the text box name and the field name. (You could also use the Properties window to bind the text boxes, but I wanted to show you how to do it in code.) If all goes well, you should see the first record of the Customer table displayed in the text boxes. You can navigate through the records by clicking on the buttons in the group box. The code within each button is almost identical, so we just discuss the btnFirst button. The statement Me.BindingContext(MyDataSet, MyTable).Position = 0 sets the record pointer for the data set to the first record in the MyDataSet object. Because the records are zero-based , the first record is at position 0. Every form has a BindingContext() method associated with it when there are bound controls on the form. Because we do bind each text box to the MyDataSet object, we can use the Me keyword for the base object of the BindingContext() method. With the record pointer set to the desired position, we call WhichRecord() to update the record location text for the group box. The remaining buttons work in the same fashion, either incrementing or decrementing the position in the dataset. Note that we use RecordsRead to set the position when the Last button is clicked. You could also use the Count property, too: Me.BindingContext(MyDataSet, MyTable).Position = _ Me.BindingContext(MyDataSet, MyTable).Count - 1 However, because RecordsRead already holds the record count, you might as well use it. A sample run of the program is shown in Figure 25.26. Figure 25.26. Sample run of the DBTextboxes program. That's all there is to it! The key is to bind the text boxes to a DataSet object. Once the dataset is built, the rest is very easy. You really should experiment with this program. For example, you might try to modify the program so that it would work with other tables. How would you cope with the labels for the text boxes in this situation? Would parts of the SQLTester project be useful? Trying to figure out how to accomplish these tasks is a great way to learn how to manipulate a database. |

EAN: 2147483647
Pages: 238