Adobe GoLive CS2 Tips and Tricks The 250 Best
Authors: Pratt A. Grillo L.
Published year: 2005
Pages: 121-122/301
Buy this book on amazon.com >>

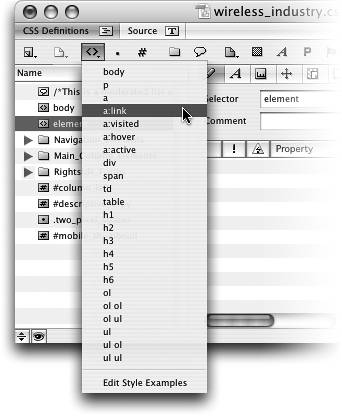
TIP 110: Saving Time with Pull-down Menus

Whether you're a CSS beginner who needs help getting started or an experienced coder hoping to save time, you'll love the pull-down menus throughout the CSS Editor ( Figure 110 ). Some of the new style icons in the default view of the CSS Editor, or in the buttons on top if you've turned them on as described in Tip 109, have small black triangles on them. These triangles indicate that if you click and hold on the icons you'll see an automatically populated list of options to choose from.

Figure 110. The pull-down menus in the CSS Editor help you learn and save time when editing CSS.


Customizing the Elements Menu

From the bottom of the Elements menu, choose Edit Styles Example to open the settings file. If there's an obscure element or style property you always want to use, edit it here, and it will be added to the pull-down menu.


For example, if you click and hold on external or @import icons, those menus are auto-populated with all the .css files from the active site. The Elements pull-down menu is also populated with several of the most common elements you'll want to create CSS rules for.


TIP 111: Understanding the CSS Editor Tabs

You can edit dozens of different CSS style properties and attributes, and they are broken into several logical categories in the different sections of the CSS Editor ( Figure 111 ). Let's start on the left side and work our way across.

Figure 111. The CSS Editor includes eight different categories of properties you can edit for a CSS rule.


Blue Cues

With a quick click through the various tabs, it can be hard to identify where you made changes. The labels of any fields you've edited for the selected rule change from black to blue. If these blue labels annoy you, you can turn them off in the CSS Editor flyout menu with the View > Mark Used Properties command.


Selector and Properties : Change selector ( name ) of the rule and add a comment here. You can see a list of all the active style properties and even add new properties by clicking the New Property icon. This ensures compatibility with future releases of the CSS specification.

Font : Customize the font family, size , color , and line height (like leading in print design) in this section. Remember, site visitors will only see the fonts you select if they have the same ones installed on their computer. It's a good idea to stick to the font families included here.

Text : Adjust text spacing, alignment, and indenting in this section. You can also make text uppercase and lowercase and use small caps in this section, but not all properties will render accurately in the Layout Editor. Make sure to use Preview mode for a more accurate rendering.

Block : You can edit the size, position, and visibility of an item here. Advanced users will want to use the float and clear properties.

Editing Multiple Rules

Select multiple rules on the left to change common properties at the same time.


Margin and Padding : The margin is the space between the item and other items, and padding is the space between the item outline and any interior content. When you edit these properties, decide whether you want to have the same value on all sides or edit the top, right, bottom, and left independently.

Border and Outline : Change the thickness , color, and style of borders for items in this section.

List Item and Others : List bullets can be customized and even rendered from images using the properties in this section.

Background : Customize the background color or image of an item, such as the body element, in this section. You can also control the tiling behavior of background images.

Adobe GoLive CS2 Tips and Tricks The 250 Best
Authors: Pratt A. Grillo L.
Published year: 2005
Pages: 121-122/301
Buy this book on amazon.com >>