Custom Greeting for Different Virtual Partitions
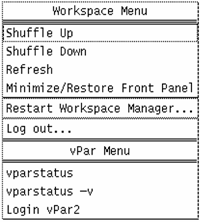
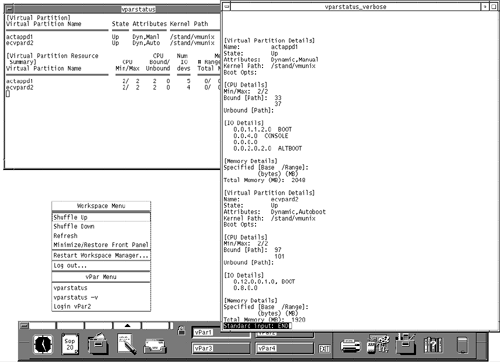
| The first encounter users have with CDE on the vPars system is the login screen. Let's customize the login screen so that it shows the hostname, which is probably already configured on your CDE login screen, as well as the vPar name as part of the greeting. If your hostname and vPar name are the same, you don't need to supply the vPar name on the login screen. This is an interesting customization to CDE so I'll provide the login screen changes as an example customization. The default information for the login screen is contained in /usr/dt/config/C/Xresources . We'll copy this file to /etc/dt/config/C/Xresrouces and then add the vPar name to the file. The portion of the file that includes the GREETING is shown below: !!############################################################### !! !! GREETING !! !! Dtlogin*greeting.foreground: black !! Dtlogin*greeting.background: #a8a8a8 !! Dtlogin*greeting.labelString: Welcome to %LocalHost% !! Dtlogin*greeting.persLabelString: Welcome %s !! Dtlogin*greeting.alignment: ALIGNMENT_CENTER !!############################################################### !! The !! in this file indicates a comment (unlike the # that we are accustomed to using in shell programs). We could uncomment the line that shows %LocalHost% and add to it the Virtual Partition name as shown below: You would substitute the name of your Virtual Partition for vPar Name if indeed the vPar name and hostname are different. Figure 14-7 shows the modified greeting we created: Figure 14-7. Login Screen with Update Greeting This screen shows our updated greeting at the login screen with the hostname of actappd1 as well as the line on which we would place the vPar name. Menu Picks for Virtual PartitionsIn this section we'll add some Virtual Partition- related commands to our CDE menu. Since most Virtual Partition work is performed by the system administrator, we'll update the menu picks for root only in the upcoming example. The default information for the login screen is contained in /usr/dt/config/C/Xresources . We'll copy this file to the home directory and .dt directory for root, which, on this vPar, is /.root/.dt . We'll rename the file dtwmrc after copying it. The menu portion of /.root/.dt/dtwmrc looks like the following before it is updated: Menu DtRootMenu { "Workspace Menu" f.title "Shuffle Up" f.circle_up "Shuffle Down" f.circle_down "Refresh" f.refresh "Minimize/Restore Front Panel" f.toggle_frontpanel no-label f.separator "Restart Workspace Manager..." f.restart no-label f.separator "Log out..." f.action ExitSession } We're going to add our new menu pick just after the DtRootMenu entry, which we see on our system as the left mouse button's "Workspace Menu." After adding our menu picks, the file now looks like the following: Menu DtRootMenu { "Workspace Menu" f.title "Shuffle Up" f.circle_up "Shuffle Down" f.circle_down "Refresh" f.refresh "Minimize/Restore Front Panel" f.toggle_frontpanel no-label f.separator "Restart Workspace Manager..." f.restart no-label f.separator "Log out..." f.action ExitSession Menu vParMenu "vPar Menu" f.title "vparstatus" f.exec "xterm -T vparstatus -e /usr/bin/sh -c 'vparstatus; read xxx'" "vparstatus -v" f.exec "xterm -geometry 80x50+830+0 -sl 200 -bg white -T vparstatus_verbose -e /usr/bin/sh -c 'vparstatus -vmore; read xxx'" "Login vPar2" f.exec "xterm -geometry 80x50+830+0 -sl 200 -bg white -T vPar2 -e remsh ecvpard2 &" } The f.title function shows that this is the menu title. f.exec means to execute the following string. In the first menu pick, vparstatus , we simply open an xterm window, run the vparstatus command, and wait for user input before we close the window with read . The next command uses vparstatus -v which has a more extensive output. For this command I open a much bigger xterm window and run vparstatus -vmore so that the user can hit the spacebar if the command results in more than one window of output. (There is a single quote around the vparstatus and read commands.) I included yet more options on the xterm for the remote login to the second vPar, making the terminal window very large, with lots of terminal memory and using specific colors. Our new menu now looks like that shown in Figure 14-8: Figure 14-8. vPars Menu Picks These menu picks give us vPar status, status with verbose output, and a remote login to our second vPar. Issuing these commands open up windows and executes the commands shown in our menu picks. Figure 14-9 shows a screen shot with the two vparstatus windows open from having selected the two vparstatus commands from the menu: Figure 14-9. Screen Shot Showing Two vparstatus Windows The upper left-hand window contains the output of vparstatus and the right-hand window contains the output of vparstatus -v . The updated menu is shown in the lower left of the screen. We can perform additional CDE customization, such as create workspaces for our vPars so that when we select a workspace we have windows open to the vPar for which the workspace is named. We performed only basic customization to CDE for our vPars environment. You can perform extensive customization in CDE. The background provided in the remainder of this chapter provides information that can help you with additional customization. |

EAN: 2147483647
Pages: 301