Section B.11. DVD Problems
B.11. DVD ProblemsiDVD 6 has not exactly earned a reputation for rock-sold stability. (Be sure to check the note in Section B.3.2.) If you're having problems beyond general mysterious glitchiness, may the following hints help you along. B.11.1. Exporting to iDVD Fails (Error -43)As noted here and there throughout this book, you can extend iMovie's effects, transitions, and title styles by installing plug-ins from other companies. If you haven't updated your plug-ins to iMovie 6specific versions, you've found the problem; they can prevent you from exporting to iDVD. B.11.2. Video and Audio Aren't In SyncOn some longer movie projects (20 minutes or more), everything plays fine in iMovie, but when you turn your project into a QuickTime movie or burn it to a DVD, the audio and video grow slowly, horrifyingly out of sync. The longer the movie plays, the farther apart they drift . The most important thing to check is the audio recording settings of your camcorder. As described at the beginning of this chapter, most camcorders come set to record 12-bit audio , which lies at the heart of the video/audio drift problem. Change it to 16-bit audio, using the camcorder's own menus . (If you use a video converter like the Formac Studio or Dazzle Hollywood Bridge, make sure it, too, is set to import 16-bit audio, not 12-bit.) If it's too late for that step, here are two possible fixes. B.11.2.1. The back-to-camcorder solutionSet your camcorder to 16-bit audio. Once editing is complete, export the entire movie to your camcorder (see Chapter 11). Then start a new iMovie project file and import the camcorder's footage right back into your Mac (Chapter 4). This time, you should be able to export the project without the drift. B.11.2.2. The start-over solution If your video was shot as one long clipa 60-minute lecture, for exampleit may help to set your iMovie preferences to limit the length of imported clips to 5 minutes or less. (Choose iMovie B.11.2.3. The export-as-QuickTime solutionFor this trick, you'll export the project as a high-quality QuickTime movie. Chapter 12 offers details on exporting iMovie projects as QuickTime movies. For this particular task, though, these steps guide you through the proper settings:
If all went well, you now have a very large, perfect- quality QuickTime movie on your hard drive. If your project contains no DVD chapter markers, drag this exported movie into the iDVD window to place it therewith no audio-video sync problems, if the programming gods are smiling. If the project does require chapters, import the exported movie to a new iMovie project, add chapters, and then send it to iDVD as usual. B.11.3. Photos Look Jaggy and Awful on DVDAll over the world, every single day, more Mac fans try to turn their digital photos into DVD slideshows using iMovieand find out that the photos look terrible . What makes this syndrome so baffling is that the photos probably began life with super high resolution and look fantastic in Photoshop or iPhoto. But once they arrive on a DVD, the pictures look lousy.
It turns out that when you choose Share The solution is to bypass iMovie's low-quality photo-rendering cycle altogether. You can do that in either of two ways. B.11.3.1. The Ken Burns MethodIf you turn your photos into digital video clips, then iMovie doesn't consider them stills any more, and won't attempt to render them. Here's how to do that: Turn on the Ken Burns Effect checkbox (Section 9.3), configure the pan or zoom settings, then import the image. After the bright red progress bar finishes its trip across your photo clip, you're left with a very high quality "still" video clip that iMovie won't attempt to process when you hand off to iDVD. Repeat this process for any other still photos in your movie. At this point, your still photos are no longer still photos. Clicking the "Create iDVD Project" button is now safe. iMovie will make no attempt to render your stills, because they've already been rendered by the far superior Ken Burns feature. B.11.3.2. The Drag-into-iDVD Method The second way to bypass iMovie's still-photo rendering feature is to avoid the Share If you do that, iMovie's weak photo-rendering software doesn't touch your stillsand iDVD's own, much better rendering software processes them instead. You may find that the Ken Burns technique looks slightly better on some photos, but of course, it's much more work than the drag-into-iDVD method. Either way, though, you'll be delighted with the results. At disc-burning time, iDVD will perform the photo processing itself, with much better results. |
 Preferences, click Import, use the "Limit scene length to __ minutes control.) Re-import the video from the camera to iMovie.
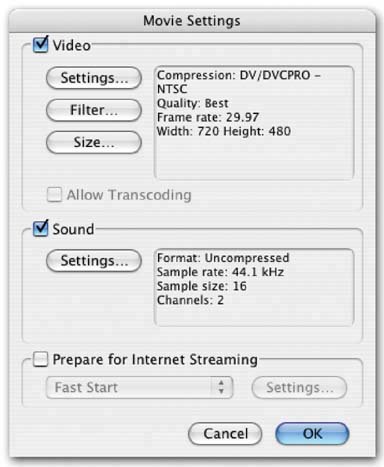
EAN: N/A
Pages: 203
- ERP Systems Impact on Organizations
- Enterprise Application Integration: New Solutions for a Solved Problem or a Challenging Research Field?
- Data Mining for Business Process Reengineering
- Intrinsic and Contextual Data Quality: The Effect of Media and Personal Involvement
- A Hybrid Clustering Technique to Improve Patient Data Quality