Section 14.4. Shortening Clips by Dragging
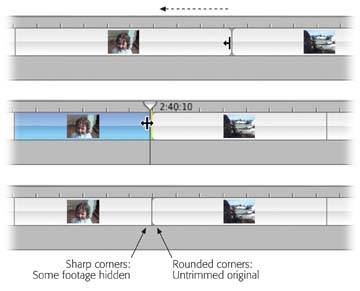
14.4. Shortening Clips by DraggingAlmost nobody hits the camcorder's Record button at the precise instant when the action begins and stops recording the instant it stops. Life is just too unpredictable. That's why the first thing most people do when they get their clips into a movie is trim themto chop the boring parts off the beginning and ending of each clip before dragging them onto the timeline. Most of the time, you'll want to adopt one of iMovie's sweetest features instead: edge dragging . Instead of chopping off the ends of your clips, you can just hide the ends by dragging them inward, as shown in Figure 14-3. (This kind of nondestructive edge-dragging also works with audio clips. It's a common technique in GarageBand, too.) Tip: Here's a great way to use this technique. First, play back the sequence. Using the arrow keys, position the Playhead so that it pinpoints the precise frame where you want the clip to end. In other words, you're using the Playhead to mark the target for the drag-cropping you're about to perform.Now grab the end of the clip and drag it up against the Playhead. Conveniently enough, the end you're dragging snaps against the ghosted Playhead line, as though it's a bookmark. As a result, you get individual-frame accuracy without having to remember precisely how far to drag. (This trick works only if "Snap to items in timeline" is turned on in iMovie  Preferences.) Preferences.) key as you drag the clip's edge inward. Now you're creating a gap that, when played back, appears as black space. Later, you can either convert the gap to a clip unto itself (Section 14.8.1) or fill it with pasted footage. On the other hand, when you drag a clip's edge outward to expose previously hidden footage, iMovie generally shoves all subsequent clips to the right to make room. Your movie, as a result, gets longer. Once again, though, the Want better precision? Try this technique. First, play back the sequence. Using the arrow keys, position the Playhead so that it pinpoints the precise frame where you want the clip to end. In other words, you're using the Playhead to mark the target for the drag-cropping you're about to perform.
Now grab the end of the clip and drag it up against the Playhead. Conveniently enough, the end you're dragging snaps against the ghosted Playhead line, as though it's a bookmark. As a result, you get individual-frame accuracy without having to remember precisely how far to drag. (This trick works only if "Snap to items in timeline" is turned on in iMovie |
EAN: 2147483647
Pages: 314