2.5. Icon and List Views: All Versions Windows' windows look just fine straight from the factory; the edges are straight, and the text is perfectly legible. Still, if you're going to stare at this computer screen for half of your waking hours, you may as well investigate some of the ways these windows can be enhanced for better looks and greater efficiency. For starters, you can view the files and folders in an Explorer window in either of two ways: as icons (of any size ) or as a list (in several formats). Figure 2-11 shows some of your options. 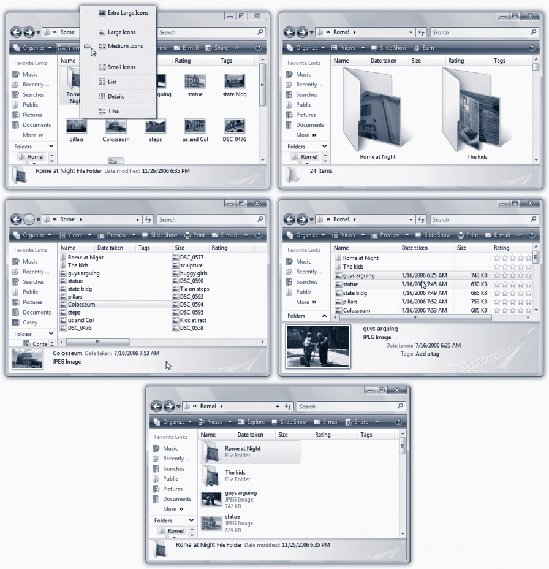 | Figure 2-11. The Views pop-up menu is a little weird; it actually has two columns . At right, it displays the preset view options for the files and folders in a window. At left, a slider adjusts icon sizes to any incremental degree of scalingat least until it reaches the bottom part of its track .
In any case, here's a survey of the window views in Vista. From top left: Icon view (small), Icon view (large), List view, Details view, and Tiles view. List and Details views are great for windows with lots of files . | |
Every window remembers its view settings independently. You might prefer to look over your Documents folder in list view (because it's crammed with files and folders), but you may prefer to view the Pictures folder in icon view, where the icons depict miniatures of the actual photos. To switch a window from one view to another, you have three options, all of which involve the Views pop-up menu shown in Figure 2-11: -
Click the Views button . With each click, the window switches to the next view in this sequence: List, Details, Tiles, Large Icons. -
Use the Views pop-up menu . If you click the  triangle next to the word Views, the menu opens, listing Extra Large Icons, Large Icons, Small Icons, List, and so on. Choose the option you want. (Theyre described below.) triangle next to the word Views, the menu opens, listing Extra Large Icons, Large Icons, Small Icons, List, and so on. Choose the option you want. (Theyre described below.) -
Use the slider . The Views menu, once opened, also contains a strange little slider down the left side. It's designed to let Vista's graphics software show off a little. The slider makes the icons shrink or grow freely , scaling them to sizes that fall between the canned Extra Large, Large, Medium, and Small choices. What's so strange about the slider is that part way down its track, it stops adjusting icon sizes and turns into a selector switch for the last three options in the menu: List, Details, or Tiles. Try ityou'll see.
Tip: If your mouse has a scroll wheel on top, you've got yourself a handy shortcut for manipulating the icon sizes. Just turn that wheel while pressing your Ctrl key.
-
Icon View . In an icon view, every file, folder, and disk is represented by a small picturean icon . This humble image, a visual representation of electronic bits and bytes, is the cornerstone of the entire Windows religion. (Maybe that's why it's called an icon.) GEM IN THE ROUGH
How to Shed Your Metadata's Skin | | At the bottom of the Properties dialog box is a peculiarly worded link: "Remove Properties and Personal Information." This is a privacy feature. What that means is, "Clean away all the metadata I've added myself , like author names , tag keywords, and other insights into my own work routine." Microsoft's thinking here is that you might not want other people who encounter this document (as an email attachment, for example) to have such a sweeping insight into the minutiae of your own work routine. When you click this link, the Remove Properties dialog box appears, offering you a scrolling list of checkboxes: Title, Rating, Tags, Comments, and lots and lots of others. 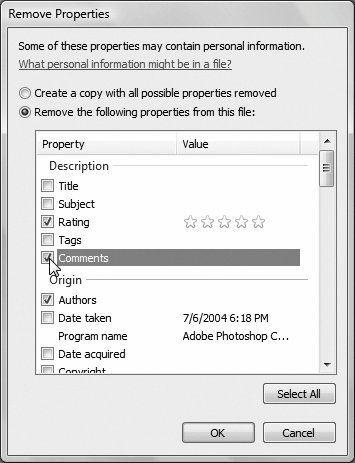 You can proceed in either of two ways. If you turn on "Create a copy with all possible properties removed," then all of the metadata that's possible to erase (everything but things like file type, name, and so on) will be stripped away. When you click OK, Windows instantly creates a duplicate of the file (with the word Copy tacked onto its name ), ready for distribution to the masses in its clean form. (The original is left untouched.) If you choose "Remove the following properties from this file" instead, you can specify exactly which file details you want erased from the original. (Turn on the appropriate checkboxes.) |
What's especially cool is that if you make your icons big enough, folder icons appear turned 90 degrees. Now, in real life, setting filing folders onto a desk that way would be idiotic; everything inside would tumble out in a chaotic mess. But in Windows-land, the icons within a folder remain exactly where they are. Better yet, they peek out just enough so that you can see them. In the Music folder, for example, a singer 's folder shows the first album cover within; a folder full of PowerPoint presentations shows the first slide or two; and so on. (You can see the effect in Figure 2-11.)
Note: Because you can now view icons at any size you like, Microsoft has done away with the Thumbnails and Filmstrip views.
-
Tiles view . Your icons appear at standard size, with name and file details just to the right . -
List view packs , by far, the most files into the space of a window; each file has a tiny icon to its left, and the list of files wraps around into as many columns as necessary to maximize the window's available space. -
Details view is the same as List view, except that it presents only a single column. It's a table, really; additional columns reveal the size, icon type, modification date, rating, and other information. POWER USERS' CLINIC
Secrets of the Details-View Columns | | In windows that contain a lot of icons, Details view is a powerful weapon in the battle against chaos. Better yet, you get to decide how wide the columns should be, which of them should appear, and in what order. Here are the details on Details: Add or remove columns . Right-click any column heading (like Name or Size). When the shortcut menu opens, you'll see that checkmarks appear next to the visible columns: Name, Date Modified, Size, and so on. Choose a column's name to make it appear or disappear. But don't think that you're stuck with that handful of common columns. If you click More in the shortcut menu, you open the Choose Details dialog box, which lists over 200 more column types, most of which are useful only in certain circumstances: Album Artist (for music files), Copyright, Date Taken, Exposure Time (for photos), Windowsvistatmm (for people), Video Compression (for movies), and on and on. To make one of these columns appear, turn on its checkbox and then click OK; by the time you're done, your Explorer window can look like a veritable spreadsheet of information. Rearrange the columns . You can rearrange your Details columns just by dragging their gray column headers horizontally. (You can even drag the Name column out of first position.) As you drag, a tiny bold divider line in the column-heading area snaps into place to show where it thinks you intend to drop the column you're dragging. Change column widths . If some text in a column is too long to fit, Windows displays an ellipsis (...) after the first few letters of each word. In that case, here's a great trick: Carefully position your cursor at the right edge of the column's header (Name, Size, or whatevereven to the right of the triangle). When the cursor sprouts horizontal arrows from each side, double-click the divider line to make the column adjust itself , fitting automatically to accommodate the longest item in the column.  If you'd rather adjust the column width manually, you can do so. Instead of double-clicking the dividing line between two column headings, just drag horizontally. Doing so makes the column to the left of your cursor wider or narrower. |
 |