12.3. Reading Email: All Versions Just seeing a list of the names of new messages in Mail is like getting wrapped presentsthe best part's yet to come. There are two ways to read a message: using the preview pane, and opening the message into its own window. To preview a message, click its name in the list pane; the body of the message appears in the preview pane below. Don't forget that you can adjust the relative sizes of the list and preview panes by dragging the gray border between them up or down. To open a message into a window of its own, double-click its name in the list pane. An open message has its own toolbar, along with Previous and Next message buttons (which look like upward- and downward-pointing arrows). Once you've read a message, you can view the next one in the list either by pressing Ctrl +U (for the next unread message), or by clicking its name in the list pane. (If you're using preview mode, and haven't opened a message into its own window, you can also press the up or down arrow key to move from one message to the next.)
Tip: To mark a message that you've read as an unread message, so that its name remains bolded, right-click its name in the list pane and then choose Mark as Unread from the shortcut menu.
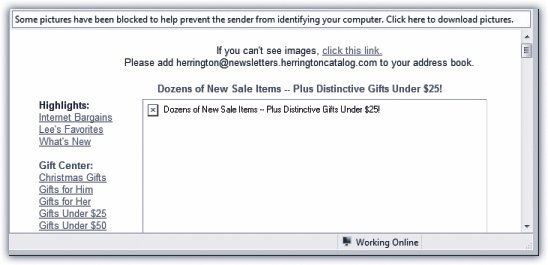
Here's another timesaver: To hide all the messages you've already read, just choose View  Current View Hide Read Messages. Now, only unread messages are visible in the selected folder. To bring the hidden messages back, choose View Current View Show All Messages. Current View Hide Read Messages. Now, only unread messages are visible in the selected folder. To bring the hidden messages back, choose View Current View Show All Messages. 12.3.1. When Pictures are Part of the Message Sending pictures in email is a globally popular activitybut Mail doesn't want you to see them. Mail comes set up to block images, because these images sometimes serve as " bugs " that silently report back to the sender whether you received and opened the message. At that point, the spammers know that they've found a live, working email addressand, better yet, a sucker who opens mail from strangers. And presto, you're on their "safe senders" list, and the spam flood really begins. You'll know if pictures were meant to appear in the body of a message; see the strip that appears at the top in Figure 12-7.
12.3.2. How to Process a Message Once you've read a message and savored the feeling of awe brought on by the miracle of instantaneous electronic communication, you can handle the message in any of several ways. 12.3.2.1. Deleting messages Sometimes it's junk mail, sometimes you're just done with it; either way, it's a snap to delete a message. Click the Delete button on the toolbar, press the Delete key, or choose Edit Delete. (You can also delete a batch of selected messages simultaneously .) UP TO SPEED
Selecting Messages | | In order to process a group of messages simultaneouslyto delete, move, or forward them, for exampleyou must first master the art of multiple message selection. To select two or more messages that appear consecutively in your message list, click the first message, then Shift-click the last. Known as a contiguous selection , this trick selects every message between the two that you clicked. To select two or more messages that aren't adjacent in the list (that is, skipping a few messages between selected ones), Ctrl-click the messages you want. Only the messages you click get selectedno filling in of messages in between, this time. After using either technique, you can also deselect messages you've managed to highlightjust Ctrl-click them again. |
The messages don't actually disappear. Instead, they move to the Deleted Items folder. If you like, click this folder to view a list of the messages you've deleted. You can even rescue some simply by dragging them into another folder (even right back into the Inbox). Mail doesn't truly vaporize messages in the Deleted Items folder until you "empty the trash." You can empty it in any of several ways: -
Right-click the Deleted Items folder. Choose "Empty 'Deleted Items' Folder" from the shortcut menu. -
Click a message, or a folder, within the Deleted Items Folder list and then click the Delete button on the toolbar (or press the Delete key). You're asked to confirm its permanent deletion. -
Set up Mail to delete messages automatically when you quit the program. To do so, choose Tools Options Advanced. Click the Maintenance button, and then turn on "Empty messages from the 'Deleted Items folder on exit." Click OK. 12.3.3. Replying to Messages To reply to a message, click the Reply button in the toolbar, or choose Message Reply to Sender, or press Ctrl+R. Mail creates a new, outgoing email message, preaddressed to the senders return address. (If the message was sent to you and a few other people, and you'd like to reply to all of them at once, click Reply All in the toolbar.) To save additional time, Mail pastes the entire original message at the bottom of your reply (either indented, if it's HTML mail, or marked with the > brackets that serve as Internet quoting marks); that's to help your correspondent figure out what you're talking about.
Note: To turn off this feature, choose Tools Options, click the Send tab, and then turn off "Include message in reply."
UP TO SPEED
About Mailing Lists | | During your email experiments, you're likely to come across something called a mailing lista discussion group conducted via email. By searching Yahoo.com or other Web directories, you can find mailing lists covering just about every conceivable topic. You can send a message to all members of such a group by sending a message to a single addressthe list's address. The list is actually maintained on a special mail server. Everything sent to the list gets sent to the server, which forwards the message to all of the individual list members . That's why you have to be careful if you're actually trying to reply to one person in the discussion group; if you reply to the list and not to a specific person, you'll send your reply to every address on the listsometimes with disastrous consequences. |
Your insertion point appears at the top of the message box. Now, just begin typing your reply. You can also add recipients, remove recipients, edit the subject line or the message, and so on.
Tip: Use the Enter key to create blank lines within the bracketed original message in order to place your own text within it. Using this method, you can splice your own comments into the paragraphs of the original message, replying point by point. The brackets preceding each line of the original message help your correspondent keep straight what's yours and what's hers. Also, if you're using HTML formatting for the message, you can format what you've written in bold, italic, underlined , or even in another color for easier reading.
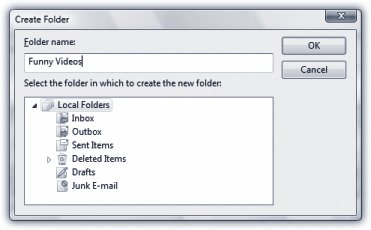
12.3.4. Forwarding Messages Instead of replying to the person who sent you a message, you may sometimes want to forward the messagepass it onto a third person. To do so, click Forward in the toolbar, choose Message Forward, or press Ctrl+F. A new message opens, looking a lot like the one that appears when you reply. Once again, before forwarding the message, you have the option of editing the subject or the message. (For example, you may wish to precede the original message with a comment of your own, along the lines of: "Frank: I thought youd be interested in this joke about Congress.") All that remains is for you to specify who receives the forwarded message. Just address it as you would any outgoing piece of mail. 12.3.5. Printing Messages Sometimes there's no substitute for a printout of an email messagean area where Mail shines. Click Print in the toolbar, choose File Print, or press Ctrl+P. The standard Windows Print dialog box pops up, so that you can specify how many copies you want, what range of pages, and so on. Make your selections, and then click Print. 12.3.6. Filing Messages Mail lets you create new folders in the Folders list; by dragging messages from your Inbox onto one of these folder icons, you can file away your messages into appropriate cubbies. You might create one folder for important messages, another for order confirmations from shopping on the Web, still another for friends and family, and so on. In fact, you can even create folders inside these folders, a feature beloved by the hopelessly organized. To create a new folder, see Figure 12-8.
Tip: To rename an existing folder, right-click it and choose Rename from the shortcut menu.
To move a message into a folder, proceed like this: -
Drag it out of the list pane and onto the folder icon. You can use any part of a message's "row" in the list as a handle. You can also drag messages en masse onto a folder after selecting them. -
Control-click a message (or one of several that you've highlighted). From the shortcut menu, choose Move to Folder. In a dialog box, the folder list appears; select the one you want, and then press Enter or click OK.
Tip: When you click a arrow in the Folder list, you see all folders contained within that folder, exactly like in Windows Explorer. You can drag folders inside other folders, nesting them to create a nice hierarchical folder structure. (To drag a nested folder back into the list of "main" folders, just drag it to the Local Folders icon.)You can also drag messages between folders; just drag one from the message list onto the desired folder at the left side of the screen.This can be a useful trick when you apply it to a message in your Outbox. If you decide to postpone sending it, drag it into any other folder. Windows Mail won't send it until you drag it back into the Outbox.
12.3.7. Flagging Messages Sometimes, you'll receive an email message that prompts you to some sort of action, but you may not have the time or the fortitude to face the task at the moment. ("Hi there...it's me, your accountant . Would you mind rounding up your expenses for 1993 through 2001 and sending me a list by email?") That's why Mail lets you flag a message, positioning a small, red flag in the corresponding column next to a message's name. These little flags are visual indicators that mean whatever you want them to mean. You can bring all flagged messages to the top of the list by choosing View Sort By Flag. To flag a message in this way, select the message (or several messages) and choose Message Flag Message. (Use the same command again to clear a flag from a message.) 12.3.8. Opening Attachments Just as you can attach files to a message, people can send files to you. You know when a message has an attachment because a paper-clip icon appears next to its name in the Inbox. To free an attached file from its message, releasing it to the wilds of your hard drive, use one of the following methods : -
Click the attachment icon, select Save Attachments from the shortcut menu, and then specify the folder in which you want the file saved (Figure 12-9). 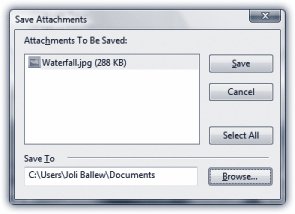 | Figure 12-9. One way to rescue an attachment from an email message is to click the paper-clip icon and choose Save Attachments. You can also drag an attachment's icon onto your desktop. Either way, you take the file out of the Mail world and into your standard Windows world, where you can file it, trash it, open it, or manipulate it as you would any file . | |
-
Click the attachment icon, and select the attachment to open. Choose the name of the attachment in order to open the file directly (in Word, Excel, or whatever). -
If you've double-clicked the message so it appears in its own window, drag the attachment icon out of the message window and onto any visible portion of your desktop. -
Again, if you've opened the message into its own window, you can double-click the attachment's icon in the message. Once again, you're asked whether you want to open the file or save it to the disk. 12.3.9. Message Rules Once you know how to create folders, the next step in managing your email is to set up message rules . These are filters that can file, answer, or delete an incoming message automatically based on its subject, address, or size . Message rules require you to think like the distant relative of a programmer, but the mental effort can reward you many times over. In fact, message rules can turn Mail into a surprisingly smart and efficient secretary. 12.3.9.1. Setting up message rules Now that you're thoroughly intrigued about the magic of message rules, here's how to set one up: -
Choose Tools Message Rules Mail . If you've never created a message rule, you'll see what's shown in Figure 12-10. 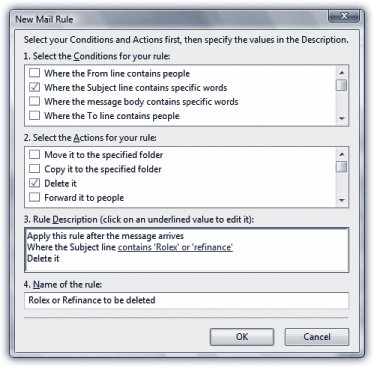 | Figure 12-10. Building a message rule entails specifying which messages you want Mail to look forand what to do with them. By adding the underlined words, as shown here, you specify what criteria you're looking for. Here, any email with the word Rolex or Refinance in the Subject line is automatically deleted . | | If you have created message rules before, you see the Message Rules window first. Click New to open the New Mail Rule window shown in Figure 12-10. -
Use the top options to specify how Mail should select messages to process . For example, if you'd like Mail to watch out for messages from a particular person, you would choose, "Where the From line contains people." To flag messages containing loan, $$$$, XXXX, !!!! , and so on (favorites of spammers), choose, "Where the Subject line contains specific words." If you turn on more than one checkbox, you can set up another condition for your message rule. For example, you can set up the first criterion to find messages from your uncle, and a second that watches for subject lines that contain "joke." Now, only jokes sent by your uncle get placed in, say, Deleted Items. Figure 12-11 shows the word "and," plus a few other items you'll learn about shortly. 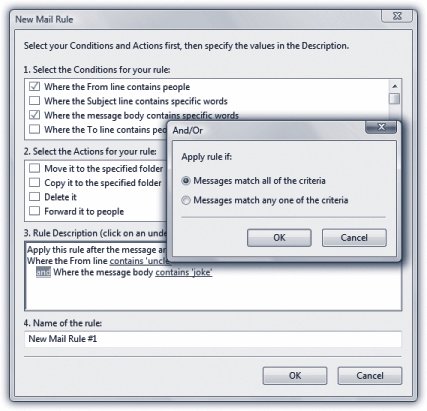 | Figure 12-11. If you've set up more than one criterion, you'll see the underlined word and at the bottom of the dialog box. It indicates that the message rule should apply only if all of the conditions are true. Click the and to produce a little dialog box, where you have the option to apply the rule if any of the conditions are met . | | -
Using the second set of checkboxes, specify what you want to happen to messages that match the criteria . If, in step 2, you told your rule to watch for messages from your uncle containing the word "joke" somewhere in the message body, here's where you can tell Mail to delete or move the message into, say, a Spam folder. With a little imagination , you'll see how these checkboxes can perform absolutely amazing functions with your incoming email. Windows Mail can delete, move, or print messages; forward or redirect them to somebody; automatically reply to certain messages; and even avoid downloading files bigger than a certain number of kilobytes (ideal for laptop lovers on slow hotel room connections). -
Specify which words or people you want the message rule to watch out for . In the bottom of the dialog box, you can click any of the underlined phrases to specify which people, which specific words, which file sizes you want Mail to watch out fora person's name, or XXX , in the previous examples. If you click "contains people," for example, a dialog box appears that lets you open your Contacts list to select certain individuals whose messages you want handled by this rule. If you click "contains specific words," you can type in the words you want a certain rule to watch out for. And so on. -
In the very bottom text box, name your mail rule. Click OK . Now the Message Rules dialog box appears (Figure 12-12). 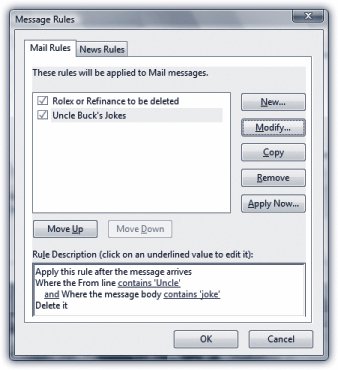 | Figure 12-12. Once a rule is created, it lands in the Message Rules window under the Mail tab. Here, you can manage the rules you've created, choose a sequence for them (those at the top get applied first), and apply them to existing messages (by clicking Apply Now) . | |
Tip: Windows Mail applies rules as they appearfrom top to bottomin the Message Rules window. If a rule doesn't seem to be working properly, it may be that an earlier rule is intercepting and processing the message before the "broken" rule even sees it. To fix this, try moving the rule up or down in the list by selecting it and then clicking the Move Up or Move Down buttons.
12.3.9.2. Two sneaky message-rule tricks You can use message rules for many different purposes. But here are two of the best: -
File mail from specific people . For instance, if you have a few friends who constantly forward their idea of funny messages, create a rule that sends any email from them to a specific folder automatically. At the end of the day, look through the folder just to make sure you haven't missed anything, and if you have time, read the "most excellent funny emails in the whole wide world." -
The email answering machine . If you're going on vacation, turn on "For all messages" in step 2, and then "Reply with message" in step 3. In other words, you can turn Windows Mail into an email answering machine that automatically sends a canned "I'm away until the 15th" message to everyone who writes you.
Tip: Unsubscribe from, or turn off, any email mailing lists before you turn on "For all messages." Otherwise, you'll incur the wrath of the other list members by littering their email discussion groups with copies of your autoreply message.
|