15.3. QuickTime Movies A QuickTime movie is a video file you can play from your hard drive, a CD or DVD, or the Internet. Like any movie, it flashes many individual frames (photos) per second before your eyes, while also playing a synchronized soundtrack. 15.3.1. QuickTime Player Thousands of Mac OS X programs can open QuickTime movies, play them back, and sometimes even incorporate them into documents: Word, FileMaker, Keynote, PowerPoint, Safari, America Online, and even the Finder (Figure 15-4). But the cornerstone of Mac OS X's movie-playback software is QuickTime Player, which sits in your Applications folder (and even comes factory-installed in the Dock). It's designed not only to play movies, but also to show pictures, and to play sounds, in all kinds of formats ”and it's been seriously beefed up in Tiger. 15.3.1.1. Playing movies with QuickTime Player You can open a movie file by double-clicking it, dragging it onto the QuickTime Player icon, or launching QuickTime Player and then choosing File Open File (c-O). As shown in Figure 15-5, a number of controls help you govern the movie's playback: -
Scroll bar . Drag the triangle to jump to a different spot in the movie.
Tip: You can also press the right and left arrow keys to step through the movie one frame at a time. If you press Option -right or -left arrow, you jump to the beginning or end of the movie. In the Pro version, Option-arrow also jumps to the beginning or ending of a selected stretch of the movie.
-
Resize handle . Drag diagonally to make the window bigger or smaller.
Tip: When you drag the resize handle, QuickTime Player strives to maintain the same aspect ratio (relative dimensions) of the original movie, so that you don't accidentally squish it. If you want to squish it, however ”perhaps for the special effect of seeing your loved ones as they would look with different sets of horizontal and vertical genes ”press Shift as you drag.If you press Option while dragging, meanwhile, you'll discover that the movie frame grows or shrinks in sudden jumping factors of two ”twice as big, four times as big, and so on. On slower Macs, keeping a movie at an even multiple of its original size in this way ensures smoother playback.
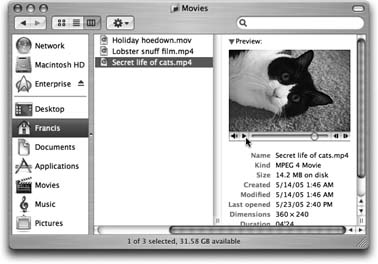 | Figure 15-4. You don't need any special software to play QuickTime movies. Just view their Finder windows in column view (or Get info on them and use the Preview panel). To preview a selected QuickTime movie, in miniature , click the Play triangle to play; click it again to pause. The two buttons on the right end are frame-advance buttons . | |
-
Selection handles . These tiny handles appear only in the Pro version. You use them to select, or highlight, stretches of footage. -
Volume . If you like, you can make the soundtrack louder or softer by dragging this slider with your mouse or clicking in its "track." You may find it easier, however, to press the up or down arrow keys. 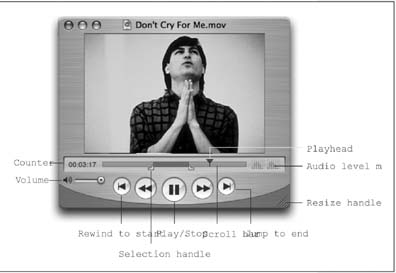 | Figure 15-5. Some of the controls shown here are available only in the Pro version of QuickTime Player. They appear as soon as you type in your registration code (which you get when you pay $30). | |
Tip: To mute the sound, click the little speaker icon, or press Option-down arrow. Press Option-up arrow to make the volume slider jump to full-blast position.
-
Audio level meters . This tiny graph dances to indicate the relative strength of various frequencies in the soundtrack, like the VU meters on a stereo. If you don't see any dancing going on while the movie plays, then you've opened a movie that doesn't have a soundtrack. -
Counter . In "hours: minutes: seconds" format, this display shows how far your Playhead cursor has moved into the movie. If you have QuickTime Pro, the counter reveals the position of the selection handle you've most recently clicked (if any). -
Rewind, Fast Forward . By clicking one of these buttons and keeping the mouse button pressed, you get to speed through your movie, backward and forward, respectively, complete with sound. -
Rewind to Start, Jump to End . These buttons do exactly what they say: scroll to the beginning or end of your movie. In the Pro version, they can also jump to the beginning and ending of the selected portion of the movie (if any). All of this, in other words, is exactly the same as pressing the Option-left arrow or -right arrow keys.
Tip: Try minimizing a QuickTime Player window while a movie is playing. It shrinks to the Dock ”and keeps on playing . Do this enough times, and you'll know what it's like to be Steve Jobs on stage.
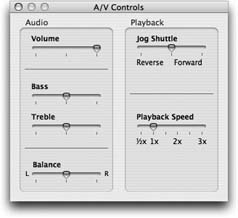 | Figure 15-6. The new A/V Controls should really be called A controls, because they govern only the audio; they don't affect the V (video picture) at all, unless you count the playback-speed controls on the right side. | |
15.3.1.2. Hidden controls Don't miss the Window Show A/V Controls commands. As shown in Figure 15-6, they let you fine-tune the video and audio you're experiencing. 15.3.1.3. Fancy playback tricks Nobody knows for sure what Apple was thinking when it created some of these additional features ”exactly how often do you want your movie to play backward? ”but here they are. Some of these features are available only in the unlocked Pro version of QuickTime Player, as indicated below. -
Change the screen size . Using the View menu commands, such as Double Size and Fill Screen, you can enlarge or reduce the actual "movie screen" window. Making the window larger also makes the movie coarser, because QuickTime Player simply enlarges every dot that was present in the original. Still, when you want to show a movie to a group of people more than a few feet back from the screen, these larger sizes are perfectly effective. -
Play more than one movie . You can open several movies at once and then run them simultaneously . (Of course, the more movies you try to play at once, the jerkier the playback gets.)
Tip: If you have Player Pro, you can use the View Play All Movies command to begin playback of all open movies at the same instant.
-
Play the movie backward . You can play the movie backward ”but not always smoothly ”by pressing c-left arrow, or by Shift-double-clicking the movie itself. (You must keep the Shift button pressed to make the backward playback continue.) There's no better way to listen for secret subliminal messages. -
Loop the movie . When you choose View Loop and then click Play, the movie repeats endlessly until you make it stop. UP TO SPEED
QuickTime Player vs. QuickTime Player Pro | | Mac OS X comes with the all-around audio, video, and picture player known as QuickTime Player. If you peruse its menus , however, you'll discover that over half the commands are dimmed, unavailable, and marked by a little logo that says "PRO." Actually, what it really says is, "Pay us $30! C'mon, pal!" If you choose one of these dimmed commands, you get a dialog box that describes the feature you would have available if you upgraded to QuickTime Pro for $30 by clicking the Buy Now button. Once you've turned QuickTime Player into Player Pro, all of those dimmed features spring to life, and the PRO logos disappear. (Even if you paid for the Pro version of QuickTime 6, you have to pay again for the Tiger version, QuickTime 7 ”a distinct sore point for a lot of Mac fans.) To execute this transaction, open the QuickTime pane of System Preferences. (Or, if you're already in QuickTime Player, choose QuickTime Player Registration.) Click Buy QuickTime Pro. You wind up on the Apple Store Web site, which stands ready to accept your order. Apple then gives you a serial number, which you should type into the QuickTime System Preferences pane. Once you've upgraded, you gain several immediate benefits ”not the least of which is the permanent disappearance of the "PRO" logos in all of the QuickTime Player menus. Now QuickTime Player can edit your movies, as described later in this chapter. It can also import many more sound and graphics formats, record audio and video, and ”via the File - Export command ”convert sounds, movies, and graphics into other formats. Nor is QuickTime Pro the only upgrade you can buy. For another $20, you can add the MPEG-2 Playback Component, which gives QuickTime Player the ability to open and play MPEG-2 files (like the super- high-quality files found on a DVD). 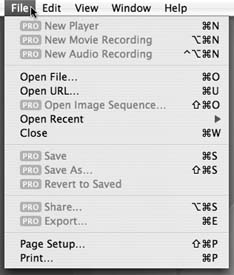 |
Play a selection (Pro only) . When you choose View Loop Back and Forth and then click Play, the movie plays to the end ”and then plays backward, from end to beginning. It also repeats this cycle until you make it stop. 15.3.2. Internet Streaming QuickTime QuickTime Player also lets you watch "Internet slide shows," watch a couple of live TV stations , or listen to the radio ”all as you work on your Mac, and all at no charge. 15.3.2.1. Streaming video from your browser With ever-increasing frequency, Web sites advertise streaming video events, such as Steve Jobs keynote speeches and the occasional live rock concert. You'll find a note on a Web page, for example, that says, "Watch the live debate by clicking here on October 15 at 9:00 p.m. EST."  | Figure 15-7. Several "picks of the day" are featured in the main window; click the little Hot Picks button (indicated here by the cursor) to switch among them. Movie trailers are on the right. You can click a featured ad to see the associated clip in iTunes (!) or your Web browser. | |
If you do so, you'll find yourself transported once again into QuickTime Player, which connects to the appropriate Internet "station" and plays the video in its window. (You can also choose File Open URL from within QuickTime Player to type in the Web address.)
Note: You don't have much control when watching a live broadcast. You generally can't rewind, and you certainly can't fast-forward. You may be able to pause the broadcast, but when you un-pause, you wind up at the current broadcast moment ”not where you stopped .
15.3.2.2. Streaming video in QuickTime Player Fortunately, if you're eager to experience the high-tech thrill of watching live Internet video, you don't have to wait until you stumble onto a broadcast advertised on a Web page. Thanks to Apple's QuickTime TV initiative, a number of TV and radio broadcasts are going on at this very moment ”24 hours a day. A sampling of them appears every time you open QuickTime Player, as shown in Figure 15-7.
Tip: You can find a list of additional QuickTime TV channels at www.apple.com/quicktime/qtv.
15.3.2.3. Manipulating your Favorites When you choose Window Favorites Show Favorites, you see a list of items you've put there for quick access. Although few people use this feature, it's possible to add the icons of your own QuickTime movies to the Favorites panel ”not QuickTime TV channels, but actual movies on your hard drive. To do so, you can use either of these methods : -
Drag the icon of a QuickTime movie, picture file, or sound clipping directly off your desktop and into QuickTime Player's Favorites window. -
Open a movie, picture, or sound, and then choose Window Favorites Add Movie As Favorite. You can also reorganize the locations of the Favorites icons by dragging them up or down in the list. To delete one of your favorites, just click its name and then press Delete (and click OK in the confirmation box). 15.3.3. QuickTime Player Pro If you've spent the $30 to upgrade your free copy of QuickTime Player to the Pro version, you've unlocked a number of useful features. For example: -
Your View menu contains additional playback options, such as those described in "Fancy playback tricks" on Section 15.3.1.2. -
When you find a QuickTime movie on a Web page, you can usually save it to your hard drive. (Click the movie; hold down the mouse button until a pop-up menu appears; choose Save As QuickTime Movie, or the equivalent in your browser.) 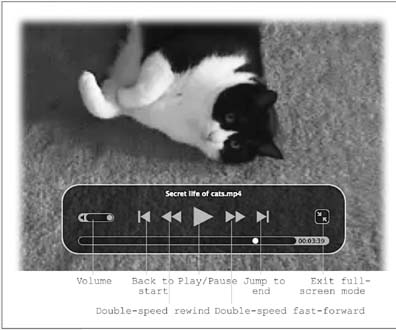 | Figure 15-8. When you jiggle your mouse in Full Screen mode, you get this control panel for pausing, stopping, rewinding, and so on. Just remember that although Full Screen is terrific when you want to play a movie for a large group of people, an enlarged QuickTime movie is also a jerki er and grainier one. | |
-
Using the Window Show Movie Properties command, you can view, turn on and off, add, or delete the individual tracks in a particular movie. (Most movies have nothing but a video track and a soundtrack. But a few specialized movies may also contain a text track, an animation track, alternate soundtracks , and so on.) -
The View Full Screen (c-F) command is the best possible way to view a QuickTime movie on your screen. When you use this command, QuickTime Player blacks out the screen and devotes most of the Mac's processing power to playing the movie smoothly. (See Figure 15-8.) By far the most powerful feature you gain in the Pro version, however, is its ability to edit QuickTime movies. You can rearrange scenes, eliminate others, and save the result as a new movie with its own name. 15.3.3.1. Selecting footage Before you can cut, copy, or paste footage, you have to specify which footage you want to manipulate. See the two L-shaped handles that start out at the left end of the horizontal scroll bar, as shown in Figure 15-5? These are the "in" and "out" points; by dragging these handles, you can isolate the scene you want to cut or copy.
Tip: You can gain more precise control over the selection procedure by clicking one of the handles and then pressing the right- or left-arrow key. Doing so expands or contracts the selected chunk of footage by one frame at a time.You may also prefer to select a piece of footage by Shift-clicking the Play button. As long as you hold down the Shift key, you continue to select footage. When you release the Shift key, you stop the playback, and the selected passage appears in gray on the scroll bar.
Once you've highlighted a passage of footage, you can proceed as follows : -
Jump to the beginning or end of the selected footage by pressing Option-right arrow or -left arrow key. -
Deselect the footage by dragging the two handles together again. -
Play only the selected passage by choosing View Play Selection Only (c-T). (The other Movie menu commands, including Loop, apply only to the selection at this point.) -
Drag the movie picture out of the Player window and onto the desktop, where the selected portion becomes a movie clipping that you can double-click to view. -
Cut, copy, or clear the highlighted material using the commands in the Edit menu.
Tip: If you paste some text directly into QuickTime Player Pro, you get a two-frame title ”like an opening credit ”at the location of the scroll-bar playhead. (If you need it to be longer,paste it repeatedly.) QuickTime Player automatically uses the font, size, and style of the text that was in the text clipping. You can paste a graphic image, too, which gets you a two-frame "slide" of that still image.If you find it easier, you can also drag a text or picture clipping file directly from the desktop into the QuickTime Player window; once again, you get a two-frame insert.
15.3.3.2. Pasting footage After cutting or copying footage, you can move it elsewhere in the movie. Specify where you want the pasted material to go by clicking or dragging in the horizontal scroll bar so that the playhead marks the spot; then choose Edit Paste. The selection handles (and their accompanying gray scroll bar section) appear to show you where the new footage has appeared. (That makes it easy for you to promptly choose Edit Cut, for example, if you change your mind.) But in QuickTime Player Pro, Cut and Paste are just the beginning of your options. For example: -
Edit Trim to Selection eliminates the outer parts of the movie ”the pieces that aren't selected. All that remains is the part you first highlighted. -
Edit Add to Movie adds whatever's on the Clipboard so that it plays simultaneously with the selected footage ”a feature that's especially useful when you're adding a different kind of material to the movie (see Figure 15-9). For example, if you paste one clip into another, you get a picture-in-picture effect. -
If you choose Edit Add to Selection & Scale, whatever you're pasting gets stretched or compressed in time so that it fits the highlighted region, speeding up or slowing down both the audio and video. The effect can be powerful, comical, or just weird.
Tip: You can edit sounds exactly as you edit movies, using the same commands and shortcuts. Use the File Open File command to locate a sound file to open. It opens exactly like a QuickTime movie, except with only a scroll bar, no picture.
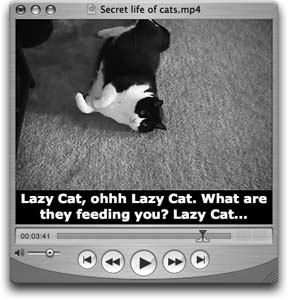 | Figure 15-9. QuickTime Player Pro has a little-known subtitling feature, complete with freedom of type style. Copy some formatted text from a word processor, highlight a slice of footage in QuickTime Player, and choose Edit Add to Movie. The copied text appears as a subtitle on a black band , beneath the picture, as shown here. | |
15.3.3.3. Saving the finished movie After you've finished working on your sound or movie, you can send it back out into the world in any of several ways. If you choose File Save As, for example, you can specify a new name for your edited masterpiece. You must also choose one of these two options: -
Save as a reference movie . You'll almost never want to use this option, which produces a very tiny QuickTime file that contains no footage at all. Instead, it's something like an alias of the movie that works only as long as the original, unedited movie remains on your hard drive. If you try to email the newly saved file, your unhappy recipient won't see anything at all. -
Save as a self-contained movie . This option produces a new QuickTime movie ”the one you've just finished editing. Although it consumes more disk space, it has none of the drawbacks of the "save normally" file described above. 15.3.3.4. Exporting the finished work Whereas the File Save As command spins out your edited movie in its original format, the File Export command lets you convert the format in the process of exporting it. The resulting dialog box offers two pop-up menus that can be very useful in tailoring your finished work for specific purposes: -
Export . Using this pop-up menu, you can convert your movie to AVI (Windows movie) format, DV Stream (for use as a clip in digital-video editing programs like iMovie and Final Cut), Image Sequence (a very large collection of individual still frames), and so on. This pop-up menu also lets you convert a sound you've been working on to AIFF, System 7, Wave (Windows), and other formats. GEM IN THE ROUGH
QuickTime Virtual Reality | | If they live to be 100, most Mac users will probably never encounter a QuickTime VR movie. Yet this kind of "panorama movie" technology is built into every Mac. The trick is finding a QuickTime VR movie; your safest bet is, as usual, the Web. (The best starting point is Apple's own QuickTime VR page, www.apple.com/quicktime/technologies/qtvr.) When you open a QuickTime VR movie, you might think at first that you've simply opened a still photo (there's no scroll bar, for example). The trick is to drag your cursor around inside the photo. Doing so rotates the "camera," enabling you to look around you in all directions. Then try pressing the Shift key, to zoom in (move forward) as much as you like. If you go too far, the image becomes too grainy. Press the Control key to zoom out (move backward). And if you really want to blow your mind, try one of the cubic VR movies posted on that Web page. It lets you rotate your view not just side to side, but al so up to the sky and down to your feet. 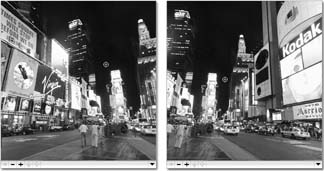 |
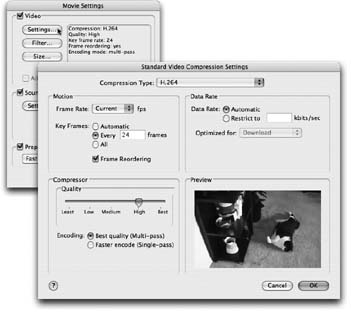 | Figure 15-10. If you're used to standard moviemaking software, like iMovie or Final Cut, you may wonder where QuickTime Player hides its compression settings. They're here, in the Options dialog box (left) and the Settings boxes that spring from within it (right). Hint: For smooth playback, use 15 frames per second or above (television playback is 30 fps); for best quality but small file size, use the Sorenson 3 Video Compressor or, if you're sure your audience has QuickTime 7 or later, H.264. | |
GEM
All About Pixlet | | If you were to open the pop-up menu at the top of the dialog box shown in Figure 15-10 (lower right), you'd see a video codec (compressor-decompressor) called Apple Pixlet Video . Now, Pixlet is not intended to compress, say, your iMovie masterpieces. Instead, it was designed for use by a professional film company ”Pixar, to be exact. Film and TV editors want to be able to edit movies with perfect frame quality and perfect frame accuracy ”without having to ship gargantuan, full-resolution, multi-gigabyte files across the network or across the country. Pixlet is the answer. It compresses the original, film-resolution movie down to about a twentieth its original file size, without introducing any artifacts (specks or blockiness). unlike other codecs, Pixlet doesn't compress video over time; that is, it doesn't memorize one key frame and then, for the following frames, store only the information for the pixels that have changed. Pixlet stores all of the color information for every single frame. (It achieves its compression solely by compressing the color information within each frame.) The point of all this is to permit editors to scrub back and forth through a scene, stepping frame by frame if they like, and viewing full, instantaneous, half-high-definition resolution at every step. |
-
Use . This pop-up menu lets you establish your preferences for the export format you've just specified above. For example, if you're exporting your movie as individual still frames, use this pop-up menu to specify the format for those individual still frames ”BMP (Windows bitmap format), JPEG, and so on. If you're exporting your work as a QuickTime movie, you can specify how much QuickTime Player should compress it. (Compression makes a file smaller, but decreases the video quality.) If you intend to let people watch this movie over the Internet, for instance, you should use one of the Streaming options, which make the movie extremely small and extremely cruddy-looking. 15.3.3.5. Compression and special effects One of QuickTime Player's most powerful features is hidden in the Export dialog box, in a place where you might never find it. If none of the canned compression settings appeal to you, you can click the Options button. In the Settings dialog box that appears (see Figure 15-10), QuickTime Player Pro offers a staggering degree of control over the movie you're exporting. (The resul ting dialog box varies according to the compression method you've selected.) When exporting a movie as a QuickTime Movie, for example, this is where you can specify the compression format , the frames per second, and (by clicking Size) the dimensions of the finished movie.  | Figure 15-11. Turn listening on and off here. If you turn on "Listen only while key is pressed," the Mac pays attention to you only when you're pressing a key (like Esc). As a convenience, it even pauses iTunes playback while you're pressing the key. If you turn on "Listen continuously with keyword," you have to say a certain keyword to "get its attention" before speaking each command. In the Keyword blank, type the word you want the Mac to listen for as it monitors the sound from your mike. | |
Tip: By clicking Options, you'll find the new QuickTime 7 compression scheme called H.264 , which offers such great quality at such low file sizes that Apple, among others, gets all sweaty-palmed just thinking about it. It's a terrific compression scheme for any movies that you ex-port ”but remember that QuickTime 7 (free for Windows and Mac) is required to see them.
As a bonus, you even get a Filter button that offers 14 special video effects. They let you blur or sharpen your movie, adjust the brightness or contrast, fiddle with the color balance, and so on. Similarly, when you're exporting a sound file, the Options button lets you specify the sound quality you want, the compression method, and more ”all various ways of manipulating the tradeoff between file size and sound quality. |