15.3. QuickTime Movies
| < Day Day Up > |
15.2. Recording SoundIf you hope to record new sounds, you need a microphone. Your microphone situation depends on the kind of Mac you have:
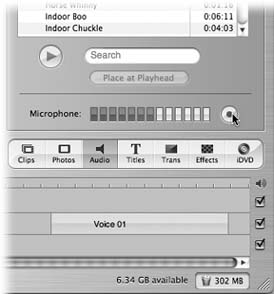
Tip: No matter which model you have, an Apple iSight videoconferencing camera works well as a microphone. The Sound pane of System Preferences lets you choose which sound source you want the Mac to listen to. Click the Input tab, and then click the sound source you want: external USB microphone, external analog microphone (that is, something plugged into the microphone or Line In jacks of Macs that have them), built-in microphone, iSight, or whatever. 15.2.1. Making the RecordingOnce you've got your microphone situation taken care of, you need to get your hands on some sound-recording software. You can use shareware programs like Amadeus II, or try iMovie (which came with your Mac) or QuickTime Player Pro (see the box on Section 15.3.1.2). 15.2.1.1. The iMovie methodAlthough you might never suspect it, every Mac comes with a basic recording program. It's iMovie, which lurks in your Applications folder. In a new movie project, click the Audio button shown in Figure 15-2. Click the round, red Record Voice button and begin to speak. Click Stop to complete the recording.
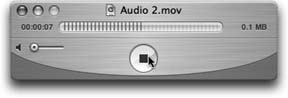
When you're satisfied with the recording, choose File Share (or, in older versions, File Export). In the resulting dialog box, click QuickTime. From the pop-up menu, choose Expert Settings. Then click Share (or Export). In the next dialog box, select "Sound to AIFF" from the Export pop-up menu. Make sure the file name ends in .aiff, then navigate to a Sounds folder, and click Save. You've just created a new alert sound! 15.2.1.2. The QuickTime Player Pro methodOpen QuickTime Player (in your Applications) folder. Choose File New Audio Recording. Click the round, red Record button and begin to speak. Option-click what's now the square Stop button to pause the recording, or click without the Option key to end (Figure 15-3). Tip: Don't adjust the tiny speaker (volume) slider in the Audio Recording window unless you're wearing headphones. This slider lets you monitor the sound ”and turning it up while the Mac's speakers are live risks producing the hideous shriek known as feedback.
When you're satisfied with the recording, choose File Export. In the resulting dialog box, choose "Sound to AIFF" from the Export pop-up menu. Make sure the file name ends in .aiff, then navigate to a Sounds folder, and click Save. Your sound is ready to play. |
| < Day Day Up > |
EAN: 2147483647
Pages: 506