Eclipse
Authors: Pluta J.
Published year: 2003
Pages: 30-32/90
Buy this book on amazon.com >>

Step 7: A Simple Program

The book up to now has primarily been a familiarization with the Eclipse workbench. You didn't really create anything usable. However, now you're going to create a program that can actually display data from a database.

Not all at once, though! Instead, we'll proceed slowly. First, you'll create a very simple program, and then you'll debug it. After that you'll add a user interface and finally a database. This step will cover only that first task: creating the initial simple program.

Step 7.1: Get into the Java perspective

click to expand

If you're already in the Java perspective, you can skip this step and continue with Step 7.2.

Note  

The Title Bar of the Eclipse IDE will indicate which perspective you're currently in. If your Title Bar says "Java - Eclipse Platform" as in Figure 7.1, then you're ready to move on.

click to expand
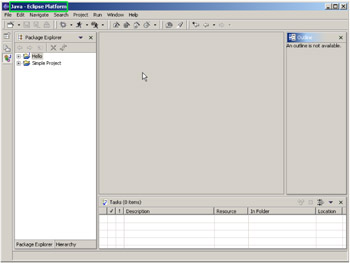
Figure 7.1: The Java Perspective, as indicated by the title bar.

Okay, for whatever reason, you're not in the Java perspective. Maybe you've skipped the first part of the book, or you were exploring, or whatever. You might be in the Resource explorer, as shown in Figure 7.2.

click to expand
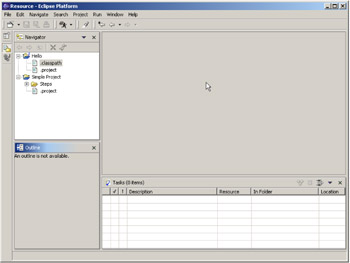
Figure 7.2: A possible alternative view of the IDE; in this case, the Resource perspective.

No matter where you are, our job now is to make sure you get to the proper perspective. That's actually quite easy. You can get to the Java perspective by using Eclipse's main menu bar.

q 7.1 (a) From Eclipse's main menu bar, select Window)Open Perspective) Java.

click to expand
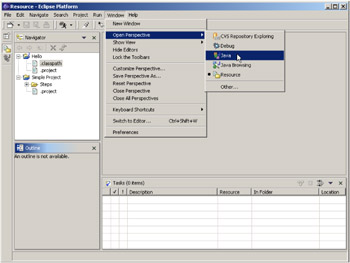
Figure 7.3: Select Window/Open Perspective/Java from the main menu bar.

The Java perspective will appear.


Step 7.2: Create the Java project

click to expand

If you already see a project named Hello in your Package Explorer, as in Figure 7.4, then you may skip ahead to Step 7.3.

click to expand
Figure 7.4: The Java perspective showing the Hello project.

Otherwise, you'll need to create a project. To do this, you'll simply do the same actions as outlined in Step 5.2.

q 7.2(a) Right-click on the Navigator pane and select New Project ...

click to expand
Figure 7.5: Bringing up the New Project wizard by right-clicking on the Navigator pane and selecting New/Project...

The New Project wizard will appear. Use it to select the type of project you are creating. For more complex projects, you may be asked for more information, but for a basic Java project, it's pretty simple.

q 7.2(b) Select Java on the left, Java Project on the right, and click Next.

click to expand
Figure 7.6: Select Java and Java Project on the left and right, and click Next.

Enter the name , click Finish, and you're done.

q 7.2(c) Type in "Hello" and click Finish.

click to expand
Figure 7.7: Finish the wizard by entering the name and clicking Finish.


Step 7.3: Creating a new class

click to expand

Creating a class is quite easy, but how you do it depends on what you plan to do with the class. For this step, you'll be creating a class that you can actually run from the command line (or the console, as it's called within Eclipse).

q 7.3(a) Right-click on Hello in the Package Explorer and select New Class.

click to expand
Figure 7.8: Creating a new class using New/Class.

q 7.3(b) Make sure the Source Folder is Hello.

q 7.3(c) Leave Package blank.

q 7.3(d) Leave Enclosing type unchecked.

q 7.3(e) Enter HeIloWorld in the Name field.

q 7.3(f) Make sure public is checked, abstract and final are unchecked.

q 7.3(g) Leave Superclass as java.lang.Object, Interfaces blank.

q 7.3(h) Make sure public static void main(String[] args) is checked.

q 7.3(i) Leave the other two unchecked.

q 7.3(j) Click Finish.

click to expand
Figure 7.9: Setting the fields properly for a new class.

Following these steps will create a class HeIloWorld in the default package (because you left Package blank) in project Hello. It will be a public class, neither abstract nor final. The class has no superclass (except for the implied superclass Object) and implements no interfaces. Finally, the IDE has been instructed to create a standard "main" method, but no other methods . That being the case, we will see the result as in Figure 7.10.

click to expand
Figure 7.10: The result of the addition of the new class HelloWorld.

There are a number of interesting results from this simple operation.

  1. A default package is added, with the icon. The default package is added because you left the package name blank in Step 7.3(c). Had you entered a package name, that package would have been created instead. Had you used an already existing package, the class would simply have been added to that package.

  2. The class HelloWorld was added. More correctly, the Java source code was added. That's what the icon in the Package Explorer indicates. The class is also created; we'll look into this a little further in a moment.

  3. A class is added with some initial comments. These comments are pretty useless at this point, but you can change them.

    Note  

    To change the default documentation for a new class, go into Window/Preferences. In the Preferences dialog, select Java/Templates and then edit the template named typecomment. You can modify quite a number of templates using this dialog.

  4. The class itself is defined as HelloWorld. You'll also notice that the class is shown in the Outline view.

  5. Last but not least, the main() method is created. It, too, has an entry in the Outline view.


Eclipse
Authors: Pluta J.
Published year: 2003
Pages: 30-32/90
Buy this book on amazon.com >>

Similar books on Amazon