| You have the capability when using DHTML to animate layers. This can go far beyond a simple layer moving from one side of the document to another; in fact, you can create entire Web presentations using layers. You can even incorporate Dreamweaver's JavaScript behaviors into the timeline. This can be a nice alternative to other technologies that might require a plug-in. Before getting any deeper into this chapter, be sure to have a strong understanding of layers and how they work. If you're not completely clear about how layers work, refer to Chapter 11, "Layers." Requirements to Keep in Mind As mentioned earlier, animating with timelines may be a nice alternative to other technologies that would require a plug-in or ActiveX control. You should be aware of some guidelines when considering the use of animated layers. Animated layers require Internet Explorer 4.0 or later and Netscape 6.0 or later. Netscape 4.x could be used; however, that version of Netscape uses its own propriety tags to generate layers the <layer> and <ilayer> tags. If you code these tags, the layers will not appear in any version of Internet Explorer or Netscape 6.0. If you want to animate any object in your HTML document, it must first be inserted into a layer. Dreamweaver will not allow you to add any other object to the timeline, other than a layer or an image. If you try, you will get an alert message warning you, as displayed in Figure 12.1. Figure 12.1. If you try to insert an item other than a layer or an image into the timeline, Dreamweaver will warn you that it can't be done. 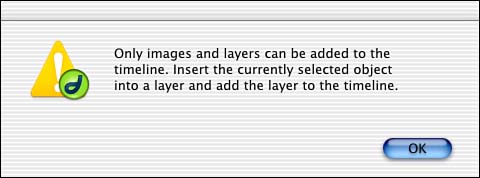
When selecting a frame rate, keep in mind that this will be considered a "desired frame rate," which means that the animation will play at the specified frame rate or as close to that specified frame rate as possible, depending on the power of the end user's machine. How the Timeline Works When animating layers with the timeline in Dreamweaver, you might want to look at the code being generated. You'll notice that Dreamweaver writes about 60 lines of code to perform a simple animation. However, if you've never used an animation program before like Flash or Director, the timeline and how the timeline works may be confusing to you. Refer to Figure 12.2 to see the timeline and its different components. Figure 12.2. The timeline is constructed of several components, which will add functionality to your animations.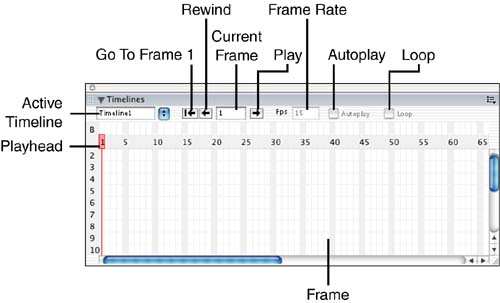
Elements of the Timeline To access the Timeline panel, choose Window, Others, Timeline. Options Bar The top portion of the timeline offers a series of options to control the timeline. The timeline drop-down menu lets you activate a particular timeline. You can control the animation by stepping through the timeline with the left and right arrows with a corresponding text box to the current frame. There is also a button that will move the playhead back to frame 1. You can also set the frame rate for the animation, turn on looping, and set an option for Autoplay. Looping plays the animation from the beginning after it reaches the end. Behavior Channel This channel indicates what frames have behaviors associated with them. Frame Numbers This bar indicates frame numbers. This can be handy when adding or moving content on the timeline. Frames These are the actual containers of the animated information. They are much like a cell in a traditional animation or a frame in a filmstrip. Playhead This bar allows you to move through the animation and displays the current frame's information in the document. Layers These numbers correspond to a layer within the timeline. Frames and Keyframes When discussing animation, I often like to refer to the old-fashion flipbook concept. Remember those old books, where if you flipped through the pages quickly you would see the content within those pages animate? Essentially, that's what's happening in Dreamweaver. The timeline allows you to assemble a virtual flipbook. The timeline is constructed of a series of frames. To view the frames, you can scrub (drag) the playhead back and forth over the populated frames. To see what a populated frame looks like, refer to Figure 12.3. Figure 12.3. The frames that appear in the timeline that are of a different color than a traditional frame contain content; therefore, they are referred to as populated frames.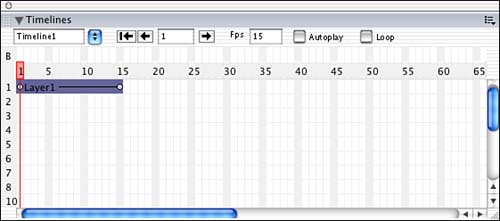
In Figure 12.3, the first and last frames in the populated frames in the timeline appear as circles. These circles are known as keyframes. A keyframe is a frame that represents a major change within the animation. The frames between the two keyframes are known as in between frames. The great thing when animating in Dreamweaver is that Dreamweaver does most of the work. In the instance shown in Figure 12.2, there are only two keyframes, so in theory, the layer should show up in the location of the first frame and in a different location on the last keyframe. However, in this case, the layer moves across the document to reach its new destination on the second keyframe. The reason for this is that Dreamweaver is tweening the animation. Tweening means that all the frames between the first frame and the second frame are all drawn for you, creating the effect of motion. This is how animation works in a traditional studio. The lead animator would draw the first frame of an animation and the last frame. Typically, these need to be the most detailed because they stay on the screen just a bit longer than the rest of the frames. Then a team of "in-betweeners" comes in and paints all the in-between frames to complete the animation. Frame Rate The frame rate determines how many frames per second the viewer will see. The higher the frame rate, the more realistic the animation will appear. To give you a frame of reference, film plays at 24 frames per second (fps) and digital video plays at 29.97 or 30fps. The default frame rate in Dreamweaver is 15. Even though video and film play at 30fps and 24fps, respectively, film and video don't have bandwidth restrictions like Web pages do, and the manner in which film and video are viewed is more standardized. When animating for the Web, your animation is at the mercy of the end user's machine. The processor speed, the speed of the Internet connection, how much RAM is available, and the quality of the video card all play crucial roles in the appearance of an animation. So if you're developing on the latest and fastest computer, you're not getting an accurate representation as to how this animation will look to the world. That's why it is especially important to test your page on several types of computers. If it chokes on a fairly standard computer, you may want to reconsider the frame rate of the animation, as well as the content you're trying to animate. Large graphical files are more difficult to process than text. So the moral of the story is, you can specify a frame rate, but ultimately, the speed of the animation is determined by the strength of the computer playing it. |

