| Dreamweaver MX provides handy option menus for setting a wide variety of CSS styles, but these menus don't cover everything you can do with style sheets. To get the most out of your CSS styles or to edit someone else's style sheet you will eventually need to work with CSS in code view. In code view, you're working directly with the CSS language, writing the selector, the braces, and the declarations instead of letting Dreamweaver MX do it for you. The code view for CSS is shown in Figure 10.12. Figure 10.12. Editing a style sheet in code view lets you directly manipulate CSS rules.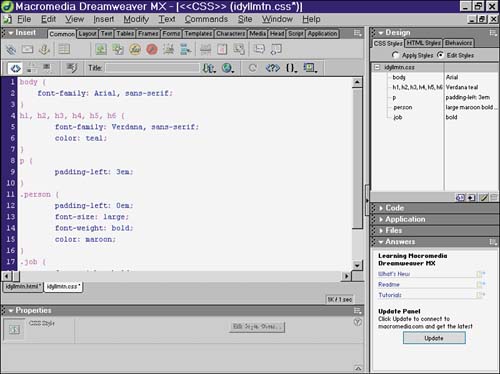
To enter code view, you need to open a style sheet via the Open option on the File menu or create a blank style sheet with the New option from the File menu. Then you'll see the raw CSS codes displayed for you, ready to be edited. Save the file via the Save option on the File menu when you're done with it! Starting with Dreamweaver MX Style Sheets To make it easier to use CSS styles, Dreamweaver MX comes with a selection of standard style sheets that can be used as the basis of your own style sheets. Using these style sheets is easy; simply choose New from the File menu and select from the available style sheets. The style sheet you pick will open in code view in Dreamweaver MX, and you can edit and save your modified style sheet. The list of Dreamweaver MX style sheets is shown in Table 10.12. Most of these style sheets also define class styles that you can use in your designs along with any custom class styles you create. Table 10.12. Dreamweaver MX Style Sheets | Style Sheet Name | Effects | | Basic: Arial | Sets the text (body, th, and td) to Arial font; defines no class styles. | | Basic: Times | Sets the text (body, th, and td) to Times New Roman font; defines no class styles. | | Basic: Verdana | Sets the text (body, th, and td) to Verdana font; defines no class styles. | | Colors: Blue | Selects a blue color scheme; defines no class styles. | | Colors: Blue/Gray/Purple | Selects a blue, gray, and purple color scheme; defines no class styles. | | Colors: Blue/White/Yellow | Selects a blue, white, and yellow color scheme; defines no class styles. | | Colors: Red | Selects a red-on-black color scheme; defines no class styles. | | Colors: Tan/Brown | Selects a tan and brown color scheme; defines no class styles. | | Colors: Yellow/Brown | Selects a yellow and brown color scheme; defines no class styles. | | Forms: Accessible | Sets the text (body, th, td, and form controls) to Arial font, using relative units. | | Forms: Arial | Sets the text (body, th, td, and form controls) to Arial font, using absolute units. | | Forms: Times | Sets the text (body, th, td, and form controls) to Times New Roman font, using absolute units. | | Forms: Verdana | Sets the text (body, th, td, and form controls) to Verdana font, using absolute units. | | Full Design: Accessible | Defines a complete page style in Arial font set using relative units; colors are blue, green, and gray. | | Full Design: Arial, Blue/Green/Gray | Defines a complete page style in Arial font set using absolute units. | | Full Design: Georgia, Red/Yellow | Defines a complete page style in Georgia font set using absolute units. | | Full Design: Verdana, Yellow/Green | Defines a complete page style in Verdana font set using absolute units. | | Link Effects | Creates special effects around links. | | Text: Accessible | Sets the text (body, th, and td) to Times New Roman font, using relative units. | | Text: Arial | Sets the text (body, th, and td) to Arial font, using absolute units. | | Text: Times | Sets the text (body, th, and td) to Times New Roman font, using absolute units. | | Text: Verdana | Sets the text (body, th, and td) to Verdana font, using absolute units. | The style sheets identified as Accessible are created with relative units and thus are made to conform to the user's font requirements instead of overriding them with absolute font sizes. The complete list of class styles defined in Dreamweaver MX style sheets is shown in Table 10.13, as well as the style sheet in which they're available. These classes correspond to the most common types of Web design tasks you'll encounter when using CSS. Table 10.13. Predefined Class Styles in Dreamweaver MX Style Sheets | Class Style | Style Sheet | Purpose | | .small | Forms, Text | Small text size | | .medium | Text | Medium text size | | .big | Forms, Text | Large text size | | .xbig | Text | Extra-large text size | | .bodystyle | Forms, Text | The main text content's style | | .expanded | Text | Text with spaced-out letters | | .justified | Text | Justified text | | .box1 | Forms, Full, Text | A box with a 3D border | | .box2 | Forms, Text | A box with a solid border | | .title | Full | The title of the page | | .subtitle | Full | The subtitle of the page | | .header | Full | The large text at the top of the page | | .nav | Full | The navigation bar's style | | .navLink | Full | Each item of the navigation bar | | .sidebar | Full | A sidebar's style | | .sidebarHeader | Full, | The header of the sidebar | | .sidebarFooter | Full | The footer of the sidebar | | .footer | Full, Text | The page footer's style | | .legal | Full | Legal notices (the fine print) | | .promo | Full | Promotional text | | .titlebar | Full | The title bar | | .dingbat | Full | Dingbats | | a.hidden | Link Effects | Invisible links | | a.nav | Link Effects | Navigation links | | a.menu | Link Effects | Menu links | | a.box | Link Effects | Links with borders | | input.big | Full | A wide input field | | input.small | Full | A narrow input field | You can attach multiple style sheets to any HTML document, which means you may want to create several style sheets and combine them. To make a quick and easy design, you could create and save style sheets based on the Text: Times and the Color: Red sheets. You can see how this looks in Figure 10.13; it took less than a minute to create these styles. Figure 10.13. Using the Dreamweaver MX style sheet Text: Times and Color: Red as a base lets you start quickly.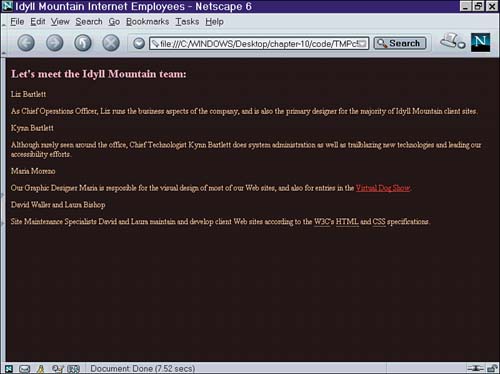
Alternatively, a Full Design style sheet can be used as the basis for a more complex design. Figure 10.14 shows what a difference the style sheet can make on the appearance of a page. Figure 10.14. Choosing a different starting style sheet, such as Full Design: Georgia, produces a different effect with the same HTML.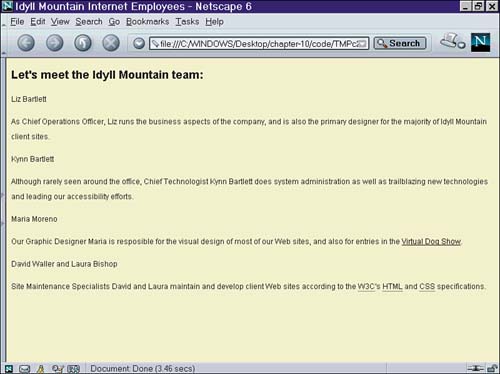
Writing Advanced CSS To use specialized CSS properties which aren't covered in the CSS styles options in Dreamweaver MX you'll need to add them manually. Many of these properties are rather obscure and not often needed; for example, the cue-after property defines a sound to be played by an audio browser. The complete list of CSS properties is available via the Answers menu in the O'Reilly CSS Reference. Importance, Order, and the Cascade As mentioned earlier in this chapter, the C in CSS stands for "cascading," and is a reference to the cascade. The cascade is the method for combining several styles, which may have conflicting notions as to the value of a CSS property. For example, three rules might specify the color of the text, and all three might conceivably be applicable. The cascade allows the browser to determine the "winner" for those parts of the styles which conflict; if there is no conflict, the styles can be combined and applied. The general principle in the cascade is that the most specific style wins. Thus, if you have one style about body and another about h1, the h1 is going to be more specific, so the headline will follow the second style in the case of a conflict. A class style is considered more specific than a redefined HTML element, and an ID selector one of the types of CSS selectors is more specific than a class selector. If two conflicting styles are equally specific such as two rules about h1 the next rule is that the style declared later in the style sheet the "newer" style takes precedence. In our hypothetical case, both h1 styles would be applied to all first-level headings, and if there were conflicting styles one setting the color blue and another setting it red the second style would prevail for that property. For this reason, order can be crucial for creating and perfecting CSS style sheets. Dreamweaver MX doesn't automatically move styles around for you, but in code view you can cut and paste styles to put them in the preferred order. The cascade order can also be changed by the use of a special keyword, called !important. That's an exclamation point before the word important. Although this may appear to mean "not important" in the eyes of most programmers, in the CSS language it means "very important." The !important keyword placed after a property declaration jumps that declaration to the very front of the priority order. If there's a conflict, any style with !important after it will beat any style without it. In Listing 10.4, you can see an example of a style sheet that was created to illustrate the cascade in action, and see how you can change that order by using !important. Listing 10.4 The Cascade Will Be Used to Determine the Effects of These Conflicting Styles p { color: white ! important; } p { color: violet; } p { background-color: blue; } p { background-color: black; } .person { background-color: red; color: green; } In evaluating this style sheet, the browser gives highest priority to any !important styles. The first p style would ordinarily be superceded by the second p style on the issue of text color, but the first style has the magic keyword !important so the color of the text is white. The third p style loses out to the later-defined fourth p style for the background-color property, so the background color is black. For HTML tags which are set , the .person style is more specific than the p tags, so the background-color will be red except that the first p style is !important, so the text color will be white. Figure 10.15 is a screenshot showing how the browsers use this logic to get the results described. Figure 10.15. The cascade order was used to determine the colors of the text and background.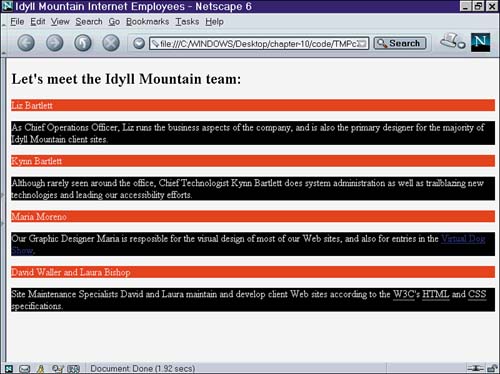
CSS Comments Nearly every computer language invented allows for the developer to insert comments, and CSS is no exception. A comment is embedded in the code and ignored by the browsers, but is available to the designer to read and edit. To create a comment in a style sheet, simply add a slash and an asterisk (/*) at the start of the comment, and end it with an asterisk and a slash (*/). Everything between the markers will be ignored by the browser. Comments are most often used to provide internal documentation so that other designers who may use your style sheet can understand it. They're also useful for avoiding those head-scratching moments when you ask yourself, "What was I thinking?" You can also use comments to prevent certain rules or properties from being applied, without deleting them entirely; this is useful for testing purposes. As shown in Listing 10.5, comments can also be used for copyright and author information. In this listing, each class style is described; you don't have to do this, but it's good practice. Listing 10.5 Comments Make This Style Sheet Easier to Read and Understand /*idyllmtn.css Style Sheet for the Idyll Mountain Internet staff page Copyright (c) 2002 by Kynn Bartlett <kynn@cssin24hours.com> */ body { /*Default font for the page*/ font-family: Arial, sans-serif; } h1, h2, h3, h4, h5, h6 { /*Make the headers more distinct*/ font-family: Verdana, sans-serif; color: teal; } p { /*This will add padding to all paragraphs...*/ padding-left: 3em; } .person { /*...except for those where */ padding-left: 0em; font-size: large; font-weight: bold; color: maroon; } .job { /*Make the job title stand out*/ font-weight: bold; } Inline Style Attributes You can attach a style sheet to an HTML document with the <link> tag, or you can embed it within the <style> element. A third way to apply styles to HTML is by using inline style elements. An inline style element enables you to apply a style directly to a section of HTML without specifying it in the style sheet; this can be useful for quickly adding a style that appears in only one place on your site. As shown in Listing 10.6, you simply set the attribute style to the declaration portion of a style rule. There's no need for a selector, because the selection is the content of the tag with the style attribute. Listing 10.6 A Snippet of HTML Code That Uses an Inline Style Attribute ... <p>Although <span style="color: red; font-weight: bold;"> rarely seen around the office</span>, <span >Chief Technologist</span> Kynn Bartlett does system administration as well as trailblazing new technologies and leading our accessibility efforts.</p> ... Inline styles are much less useful than attached or embedded styles, and for that reason, Dreamweaver MX doesn't support them. To add an inline style in Dreamweaver MX, you need to edit the source code and add the attribute. You might need to use inline styles if you want to apply a specific style only once, but in general, it is easier to create a class style and store it in an attached or embedded style sheet. Media-Specific Styles The CSS specification enables you to designate style sheets that are used only by specific media types, which are broad categories of output devices. The default media type is screen, which assumes that your browser will be displaying the Web page on a monitor. The complete list of CSS media types is shown in Table 10.14. Table 10.14. Media Types Defined by CSS | Media Type | Description | | aural | Pages read out loud by synthesized voice; for example, screenreaders for the blind. | | braille | Content represented by raised dot characters on Braille terminals for blind users. | | emboss | Pages printed out as raised dots in Braille, on thick paper. | | handheld | Content displayed on a limited-size handheld screen. | | print | Pages printed out on paper. | | projection | Content displayed as slides or transparencies projected on a large screen. | | screen | Pages displayed on a color monitor. | | tty | Content printed on teletype devices or other media with limited display capabilities, which print characters only of a fixed size and type. | | tv | Pages displayed on a television screen, possibly taking advantage of sound capabilities but with limited interaction. | To create a style sheet for a specific media type, such as print, simply create a new style sheet based on your original, and change the style rules that don't apply to the new output device. For example, many printers are black and white, so color might not be as useful. In Listing 10.7, the print.css style sheet has replaced color properties with other style effects. Listing 10.7 /*print.css Print Style Sheet for the Idyll Mountain Internet staff page Copyright (c) 2002 by Kynn Bartlett <kynn@cssin24hours.com> */ body { font-family: Arial, sans-serif; font-size: 12pt; /*An absolute font size has been set*/ } h1, h2, h3, h4, h5, h6 { font-family: Verdana, sans-serif; text-decoration: underline; /*Headers are underlined, and are not teal*/ } p { padding-left: 3em; } .person { padding-left: 0em; font-size: large; font-weight: bold; border: 2px solid black; /*Names are in boxes, and are not maroon*/ } .job { font-weight: bold; } To attach both this style sheet and the normal style sheet to the same HTML file but have them apply to different media types save them as different names and attach each to the HTML document. Then open the HTML document in code view and change the <link> tag. Add the media attribute to each <link>, as shown in Listing 10.8. Listing 10.8 The Head of an HTML File That Attaches Two Style Sheets One for Screen and One for Print ... <head> <title>Idyll Mountain Internet Employees</title> <meta http-equiv="Content-Type" content="text/html; charset=iso-8859-1"> <link href="idyllmtn.css" rel="stylesheet" type="text/css" media="screen"> <link href="print.css" rel="stylesheet" type="text/css" media="print"> </head> ... When you load this Web page in your browser, one style will be displayed on the screen, and a second will appear on your hard copy when you click Print. Design Time Style Sheets Dreamweaver MX enables you to specify style sheets that are displayed only while you are editing and that aren't included in the Web page when it's saved or previewed. These are called design time style sheets, and are accessed through the CSS menu. You create a design time style sheet the same way you create any other style sheet; however, because this is intended only for your eyes and no one else's, you don't need to worry about making it look pretty. The purpose is to make certain things stand out while you're editing, as shown by the styles in Listing 10.9. Listing 10.9 This Style Sheet Highlights Acronyms, Abbreviations, Headers, and Two Class Styles /*while-editing.css*/ abbr, acronym { background-color: silver; } .person { background-color: #FFCCFF; } .job { background-color: #66FF66; } h1, h2, h3, h4, h5, h6 { border: thin dotted teal; } After you've saved your style sheet, you can apply it to your editing environment by choosing Design Time Style Sheet from the CSS menu. Add the style sheet by clicking the plus sign and browsing to find it. Dreamweaver MX will now display the HTML page using the styles you've defined in your design time style sheet, as shown in Figure 10.16. Figure 10.16. A design time style sheet assists in the editing process by making certain tags stand out.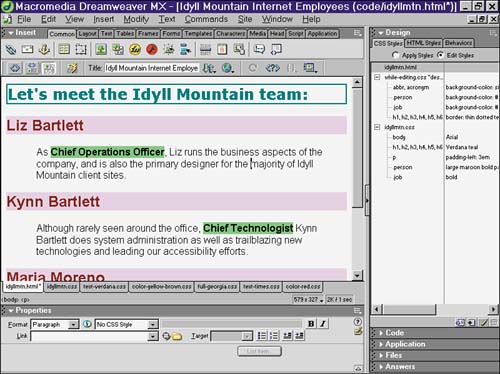
Remember that these styles will not be shown in your browser, even when you preview the page; they are used by Dreamweaver MX only while you're in design view. Design time style sheets effectively enable you to extend Dreamweaver MX's display capabilities to highlight whatever you like while editing! |

