| Though we often talk informally about importing "Flash movies" into Director, it should be stressed that Director imports only SWF files, not FLA files. (SWF is the file format in which Flash movies are distributed via the Web; FLA files are used for authoring and editing Flash movies. To use FLA files in Director, see "Editing Flash Cast Members ," later in this chapter.) SWF files from applications other than Flash (such as Adobe's Freehand or Illustrator) can be imported as well, though Director will still call them "Flash movies" ( Figure 11.3 ). Figure 11.3. SWF files exported from Flash (left) and Freehand (right), together in the Cast window. Both have Flash movie icons in their lower-right corners.  Flash cast members have a number of properties that affect the way the Flash movie appears and plays in Director. Many of these properties can be set on the Property Inspector's Flash tab. Others (which won't be covered in this book) can be set only by means of Lingo commands. To import a Flash movie: -
Follow the same procedure that you use to import other kinds of cast members. (See "Importing Cast Members" in Chapter 2.) Unlike digital video files, Flash movies may be imported with either the Standard Import option (in which the cast member becomes part of the Director movie file) or the Link to External File option. To set a Flash cast member's properties: -
Select a Flash cast member in the Cast window. -
Select the Flash tab in the Property Inspector ( Figure 11.4 ). Figure 11.4. Use the Flash tab in the Property Inspector to adjust properties for your Flash cast member.  -
Change properties as desired. The last two properties on the tab, Normal FPS and Frames, can't be changed. They tell you the frame rate of, and the number of frames in, the imported Flash movie. You can set the following properties in the Flash tab: -
Image: This option is selected by default. It allows the visual content of the Flash movie to be seen on the Stage. -
Loop: This option is selected by default. It causes the Flash movie to loop (repeat from the beginning) if it's on the Stage for a period of time that exceeds the duration of the Flash movie. -
Paused : If this option is selected, the Flash movie will be paused at its first frame when it first appears on the Stage. Thereafter, the only way to start playing the movie is by means of a command in a Lingo script. -
Audio: This option is selected by default. It allows the audio content of the Flash movie to be heard . -
DTS: DTS stands for Direct to Stage. When this option is selected, the Flash movie is placed in front of the Stage instead of interacting with other sprites on the Stage. Ink effects and the Blend property don't work when DTS is turned on, and motion tweening may not work properly. However, by reducing the load on the computer's processor, this option may improve the playback performance of your Director movie. -
Preload: This option affects only Flash cast members that are linked to external files. If selected, it causes the entire Flash movie to be loaded into memory before the first frame of your Director movie is played . The Preload option improves playback performance but causes a delay while the Flash movie loads. -
Static: This option allows Director to display only the first frame of the Flash movie. If you've imported a single-frame Flash movie, selecting this option tells Director not to bother updating the movie in every frame, and thus improves playback performance. -
Rate: Choose an option from the pop-up menu ( Figure 11.5 ). Normal, the default, plays the Flash movie at its original frame rate (shown at the bottom of the Property Inspector). The Lock-Step option plays the Flash movie at the same frame rate as your Director movie. If you want to specify a different frame rate, choose Fixed and enter the desired frame rate in the FPS box to the right of the menu. (Director will not play the Flash movie at a frame rate faster than that of the Director movie, even if you enter a higher number here.) Figure 11.5. In the Rate pop-up menu, choose the frame rate of your Flash movie.  -
Scale: This pop-up menu determines what happens when you resize a Flash sprite on the Stage. (Note that the dimensions of a Flash cast member are those of the Flash Stage at the time the SWF file was exported. To eliminate unnecessary space within the cast member, see the sidebar "Optimizing the Flash Stage."). Here are the menu options you can choose from: -
The Show All and No Border options both allow the Flash movie to keep its original proportions if the sprite is resized disproportionately. The former does it by "letterboxing" the Flash movie, using the background color of the Flash Stage; the latter does it by cropping out parts of the movie that don't fit within the sprite ( Figure 11.6 ). Figure 11.6. A Flash sprite resized disproportionately with the Show All and No Border options.  -
The Exact Fit option resizes the Flash movie to match the sprite exactly, regardless of its original proportions. The No Scale option does the opposite : It always keeps the Flash movie at its original size, regardless of the size of the sprite ( Figure 11.7 ). Figure 11.7. A Flash sprite resized disproportionately with the Exact Fit and No Scale options.  -
Auto Size , the default option, acts like Exact Fit, but it makes the Flash movie fit entirely within the sprite's bounding rectangle if the movie is rotated or skewed ( Figure 11.8 ). Figure 11.8. A Flash sprite resized and rotated with the Exact Fit and Auto Size options.  -
Quality This pop-up menu determines how Director applies anti-aliasing to the Flash movie. (Anti-aliasing greatly improves the appearance of the movie but puts a greater load on the computer's processor.) The High and Low settings turn anti-aliasing on and off, respectively ( Figure 11.9 ). The Auto-High setting turns anti-aliasing on to begin with, but turns it off if Director is unable to play the movie at the tempo specified by the Rate setting. The Auto-Low setting turns anti-aliasing off to begin with, but turns it on later if Director is able to achieve the tempo specified by the Rate setting. Figure 11.9. A Flash sprite with and without anti-aliasing. While anti-aliasing presents a smoother appearance, it places greater demands on the computer's processor.   Tip Tip -
If you want to set the properties for a Flash movie before you import it, use Insert > Media > Flash Movie to import the file (instead of the usual File > Import). The Flash Asset Properties window opens ( Figure 11.10 ), allowing you to set the same properties that can be set on the Flash tab of the Property Inspector. You can then select a file to import by using the Browse button. Figure 11.10. If you want to set the properties for a movie before importing it into Director, choose Insert > Media > Flash Movie to open the Flash Asset Properties window, shown here. 
Optimizing the Flash Stage When you import a Flash movie into Director, the cast member has the same dimensions that the Flash Stage had at the time the movie was exported ( Figure 11.11 ). To avoid inconvenience and wasted space, follow these steps to make the Flash Stage as small as possible before exporting your movie from Flash MX: Figure 11.11. A Flash cast member with a Stage size of 320 by 240 pixels, and the same cast member reexported from Flash with a smaller Stage size. The smaller version is easier to work with when you place it on the Stage in Director.  -
Move the objects in your Flash movie as close as possible to the upper-left corner of the Stage. -
Choose Modify > Document. The Document Properties dialog box opens ( Figure 11.12 ). Figure 11.12. The Document Properties dialog box in Flash MX.  -
In the row of buttons headed by the word Match , click the Contents button. The Stage dimensions shrink to the minimum necessary to accommodate the objects on the Stage. -
Click OK to close the dialog box. | To change the dimensions of a Flash cast member: -
Select a Flash cast member in the Cast window. -
Select the Flash tab in the Property Inspector. -
Type a new value into the Scale box ( Figure 11.13 ). Figure 11.13. The Scale box on the Property Inspector's Flash tab. 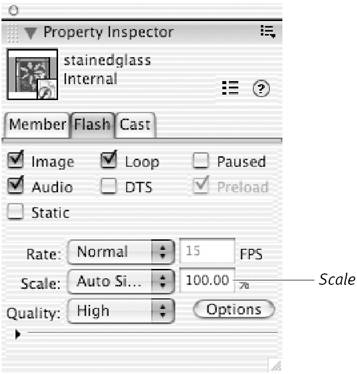 The default value is 100 percent. Enter a lower percentage to shrink the cast member or a higher percentage to enlarge it. -
Press Enter. The cast member is scaled to the percentage you specified, keeping its original proportions. Tip -
Although the Scale box is next to the Scale pop-up menu, the two have nothing to do with each other. By entering a number in the Scale box, you resize the cast member . The selection you make from the Scale pop-up menu (see "To set a Flash cast member's properties," earlier in this chapter) governs the resizing of individual sprites .
To preview a Flash movie: -
Select a Flash cast member in the Cast window. -
Select the Flash tab in the Property Inspector. -
Click the Options button. The Flash Asset Properties window opens. -
Click the Play button at the left side of the window to preview the Flash movie ( Figure 11.14 ). Figure 11.14. The preview area of the Flash Asset Properties window.  The movie plays, and the Play button becomes a Stop button. -
Click the Stop button to end the preview. -
Click OK to close the window. |