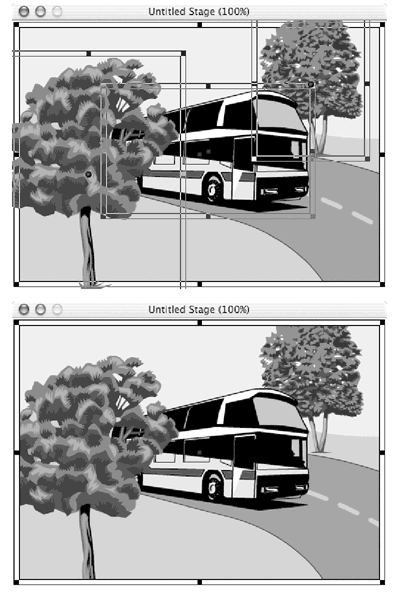
Working with Flash Sprites As with digital video sprites, you can resize and tween Flash sprites without interfering with their content. Unlike video sprites, Flash sprites can also be rotated and skewed ( Figure 11.15 ). Figure 11.15. A Flash sprite (left), and the same sprite rotated and skewed (right).  If a Flash cast member includes time-based content (that is, animation with a frame rate and duration independent of the Director movie, as described in the sidebar "Tips on Exporting from Flash"), you may have to make special calculations when deciding how many frames a Flash sprite should span. For more information on this subject, see "Working with Video Sprites" in Chapter 10. Because of the way Director handles memory for Flash movies, having too many Flash sprites on the Stage at the same time can slow your Director movie's performance. If you find that you have more than a few Flash sprites on the Stage at once, go back into Flash and combine them into a single movie whenever possible ( Figure 11.16 ). Figure 11.16. Multiple Flash sprites selected on the Director Stage (top), and the same images combined into a single sprite (bottom).  To turn a Flash cast member into a sprite: To make the background of a Flash sprite invisible: -
Select a Flash sprite on the Stage or in the Score. -
Select the Sprite tab in the Property Inspector. -
Open the Ink menu and choose Background Transparent, Transparent, or Blend. The background of the Flash spritewhich is, in fact, the Flash Stage itselfdisappears ( Figure 11.17 ). It doesn't matter what color the Flash Stage is, and it doesn't matter what the background color is set to in Director's Tool palette. Figure 11.17. A Flash sprite with the default Copy ink effect and with the Background Transparent ink effect.   Tip Tip -
The Background Transparent, Transparent, and Blend ink effects are the only ones that work with a Flash sprite. Their only effect is to make the Flash Stage disappear; they don't change the appearance of the Flash movie in any other way.
To make the content of a Flash sprite play through just once: -
Select a Flash sprite in the Score. -
Select the Flash tab in the Property Inspector. Look at the values for Normal FPS and Frames, at the bottom of the Property Inspector. -
If the frame rate (Normal FPS) of the Flash movie is the same as the current tempo of your Director movie, do the following: -
Select Lock-Step from the Rate pop-up menu ( Figure 11.18 ). Figure 11.18. Selecting Lock-Step from the Rate pop-up menu locks the frame rate of the Flash sprite to the actual tempo of the Director movie.  -
Extend the Flash sprite in the Score to span the number of frames indicated by the Frames value. or If the frame rate (Normal FPS) of the Flash movie is different than the current tempo of your Director movie, do the following: -
Divide the Frames value by the Normal FPS value to get the duration of the Flash movie, in seconds ( Figure 11.19 ). Figure 11.19. Divide the Frames value by the Normal FPS value to get the duration of the Flash moviein this case, 3 seconds.  -
Multiply the number of seconds you arrived at in step 1 by the current tempo (in frames per second) of your Director movie. This gives you the optimal number of frames for the Flash sprite. -
Extend the Flash sprite in the Score to span the number of frames you arrived at in step 2 ( Figure 11.20 ). Figure 11.20. If the tempo of the Director movie is 15 fps, the optimal sprite length for a 3-second Flash movie would be 3 times 15, or 45 frames.  -
Play the movie. The Flash sprite plays once, then disappears.  Tips Tips -
Because of variations in the playback speed of the Flash sprite and your Director movie, they're unlikely to synchronize exactly if their frame rates are different. Therefore, it's much preferable to give the Flash movie the same frame rate as the Director movie, and to use the Lock-Step method. -
The Wait for Cue Point command, which you might use in this situation with a digital video sprite, doesn't work with Flash sprites.
To loop the content of a Flash sprite: -
Follow the steps for the previous task, "To make the content of a Flash sprite play through just once," to arrive at the minimum number of frames for the Flash sprite. -
In the Score, extend the sprite so that it spans more frames than the number you arrived at in step 1. The longer the sprite, the more times the Flash movie will repeat. -
With the sprite still selected, click the Property Inspector's Flash tab. -
Select the Loop option, if it's not selected already ( Figure 11.21 ). (It's selected by default when you import a Flash movie.) Figure 11.21. The Loop option on the Flash tab of the Property Inspector is selected by default.  -
Play the movie. The sprite's content loops repeatedly for as long as the sprite is on the Stage. |


