Section 12.2. A uClinux Demonstration Project
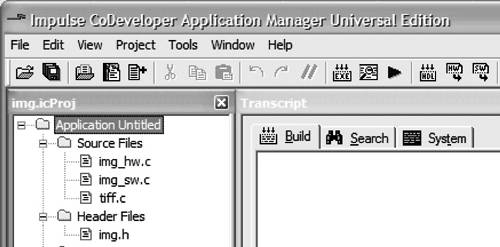
12.2. A uClinux Demonstration ProjectTo demonstrate the feasibility of combining C-to-hardware programming with uClinux, we'll make use of the same type of application presented in Chapter 11, an image filter. As in the previous chapter, this image filter accepts pixel data on a data stream representing all pixels in a 512-by-512 image. It is implemented in Impulse C using two hardware processes that communicate with a software test bench (also written using Impulse C library calls) residing on the embedded processor. During processing, pixels are sent by the software test bench (via the FSL bus interconnect provided with MicroBlaze) into the input stream of the first hardware process. In this process the pixels are cached, packaged into three streams (representing three streaming scan lines of the image), and fed in turn to the image filter process in a parallel pipeline with an effective maximum throughput of two clock cycles per pixel. The resulting pixels are subsequently streamed to the filter's output and back to the software test bench. (Refer to Chapter 11 for details of this filter's behavior.) In order to test this image filter with a variety of images, a software test bench has been written that reads image data from an input file (in TIFF format) and streams this data across the FSL interconnect, using Impulse C software macros, to the hardware column generator. After filtering, the processed pixels are read back in by the software test bench using the Impulse C non-blocking stream read function (co_stream_read_nb). The software test bench then writes the processed image to a new TIFF-format file containing the filtered image. The uClinux operating system supports the required file I/O operations, using a RAM disk provided in the uClinux platform. To complete the test and allow images to be easily moved from a host PC to the Memec V2MB1000 board, a TFTP client, run from the uClinux console, communicates with a TFTP server run from the PC. The complete demonstration is diagrammed in Figure 12-1. Figure 12-1. uClinux demonstration project system diagram. The remainder of this chapter demonstrates step-by-step how this test was accomplished, using the 6.3i release of the Xilinx tools. The Impulse C Project FilesThe files required for this project (see Figure 12-2) are as follows:
Figure 12-2. The Impulse C project files.
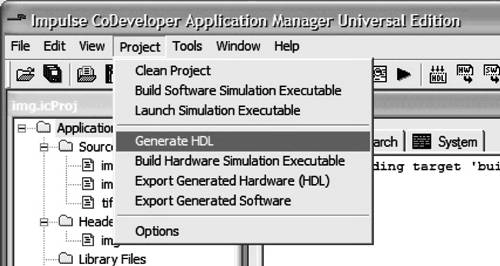
The C code contained in img_hw.c describes two hardware processes representing the filter itself (prep_run and filter_run) along with two additional processes that pack and unpack the streaming pixel data. These processes will be generated as hardware (in the form of synthesizable HDL files), while the remaining software elements (in img_sw.c and tiff.c) will be implemented as software running on MicroBlaze. Building the Application for the Target PlatformIn this step we will generate HDL for the image filter hardware processes and export that hardware (as well as the software files) into an EDK project directory. Before doing this, we must copy the sample EDK platform files for the prebuilt uClinux platform to a directory within the image filter sample project directory. (These files are provided by Impulse Accelerated Technologies and are available on the Impulse website at www.ImpulseC.com.) Copying the Sample uClinux Platform FilesTo set up the sample uClinux Platform files, we create a new subdirectory called uclinux_edk within the project directory. We copy the files supplied for the platform into the new directory, as shown in Figure 12-3. Figure 12-3. Copying the pre-built uClinux MicroBlaze platform. Specifying the Platform Support PackageReturning to the Impulse tools, we will now set the options needed for generating hardware and exporting the generated files (both hardware and software) to the uClinux platform. To specify a platform target, we open the Generate Options dialog as shown in Figure 12-4. Notice that we have set the platform name to Xilinx MicroBlaze FSL uClinux and we have set the Hardware and Software Export Directories to uclinux_edk. Figure 12-4. Setting HDL generation options.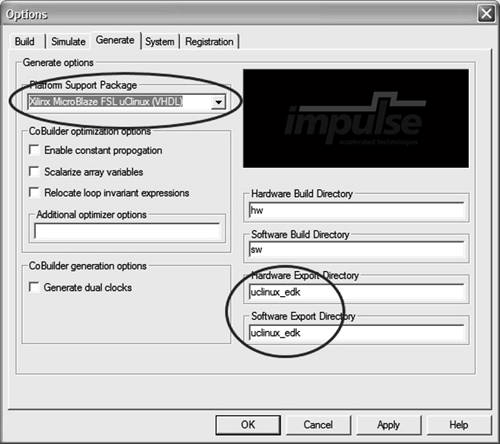 Building the Image Filter HardwareTo generate the image filter hardware, we select Generate HDL from the Project menu, as shown in Figure 12-5. A transcript window opens, showing us the progress of the hardware generation. Figure 12-5. Starting the HDL generation process.
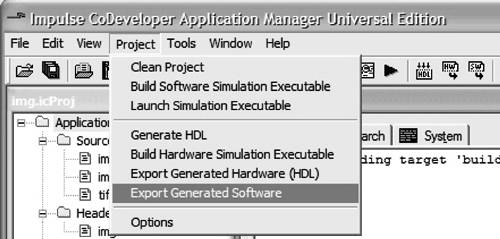
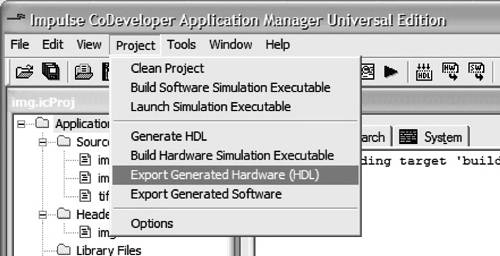
Exporting the Software and HardwareCoDeveloper generates hardware and software output files in the build subdirectories specified in the Generate Options dialog (see Figure 12-4). We can view the generated files by navigating to the hw and sw subdirectories of the project directory. To move the generated files into the EDK project directory (which in this case is the uclinux_edk subdirectory created earlier), we will use the Software Export and Hardware Export feature of the Impulse tools. We export the software files to the uclinux_edk directory by selecting Export Generated Software from the Project menu, as shown in Figure 12-6. We then export the hardware files to the uclinux_edk directory by selecting Export Generated Hardware, as shown in Figure 12-7. Figure 12-6. Exporting the software components.
Figure 12-7. Exporting the hardware components.
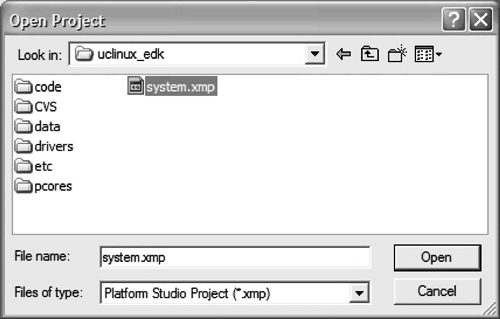
We now have all the files needed to build the platform, including the image filter hardware and software. The remaining steps make use of the Xilinx EDK (Platform Studio) tools. Modifying the Sample uClinux PlatformWe now move into the Xilinx tools environment. We open the prebuilt sample project by starting Xilinx Platform Studio and selecting Open Project from the File menu and navigating to the uclinux_edk directory (see Figure 12-8) to find the project file named system.xmp. Figure 12-8. Opening the Platform Studio project.
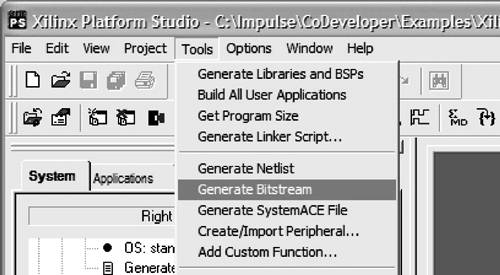
Now we will modify the sample project to add and connect the image filter hardware block that was generated in the previous step. Configuring the Platform with the Image Filter IP CoreThe first step in modifying the standard uClinux platform is to add sufficient FSL links for the image filter's stream I/O. The image filter has just two stream interfaces (the pixel filter input and the pixel filter output), so we will need to add two FSL connections to the platform. We do this by selecting the Add/Edit Cores item from the Platform Studio Project menu, selecting the Parameters tab, and then selecting the IP instance named microblaze_0. We find a parameter named C_FSL_LINKS in the list of parameters on the left side of the dialog and we increase the value specified for this parameter by 2 to accomodate the two streams used by the image filter. For example, we change the C_FSL_LINKS parameter from a value of 1 to a value of 3, as shown in Figure 12-9. Figure 12-9. Adding FSL links for the image filter data streams.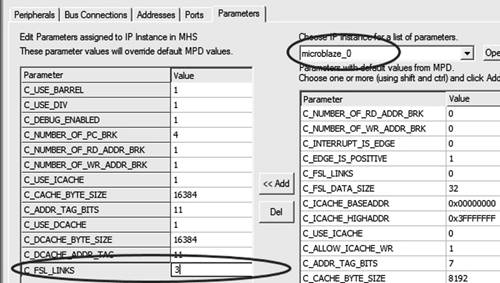 The next step is to add the image filter as a peripheral. We do this by selecting the Peripherals tab and finding the entry for fsl_img in the list of IP blocks on the right side of the dialog. This is the hardware block that was exported to the EDK project by the Impulse tools when we invoked the Export Hardware menu item. We click the Add button to add one instance of the fsl_img block to the platform, as shown in Figure 12-10. Figure 12-10. Adding the generated image filter peripheral.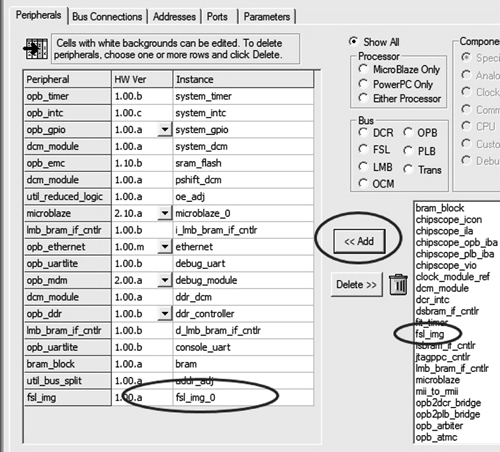 Making the FSL ConnectionsNow we need to connect the new peripheral to the MicroBlaze processor via the FSL links. To do this, we select the Bus Connections tab and find the entry for fsl_v20_v1_00_b in the bus selection. We click the Add button twice to add two FSL connections to the platform. We then use the connection matrix (on the left side of the Bus Connections dialog) to connect the microblaze_0 mfsl1 master to the fsl_img_0 mfsl0 slave, and the microblaze_0 sfsl2 slave to the fsl_img_0 mfsl1 master, as shown in Figure 12-11. This establishes the FSL stream connections between the MicroBlaze processor and the image filter hardware block. Figure 12-11. Connecting the image filter peripheral to the FSL links.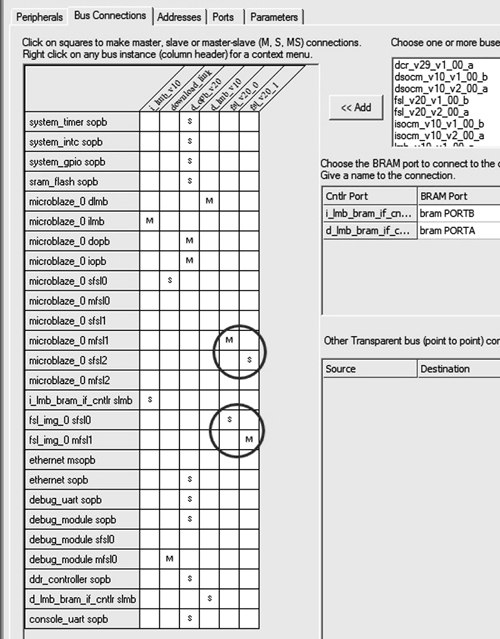 Connecting the Image Filter Clock and Reset LinesNow that we have the image filter peripheral connected to the MicroBlaze processor via the FSL bus, we need to add clock and reset connections for the FSL links and for our new peripheral. In this example, we are using a single clock for both the MicroBlaze core and the FPGA logic. To connect the required clock and reset lines, we select the Ports tab of the Add/Edit Cores dialog and add the fsl_img_0 clock port (clk), as well as the clock and reset ports for the fsl_v20_0 and fsl_v20_1 blocks. We verify that the clock ports are all connected to Net Name sys_clk, and we change the SYS_Rst ports so they connect to net_gnd as shown in Figure 12-12. Figure 12-12. Connecting the image filter clock and reset ports.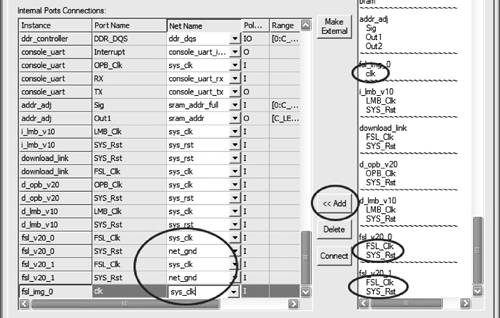 We have now finished connecting the image filter block to the Micro-Blaze core and configuring the platform. We click the OK button to save the changes and exit the Add/Edit Cores dialog. Generating the FPGA BitmapWe are now ready to generate the bitstream and download it to the FPGA. To generate the bitstream, we select Generate Bitstream from the Tools menu (see Figure 12-13). The Xilinx software performs a number of steps, including logic synthesis and place-and-route, resulting in an FPGA bitmap file. Figure 12-13. Generating the FPGA bitmap.
To download the bitmap file to the board, we connect the JTAG cable and select Download from the Tools menu (see Figure 12-14). Figure 12-14. Downloading the FPGA bitmap.
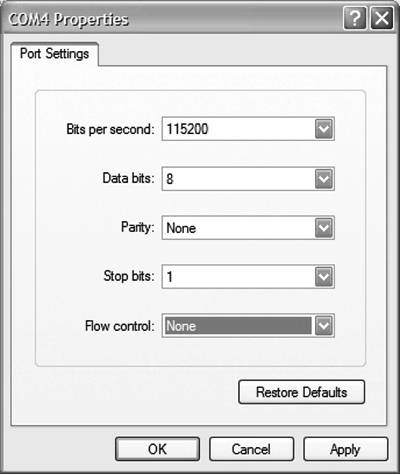
After downloading is complete, the FPGA is configured with all the necessary components for use with uClinux, including the MicroBlaze processor core, peripheral devices, and the image filter IP core. The next steps are to download the uClinux kernel image and the image filter test application. Downloading the Kernel ImageThe FPGA is now programmed and ready to accept a MicroBlaze software image, which in the case of this example will be the uClinux kernel image. The uClinux kernel will be downloaded using the serial port located on the V2MB1000 main board, while a second serial cable will be attached to the P160 expansion module and used for a console. To open the console connection, we start a Hyperterminal session on a second available COM port of our development machine and connect to the V2MB1000 board via the P160 expansion module. We give the Hyperterminal session the following properties:
These settings are shown in Figure 12-15. Note that this is not the COM port that will be used to download the uClinux kernel. On our development system, COM1 is used for the kernel download and is configured automatically by the kernel download script. Figure 12-15. Configuring Hyperterminal for the uClinux console.
To download the kernel image, we open a Xilinx Xygwin shell window and use the cd command to change directories to the uclinux_edk subdirectory created earlier. We execute the following command to download the uClinux kernel image over COM1: ./dl.sh This command script, supplied with the uClinux for MicroBlaze distribution, causes the binary image of the operating system to be downloaded to the MicroBlaze processor via the serial port. This takes a few moments to complete and generates messages similar to those shown in Figure 12-16. Figure 12-16. Downloading the uClinux kernel to the V2MB1000 board.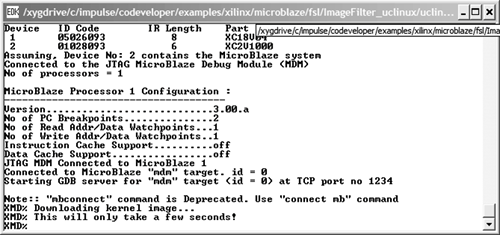 When the kernel download process is complete, we see a login prompt on the uClinux console window. We can log into the uClinux session with the "root" username (no password is required), as shown in Figure 12-17. We are now communicating directly with the uClinux operating system running on the embedded MicroBlaze FPGA processor. Figure 12-17. The uClinux login screen.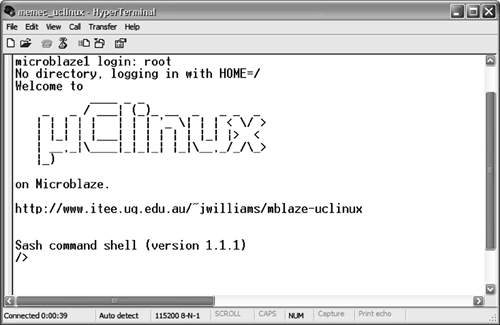 Building and Testing the Image Filter SoftwareAt this point, we have successfully configured our FPGA board as a single-board, network-enabled computer running the uClinux operating system. The next step is to download and run the image filter sample application. This test application reads data from TIFF format files, processes the data pixel-by-pixel using the hardware image filter, and writes the resulting image data to a TIFF file using the RAM disk accessible from uClinux. Performing this test, of course, requires that we move sample image files from our host development machine to the uClinux file system running on the MicroBlaze. We also need to move the necessary software application (the software side of our complete Impulse C application) to MicroBlaze. Both of these operations are accomplished using TFTP (Trivial File Transfer Protocol). First, however, we need to compile the Impulse C software application, which is represented by the source file img_sw.c and the automatically generated co_init.c. To compile the sample application, we return to the Xygwin shell window and type the following commands: cd code make FSL=1 The make command builds the Impulse C software application, named img, that will run on the MicroBlaze processor (see Figure 12-18). The makefile used in this build process, along with other supporting files, is automatically generated by the Impulse C compiler because we specified the MicroBlaze uClinux platform support package when setting the Impulse hardware generation options for the project (see Figure 12-4). Figure 12-18. Building the Impulse C software application. As described previously, the resulting test application reads data from a TIFF format file, processes that file using the FPGA hardware previously generated, and writes the results back to another TIFF format file. Using TFTP to Transfer Files to the BoardWe will now copy the compiled img program and a test image file to the platform using TFTP. To do this, we must first start a TFTP server on our host machine, or copy the files to any operational TFTP server. (Freeware TFTP servers are widely available.) For this example we will start a TFTP server on the host PC, which has a network address of 192.168.0.3. For simplicity, we set the base directory of the TFTP server to the directory containing the img executable file and the TIFF file to be copied. Returning to the uClinux console (a Hyperterminal session connected to the P160 COM port of the V2MB1000 board via COM4), we type the following commands: cd /tmp tftp -g -r peppers.tiff 192.168.0.3 tftp -g -r img 192.168.0.3 Note that the /tmp directory on uClinux is a writable RAM disk. We now have the img program on our uClinux system, along with a sample image file. Running the Image Filter ProgramTo run the img program on the board, we enter the following commands at the uClinux console: chmod 777 img ./img peppers.tiff results.tiff The complete set of commands is shown in Figure 12-19. Note that the chmod command is necessary to set the img file to an executable mode. When executed, the img program prints a message and processes the input file (peppers.tiff) to create an output file named results.tiff. The processing runs quickly, in just a few seconds. (If the process does not finish running, this indicates that an error has been made somewhere in the hardware generation process ormore likelywe have made an error in the configuration of the platform or FSL bus connections.) Figure 12-19. Running the image filter test application.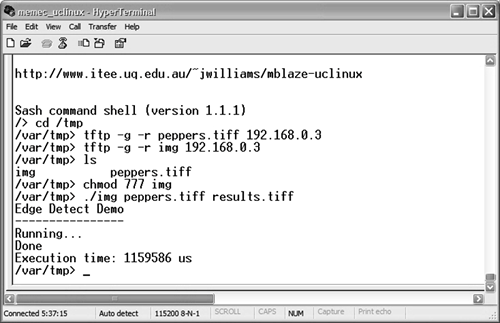 We have now successfully generated a MicroBlaze-based uClinux platform on the V2MB1000 board, combined this platform with the image filter hardware accelerator, and downloaded and run a test application. To view the results of the image filtering, we use TFTP to upload the results.tiff file to our host PC. The original and filtered images are shown in Figures 12-20 and 12-21. Figure 12-20. The test image before processing.
Figure 12-21. The test image after processing.
|


EAN: 2147483647
Pages: 208